Difference between revisions of "Deploying an instance zone direct-routing"
| Line 1: | Line 1: | ||
| − | |||
| − | |||
| − | |||
| − | |||
| − | |||
| − | |||
<br /> | <br /> | ||
This article has been created by an automatic translation software. You can view the article source [[:fr:Deploiement d'une instance en zone direct-routing|here]].<br /><span data-translate="fr"></span> | This article has been created by an automatic translation software. You can view the article source [[:fr:Deploiement d'une instance en zone direct-routing|here]].<br /><span data-translate="fr"></span> | ||
| + | |||
| + | <span data-link_translate_de_title="Bereitstellen von einer Instanz Zone direkt-routing" data-link_translate_de_url="Bereitstellen+von+einer+Instanz+Zone+direkt-routing"></span>[[:fr::de:Bereitstellen von einer Instanz Zone direkt-routing]][[:fr:de:Bereitstellen von einer Instanz Zone direkt-routing]] | ||
| + | |||
| + | |||
| + | |||
| Line 17: | Line 16: | ||
| − | 2. Deploying an instance zone <span class="notranslate">Direct-Routing</span> | + | 2. Deploying an instance zone <span class="notranslate">Direct-Routing</span> |
| − | a. deployment | + | a. deployment |
| − | 1) To connect to the web interface of <span class="notranslate">Cloud</span> Ikoula public enter the url https://cloudstack.ikoula.com/client/ then your login details as they were provided to you in the mail to delivery of your account. | + | 1) To connect to the web interface of <span class="notranslate">Cloud</span> Ikoula public enter the url https://cloudstack.ikoula.com/client/ then your login details as they were provided to you in the mail to delivery of your account. |
| Line 29: | Line 28: | ||
| − | After have connected you to your management interface you will face the following screen : | + | After have connected you to your management interface you will face the following screen : |
| Line 35: | Line 34: | ||
| − | 2) Click on 'Bodies' in the vertical left menu : | + | 2) Click on 'Bodies' in the vertical left menu : |
| Line 41: | Line 40: | ||
| − | 3) Click on 'Add an instance' : | + | 3) Click on 'Add an instance' : |
| Line 47: | Line 46: | ||
| − | 4) The deployment wizard opens : | + | 4) The deployment wizard opens : |
| − | Step 1 "Configuration" : | + | Step 1 "Configuration" : |
| − | Select the zone 3 in the drop-down list : | + | Select the zone 3 in the drop-down list : |
| Line 60: | Line 59: | ||
| − | Step 2 "Select a template" : | + | Step 2 "Select a template" : |
| − | Select the operating system you want from the drop-down list of the models proposed in the 'Sponsored' tab : | + | Select the operating system you want from the drop-down list of the models proposed in the 'Sponsored' tab : |
| Line 70: | Line 69: | ||
| − | Step 3 "Provides | + | Step 3 "Provides calculatio : |
| − | Select the calculation offer you want among the proposed configurations : | + | Select the calculation offer you want among the proposed configurations : |
| Line 77: | Line 76: | ||
| − | Step 4 "Offers of data disc" : | + | Step 4 "Offers of data disc" : |
| − | Leave checked "No thanks", your instance will be deployed with a single disc of 50GB called <span class="notranslate">ROOTDISK</span> with a LVM partitioning for you leave the possibility to adjust the size of your partitions. | + | Leave checked "No thanks", your instance will be deployed with a single disc of 50GB called <span class="notranslate">ROOTDISK</span> with a LVM partitioning for you leave the possibility to adjust the size of your partitions. |
| Line 86: | Line 85: | ||
| − | However, if you want to add a data disc | + | However, if you want to add a data disc <span class="notranslate">(DATADISK)</span> In addition to <span class="notranslate">ROOTDISK</span> de 50Go, check <span class="notranslate">« Data disk »</span> then drag your cursor to get the size you want (1) or enter the size directly (2). A <span class="notranslate">DATADISK</span> is limited to 2To. |
| Line 92: | Line 91: | ||
| − | Step 5 "Affinity" : | + | Step 5 "Affinity" : |
| − | Regarding the deployment of our trial, we have no affinity group, so you can click on «Next» : | + | Regarding the deployment of our trial, we have no affinity group, so you can click on «Next» : |
| Line 99: | Line 98: | ||
| − | Step 6 'Network' : | + | Step 6 'Network' : |
| − | Regarding our first deployment, select the security group | + | Regarding our first deployment, select the security group <span class="notranslate">« default »</span> then click on 'Next' : |
| Line 106: | Line 105: | ||
| − | Step 7 "Revise" : | + | Step 7 "Revise" : |
| − | In this last step, give a name to your instance will then appear in your interface <span class="notranslate">Cloud</span> public (Although optional, it is highly recommended ). Then check that all information is good (Provides computing, security groups, etc...;) : | + | In this last step, give a name to your instance will then appear in your interface <span class="notranslate">Cloud</span> public (Although optional, it is highly recommended ). Then check that all information is good (Provides computing, security groups, etc...;) : |
| Line 113: | Line 112: | ||
| − | Your instance appears in the list of the bodies in State | + | Your instance appears in the list of the bodies in State <span class="notranslate">« Creating »</span> |
| Line 125: | Line 124: | ||
| − | A second pop-up window tells you that the task of adding your instance completes : | + | A second pop-up window tells you that the task of adding your instance completes : |
| Line 131: | Line 130: | ||
| − | Your new instance now appears in State | + | Your new instance now appears in State <span class="notranslate">« running »</span>, is ready to be used : |
| Line 140: | Line 139: | ||
| − | + | Security groups provide a way to isolate the traffic of the instances. A security group is a group that filters incoming and outgoing traffic according to a set of rules, say 'Rules of entry' and "Outbound rules. | |
| − | These rules of network traffic filter based on the IP address or the network that tries to communicate with the instance (s). | + | These rules of network traffic filter based on the IP address or the network that tries to communicate with the instance(s). |
| Line 149: | Line 148: | ||
| − | Any user can implement a number of additional security groups. When a new virtual machine is started, it is assigned the security group by default unless another user-defined security group is specified. | + | Any user can implement a number of additional security groups. When a new virtual machine is started, it is assigned the security group by default unless another user-defined security group is specified. |
| Line 161: | Line 160: | ||
| − | c. how to allow an SSH connection to your machine | + | c. how to allow an SSH connection to your machine virtual in a security group <span class="notranslate">(Direct-Routing)</span>. |
| Line 167: | Line 166: | ||
| − | Click on the name of your instance and then go to the tab "Cards NIC" and note /copy the IP address of your instance (xxx.xxx.xxx | + | Click on the name of your instance and then go to the tab "Cards NIC" and note /copy the IP address of your instance (Xx.xxx.xxx.xxx). |
| Line 173: | Line 172: | ||
| − | 2) Create the rule in the security group to allow SSH connections : | + | 2) Create the rule in the security group to allow SSH connections : |
| − | So that you can connect to your instance via SSH, you need to create a rule of entry allowing the connection. In effect by default, all connections are filtered, input (from the outside to your instance ) and output (your instance outward ). To connect using SSH you will need to open that in entry. | + | So that you can connect to your instance via SSH, you need to create a rule of entry allowing the connection. In effect by default, all connections are filtered, input (from the outside to your instance ) and output (your instance outward ). To connect using SSH you will need to open that in entry. |
| − | + | Click on 'Network' in the vertical left menu : | |
| Line 185: | Line 184: | ||
| − | Arriving on the screen below select the 'Security groups' view : | + | Arriving on the screen below select the 'Security groups' view : |
| Line 191: | Line 190: | ||
| − | Click then on | + | Click then on <span class="notranslate">« default »</span> It is created by default security group in which you have deployed your instance : |
| Line 197: | Line 196: | ||
| − | To create the rule, click on the tab 'Rule of entry', leave checked CIDR, select the TCP protocol, enter 22 Start port and end port, and specify the IP address or network from which you want to connect in CIDR format in CIDR field and then click on 'Add' : | + | To create the rule, click on the tab 'Rule of entry', leave checked CIDR, select the TCP protocol, enter 22 Start port and end port, and specify the IP address or network from which you want to connect in CIDR format in CIDR field and then click on 'Add' : |
| Line 206: | Line 205: | ||
| − | d. create rules to allow connections between virtual machines in a security group <span class="notranslate">(Direct-Routing)</span>, | + | d. create rules to allow connections between virtual machines in a security group <span class="notranslate">(Direct-Routing)</span>, example |
| − | Log on to the web interface | + | Log on to the web interface <span class="notranslate">Cloud</span> public to Ikoula : https://cloudstack.ikoula.com/client/ |
| − | + | Click on 'Network' in the left vertical menu : | |
| Line 218: | Line 217: | ||
| − | Arriving on the screen below select the 'Security groups' view : | + | Arriving on the screen below select the 'Security groups' view : |
| Line 224: | Line 223: | ||
| − | Click on the name of the security group for which you want to add or remove rules : | + | Click on the name of the security group for which you want to add or remove rules : |
| Line 230: | Line 229: | ||
| − | Click on the "Rule of entry" tab if you want to configure an inbound rule : | + | Click on the "Rule of entry" tab if you want to configure an inbound rule : |
| Line 236: | Line 235: | ||
| − | A. allow ICMP requests (PING ) between your | + | A. allow ICMP requests (PING) between your insta : |
1- Check <span class="notranslate">« Account »</span>. | 1- Check <span class="notranslate">« Account »</span>. | ||
| − | 2- Choose the Protocol to allow amongst TCP/UDP/ICMP. | + | 2- Choose the Protocol to allow amongst TCP/UDP/ICMP. |
3- The start port to allow for TCP /UDP or ICMP Type for ICMP. | 3- The start port to allow for TCP /UDP or ICMP Type for ICMP. | ||
| Line 247: | Line 246: | ||
4- The end port to allow for TCP /UDP or ICMP for ICMP type. | 4- The end port to allow for TCP /UDP or ICMP for ICMP type. | ||
| − | 5- Your account name | + | 5- Your account name CloudStack (your login). |
| − | 6- The name of your security group, in our case | + | 6- The name of your security group, in our case <span class="notranslate">« default »</span>. |
| Line 255: | Line 254: | ||
| − | The above rule allows you to authorize the ping between the virtual machines to the security group | + | The above rule allows you to authorize the ping between the virtual machines to the security group <span class="notranslate">« default »</span>. |
| − | Note : to accept only incoming traffic to one another security group, enter the CloudStack account name and the name of a security group that has already been defined in this account. | + | Note : to accept only incoming traffic to one another security group, enter the CloudStack account name and the name of a security group that has already been defined in this account. |
| Line 264: | Line 263: | ||
| − | B. | + | B. allow SSH connections between your instances (Open port 22) : |
| Line 270: | Line 269: | ||
| − | C. | + | C. allow MySQL connections between your instances (Open port 3306) : |
| Line 276: | Line 275: | ||
| − | D. | + | D. allow all connections between your instances (Open all ports ) : |
| Line 282: | Line 281: | ||
| − | e. how to configure rules Firewall of traffic entering a security group <span class="notranslate">(Direct-Routing)</span>. | + | e. how to configure rules Firewall of traffic entering a security group <span class="notranslate">(Direct-Routing)</span>. |
| − | Log on to the web interface | + | Log on to the web interface <span class="notranslate">Cloud</span> public to Ikoula : https://cloudstack.ikoula.com/client/ |
| − | + | Click on 'Network' in the left vertical menu : | |
| Line 294: | Line 293: | ||
| − | Arriving on the screen below select the 'Security groups' view : | + | Arriving on the screen below select the 'Security groups' view : |
| Line 300: | Line 299: | ||
| − | Click on the name of the security group for which you want to add or remove rules : | + | Click on the name of the security group for which you want to add or remove rules : |
| Line 306: | Line 305: | ||
| − | Click on the "Rule of entry" tab if you want to configure an inbound rule : | + | Click on the "Rule of entry" tab if you want to configure an inbound rule : |
| Line 312: | Line 311: | ||
| − | In the example below we create a rule that allows inbound connections on port 80 (http | + | In the example below we create a rule that allows inbound connections on port 80 (http traff) whatever the source (CIDR 0.0.0.0/0 means any source, i.e. all CIDR ). |
| Line 318: | Line 317: | ||
| − | 1 | + | 1 -Check 'CIDR '. |
| − | 2 | + | 2 -Choose the Protocol to allow amongst TCP/UDP/ICMP. |
| − | 3 -Indicate the start port to allow in a port range (If you specify the same port in start port and port end this will only open so this port as in the example below ). | + | 3 -Indicate the start port to allow in a port range (If you specify the same port in start port and port end this will only open so this port as in the example below ). |
| − | 4 -Indicate the end port to allow in a port range (If you specify the same port in start port and port end this will only open so this port as in the example below ). | + | 4 -Indicate the end port to allow in a port range (If you specify the same port in start port and port end this will only open so this port as in the example below ). |
| − | 5 | + | 5 -Indicates the CIDR source to allow, example 0.0.0.0/0 to allow everyone, your public IP address (from which you connect ) followed /32 to allow only your IP address or CIDR network address (XX.XX.XX.X/XX, wit /xx = /16 for a network with a mask 255.255.0.0 eit 16bits for the network e.g. ). |
| Line 332: | Line 331: | ||
| − | Other examples of inbound rules : | + | Other examples of inbound rules : |
| − | 1) To allow incoming connections port TCP 1 à 65535 (all ports ) on all instances of the security group from a source to a specific public IP address CIDR (Enter your public IP address followed by /32) : | + | 1) To allow incoming connections port TCP 1 à 65535 (all ports ) on all instances of the security group from a source to a specific public IP address CIDR (Enter your public IP address followed by /32) : |
| Line 341: | Line 340: | ||
| − | 2) To allow SSH connections on port 22 | + | 2) To allow SSH connections on port 22 on all instances of the security group since the source of a specific network CIDR : |
| Line 347: | Line 346: | ||
| − | 3) To allow RDP connections /our bodies from any source remote desktop (CIDR 0.0.0.0/0) : | + | 3) To allow RDP connections /our bodies from any source remote desktop (CIDR 0.0.0.0/0) : |
| Line 353: | Line 352: | ||
| − | 4) To allow the ping (ICMP protocol, type 8, code 0) our bodies from any source (CIDR 0.0.0.0/0) : | + | 4) To allow the ping (ICMP protocol, type 8, code 0) our bodies from any source (CIDR 0.0.0.0/0) : |
| Line 359: | Line 358: | ||
| − | f. how to configure rules Firewall's outbound in a security group (Direct-Routing ). | + | f. how to configure rules Firewall's outbound in a security group (Direct-Routing). |
| − | Log on to the web interface | + | Log on to the web interface <span class="notranslate">Cloud</span> public to Ikoula : https://cloudstack.ikoula.com/client/ |
| − | + | Click on 'Network' in the left vertical menu : | |
| Line 371: | Line 370: | ||
| − | Arriving on the screen below select the 'Security groups' view : | + | Arriving on the screen below select the 'Security groups' view : |
| Line 377: | Line 376: | ||
| − | Click the security group for which you want to add or remove rules : | + | Click the security group for which you want to add or remove rules : |
| Line 383: | Line 382: | ||
| − | Click on the tab "Outgoing rule" If you want to configure an outbound rule : | + | Click on the tab "Outgoing rule" If you want to configure an outbound rule : |
| Line 395: | Line 394: | ||
| − | 1 | + | 1 -Check 'CIDR '. |
| − | 2 -Choose the protocol you want to allow amongst TCP/UDP/ICMP. | + | 2 -Choose the protocol you want to allow amongst TCP/UDP/ICMP. |
3 -Indicate the start port to allow. | 3 -Indicate the start port to allow. | ||
| Line 405: | Line 404: | ||
Note : to allow only a single port, specify the same port at the beginning and end. | | Note : to allow only a single port, specify the same port at the beginning and end. | | ||
| − | 5 | + | 5 -Indicate the CIDR destination to allow the connection from your instance to this IP. |
| Line 411: | Line 410: | ||
| − | Examples of outbound rules : | + | Examples of outbound rules : |
| − | 1) Allow ping (ICMP protocol, type 8, code 0) Since the instances to any destination (CIDR 0.0.0.0/0) : | + | 1) Allow ping (ICMP protocol, type 8, code 0) Since the instances to any destination (CIDR 0.0.0.0/0) : |
| Line 420: | Line 419: | ||
| − | 2) Allow http connections | + | 2) Allow http connections (TCP port 80/ typical web navigation ) Since the instances to any web server (CIDR 0.0.0.0/0) : |
| Line 431: | Line 430: | ||
<!-- Fin de l'article --> | <!-- Fin de l'article --> | ||
<br /><br /> | <br /><br /> | ||
| − | This article seemed you to be | + | This article seemed you to be u ? <vote /> |
<!--T:5--> | <!--T:5--> | ||
| Line 437: | Line 436: | ||
| − | <!-- Placez ci-dessous la ou les catégories auxquelles se rapporte votre article. Ex: [[Category: | + | <!-- Placez ci-dessous la ou les catégories auxquelles se rapporte votre article. Ex: [[Category:Contribute]] [[Category:Linux]] --> |
| − | [[Category: | + | [[Category:First_steps_on_the_cloud_public_ikoula]] |
[[Category:Public_cloud]] | [[Category:Public_cloud]] | ||
<br /> | <br /> | ||
<comments /> | <comments /> | ||
Revision as of 16:03, 6 October 2015
This article has been created by an automatic translation software. You can view the article source here.
fr::de:Bereitstellen von einer Instanz Zone direkt-routingfr:de:Bereitstellen von einer Instanz Zone direkt-routing
2. Deploying an instance zone Direct-Routing
a. deployment
1) To connect to the web interface of Cloud Ikoula public enter the url https://cloudstack.ikoula.com/client/ then your login details as they were provided to you in the mail to delivery of your account.

After have connected you to your management interface you will face the following screen :

2) Click on 'Bodies' in the vertical left menu :
![]()
3) Click on 'Add an instance' :

4) The deployment wizard opens :
Step 1 "Configuration" :
Select the zone 3 in the drop-down list :

Let the 'Model' checked selection then click on 'next '.
Step 2 "Select a template" : Select the operating system you want from the drop-down list of the models proposed in the 'Sponsored' tab :

Then click 'next '.
Step 3 "Provides calculatio :
Select the calculation offer you want among the proposed configurations :

Step 4 "Offers of data disc" :
Leave checked "No thanks", your instance will be deployed with a single disc of 50GB called ROOTDISK with a LVM partitioning for you leave the possibility to adjust the size of your partitions.

However, if you want to add a data disc (DATADISK) In addition to ROOTDISK de 50Go, check « Data disk » then drag your cursor to get the size you want (1) or enter the size directly (2). A DATADISK is limited to 2To.

Step 5 "Affinity" :
Regarding the deployment of our trial, we have no affinity group, so you can click on «Next» :

Step 6 'Network' : Regarding our first deployment, select the security group « default » then click on 'Next' :

Step 7 "Revise" :
In this last step, give a name to your instance will then appear in your interface Cloud public (Although optional, it is highly recommended ). Then check that all information is good (Provides computing, security groups, etc...;) :

Your instance appears in the list of the bodies in State « Creating »


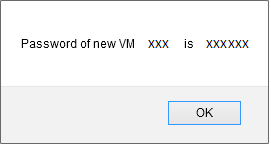
A few seconds later a pop up window opens to show you the password generated for your new instance, you must note /copy it because it's the system password for your instance that you will therefore serve to connect to it.

A second pop-up window tells you that the task of adding your instance completes :

Your new instance now appears in State « running », is ready to be used :

b. Introduction to security groups.
Security groups provide a way to isolate the traffic of the instances. A security group is a group that filters incoming and outgoing traffic according to a set of rules, say 'Rules of entry' and "Outbound rules.
These rules of network traffic filter based on the IP address or the network that tries to communicate with the instance(s).
Each CloudStack account comes with a group of default security which prohibits all incoming traffic and allows all outbound traffic as long as no rule entry or outbound rule is created.
Any user can implement a number of additional security groups. When a new virtual machine is started, it is assigned the security group by default unless another user-defined security group is specified.
A virtual machine can be a member of a number of security groups. Once an instance is assigned to a security group, it remains in this group for the whole of its useful life, you cannot move an existing instance of a security to another group.
You can modify a security group by removing or adding a number of rules for entry and exit. When you do, the new rules apply to all instances in the group, whether they are running or stopped.
If any entry is created, then no incoming traffic is not allowed, with the exception of responses to all traffic that was cleared out.
c. how to allow an SSH connection to your machine virtual in a security group (Direct-Routing).
1) You first need to retrieve the ip address of your vm
Click on the name of your instance and then go to the tab "Cards NIC" and note /copy the IP address of your instance (Xx.xxx.xxx.xxx).

2) Create the rule in the security group to allow SSH connections :
So that you can connect to your instance via SSH, you need to create a rule of entry allowing the connection. In effect by default, all connections are filtered, input (from the outside to your instance ) and output (your instance outward ). To connect using SSH you will need to open that in entry.
Click on 'Network' in the vertical left menu :
![]()
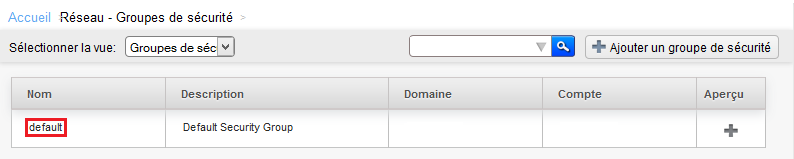
Arriving on the screen below select the 'Security groups' view :

Click then on « default » It is created by default security group in which you have deployed your instance :

To create the rule, click on the tab 'Rule of entry', leave checked CIDR, select the TCP protocol, enter 22 Start port and end port, and specify the IP address or network from which you want to connect in CIDR format in CIDR field and then click on 'Add' :

You can now connect to your instance via SSH.
d. create rules to allow connections between virtual machines in a security group (Direct-Routing), example
Log on to the web interface Cloud public to Ikoula : https://cloudstack.ikoula.com/client/
Click on 'Network' in the left vertical menu :

Arriving on the screen below select the 'Security groups' view :


Click on the name of the security group for which you want to add or remove rules :

Click on the "Rule of entry" tab if you want to configure an inbound rule :

A. allow ICMP requests (PING) between your insta :
1- Check « Account ».
2- Choose the Protocol to allow amongst TCP/UDP/ICMP.
3- The start port to allow for TCP /UDP or ICMP Type for ICMP.
4- The end port to allow for TCP /UDP or ICMP for ICMP type.
5- Your account name CloudStack (your login).
6- The name of your security group, in our case « default ».
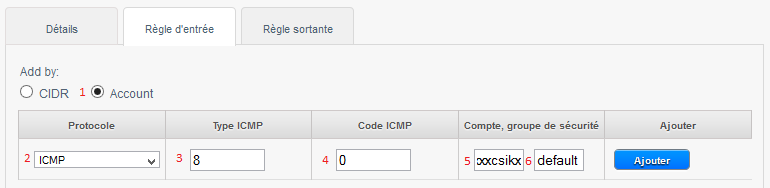

The above rule allows you to authorize the ping between the virtual machines to the security group « default ».
Note : to accept only incoming traffic to one another security group, enter the CloudStack account name and the name of a security group that has already been defined in this account.
To enable traffic between virtual machines within the security group that you now edit, enter the name of the current security group.
B. allow SSH connections between your instances (Open port 22) :

C. allow MySQL connections between your instances (Open port 3306) :

D. allow all connections between your instances (Open all ports ) :

e. how to configure rules Firewall of traffic entering a security group (Direct-Routing).
Log on to the web interface Cloud public to Ikoula : https://cloudstack.ikoula.com/client/
Click on 'Network' in the left vertical menu :
![]()
Arriving on the screen below select the 'Security groups' view :

Click on the name of the security group for which you want to add or remove rules :

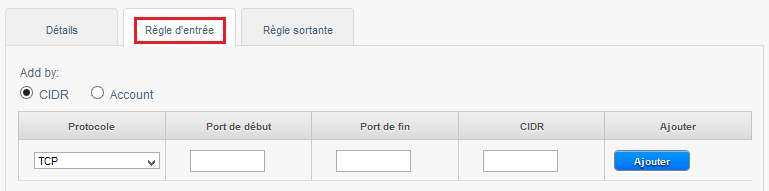
Click on the "Rule of entry" tab if you want to configure an inbound rule :

In the example below we create a rule that allows inbound connections on port 80 (http traff) whatever the source (CIDR 0.0.0.0/0 means any source, i.e. all CIDR ).
If you have a virtual machine as a web server this will be the rule to create so everyone can access your sites.
1 -Check 'CIDR '.
2 -Choose the Protocol to allow amongst TCP/UDP/ICMP.
3 -Indicate the start port to allow in a port range (If you specify the same port in start port and port end this will only open so this port as in the example below ).
4 -Indicate the end port to allow in a port range (If you specify the same port in start port and port end this will only open so this port as in the example below ).
5 -Indicates the CIDR source to allow, example 0.0.0.0/0 to allow everyone, your public IP address (from which you connect ) followed /32 to allow only your IP address or CIDR network address (XX.XX.XX.X/XX, wit /xx = /16 for a network with a mask 255.255.0.0 eit 16bits for the network e.g. ).

Other examples of inbound rules :
1) To allow incoming connections port TCP 1 à 65535 (all ports ) on all instances of the security group from a source to a specific public IP address CIDR (Enter your public IP address followed by /32) :

2) To allow SSH connections on port 22 on all instances of the security group since the source of a specific network CIDR :

3) To allow RDP connections /our bodies from any source remote desktop (CIDR 0.0.0.0/0) :

4) To allow the ping (ICMP protocol, type 8, code 0) our bodies from any source (CIDR 0.0.0.0/0) :

f. how to configure rules Firewall's outbound in a security group (Direct-Routing).
Log on to the web interface Cloud public to Ikoula : https://cloudstack.ikoula.com/client/
Click on 'Network' in the left vertical menu :

Arriving on the screen below select the 'Security groups' view :

Click the security group for which you want to add or remove rules :

Click on the tab "Outgoing rule" If you want to configure an outbound rule :
By default when no outbound rule is created, all the flow from the virtual machines to the security group is allowed as well as relating to this outflow connections.

/!\ From the moment where an exit rule is added, any outflow is prohibited except as explicitly allowed by the rules added (s).
1 -Check 'CIDR '.
2 -Choose the protocol you want to allow amongst TCP/UDP/ICMP.
3 -Indicate the start port to allow.
4 -Indicate the end port to allow.
Note : to allow only a single port, specify the same port at the beginning and end. |
5 -Indicate the CIDR destination to allow the connection from your instance to this IP.

Examples of outbound rules :
1) Allow ping (ICMP protocol, type 8, code 0) Since the instances to any destination (CIDR 0.0.0.0/0) :

2) Allow http connections (TCP port 80/ typical web navigation ) Since the instances to any web server (CIDR 0.0.0.0/0) :

This article seemed you to be u ?
Enable comment auto-refresher