Difference between revisions of "Deploying an instance zone direct-routing"
| (25 intermediate revisions by one other user not shown) | |||
| Line 1: | Line 1: | ||
| + | <span data-link_translate_en_title="Deploying an instance zone direct-routing" data-link_translate_en_url="Deploying an instance zone direct-routing"></span>[[:en:Deploying an instance zone direct-routing]][[en:Deploying an instance zone direct-routing]] | ||
| + | <span data-link_translate_de_title="" data-link_translate_de_url=""></span>[[:de:]][[de:]] | ||
| + | <span data-link_translate_he_title="פריסה של מופע אזור ישיר ניתוב" data-link_translate_he_url="%D7%A4%D7%A8%D7%99%D7%A1%D7%94+%D7%A9%D7%9C+%D7%9E%D7%95%D7%A4%D7%A2+%D7%90%D7%96%D7%95%D7%A8+%D7%99%D7%A9%D7%99%D7%A8+%D7%A0%D7%99%D7%AA%D7%95%D7%91"></span>[[:he:פריסה של מופע אזור ישיר ניתוב]][[he:פריסה של מופע אזור ישיר ניתוב]] | ||
| + | <span data-link_translate_ru_title="Развертывание экземпляра зоны прямого маршрутизации" data-link_translate_ru_url="%D0%A0%D0%B0%D0%B7%D0%B2%D0%B5%D1%80%D1%82%D1%8B%D0%B2%D0%B0%D0%BD%D0%B8%D0%B5+%D1%8D%D0%BA%D0%B7%D0%B5%D0%BC%D0%BF%D0%BB%D1%8F%D1%80%D0%B0+%D0%B7%D0%BE%D0%BD%D1%8B+%D0%BF%D1%80%D1%8F%D0%BC%D0%BE%D0%B3%D0%BE+%D0%BC%D0%B0%D1%80%D1%88%D1%80%D1%83%D1%82%D0%B8%D0%B7%D0%B0%D1%86%D0%B8%D0%B8"></span>[[:ru:Развертывание экземпляра зоны прямого маршрутизации]][[ru:Развертывание экземпляра зоны прямого маршрутизации]] | ||
| + | <span data-link_translate_ja_title="ルーティングを展開する、インスタンス ゾーン直通-" data-link_translate_ja_url="%E3%83%AB%E3%83%BC%E3%83%86%E3%82%A3%E3%83%B3%E3%82%B0%E3%82%92%E5%B1%95%E9%96%8B%E3%81%99%E3%82%8B%E3%80%81%E3%82%A4%E3%83%B3%E3%82%B9%E3%82%BF%E3%83%B3%E3%82%B9+%E3%82%BE%E3%83%BC%E3%83%B3%E7%9B%B4%E9%80%9A-"></span>[[:ja:ルーティングを展開する、インスタンス ゾーン直通-]][[ja:ルーティングを展開する、インスタンス ゾーン直通-]] | ||
| + | <span data-link_translate_ar_title="نشر مثيل منطقة مباشرة توجيه" data-link_translate_ar_url="%D9%86%D8%B4%D8%B1+%D9%85%D8%AB%D9%8A%D9%84+%D9%85%D9%86%D8%B7%D9%82%D8%A9+%D9%85%D8%A8%D8%A7%D8%B4%D8%B1%D8%A9+%D8%AA%D9%88%D8%AC%D9%8A%D9%87"></span>[[:ar:نشر مثيل منطقة مباشرة توجيه]][[ar:نشر مثيل منطقة مباشرة توجيه]] | ||
| + | <span data-link_translate_zh_title="部署实例区直接路由" data-link_translate_zh_url="%E9%83%A8%E7%BD%B2%E5%AE%9E%E4%BE%8B%E5%8C%BA%E7%9B%B4%E6%8E%A5%E8%B7%AF%E7%94%B1"></span>[[:zh:部署实例区直接路由]][[zh:部署实例区直接路由]] | ||
| + | <span data-link_translate_ro_title="Implementarea un exemplu zona directe-circuit" data-link_translate_ro_url="Implementarea+un+exemplu+zona+directe-circuit"></span>[[:ro:Implementarea un exemplu zona directe-circuit]][[ro:Implementarea un exemplu zona directe-circuit]] | ||
| + | <span data-link_translate_pl_title="Wdrażanie, wystąpienie strefy bezpośredniego routingu" data-link_translate_pl_url="Wdra%C5%BCanie%2C+wyst%C4%85pienie+strefy+bezpo%C5%9Bredniego+routingu"></span>[[:pl:Wdrażanie, wystąpienie strefy bezpośredniego routingu]][[pl:Wdrażanie, wystąpienie strefy bezpośredniego routingu]] | ||
| + | <span data-link_translate_nl_title="Een exemplaar zone direct-routering implementeren" data-link_translate_nl_url="Een+exemplaar+zone+direct-routering+implementeren"></span>[[:nl:Een exemplaar zone direct-routering implementeren]][[nl:Een exemplaar zone direct-routering implementeren]] | ||
| + | <span data-link_translate_it_title="Distribuzione di un'istanza zona diretta-routing" data-link_translate_it_url="Distribuzione+di+un%27istanza+zona+diretta-routing"></span>[[:it:Distribuzione di un'istanza zona diretta-routing]][[it:Distribuzione di un'istanza zona diretta-routing]] | ||
| + | <span data-link_translate_pt_title="Implantando uma instância zona direta-roteamento" data-link_translate_pt_url="Implantando+uma+inst%C3%A2ncia+zona+direta-roteamento"></span>[[:pt:Implantando uma instância zona direta-roteamento]][[pt:Implantando uma instância zona direta-roteamento]] | ||
| + | <span data-link_translate_es_title="Implementación de una instancia zona directa-encaminamiento" data-link_translate_es_url="Implementaci%C3%B3n+de+una+instancia+zona+directa-encaminamiento"></span>[[:es:Implementación de una instancia zona directa-encaminamiento]][[es:Implementación de una instancia zona directa-encaminamiento]] | ||
| + | <span data-link_translate_fr_title="Deploiement d'une instance en zone direct-routing" data-link_translate_fr_url="Deploiement_d%27une_instance_en_zone_direct-routing"></span>[[:fr:Deploiement d'une instance en zone direct-routing]][[fr:Deploiement d'une instance en zone direct-routing]] | ||
<br /> | <br /> | ||
| + | |||
| + | {{#seo: | ||
| + | |title=Deploying an instance zone direct-routing | ||
| + | |title_mode=append | ||
| + | |keywords=these,are,your,keywords | ||
| + | |description=Deploying an instance zone direct-routing | ||
| + | |image=Uploaded_file.png | ||
| + | |image_alt=Wiki Logo | ||
| + | }} | ||
This article has been created by an automatic translation software. You can view the article source [[:fr:Deploiement d'une instance en zone direct-routing|here]].<br /><span data-translate="fr"></span> | This article has been created by an automatic translation software. You can view the article source [[:fr:Deploiement d'une instance en zone direct-routing|here]].<br /><span data-translate="fr"></span> | ||
| + | <span data-link_translate_de_title="Bereitstellen von einer Instanz Zone direkt-routing" data-link_translate_de_url="Bereitstellen+von+einer+Instanz+Zone+direkt-routing"></span>[[:fr::de:Bereitstellen von einer Instanz Zone direkt-routing]][[:fr:de:Bereitstellen von einer Instanz Zone direkt-routing]] | ||
<!-- Début de l'article. Placez votre texte ci-après et n'hésitez pas à personnaliser les chapitres selon votre besoin --> | <!-- Début de l'article. Placez votre texte ci-après et n'hésitez pas à personnaliser les chapitres selon votre besoin --> | ||
| + | 2. Deploying an instance zone <span class="notranslate">Direct-Routing</span> | ||
| − | + | a. deployment | |
| − | |||
| − | |||
| − | |||
| − | a. deployment | ||
| − | 1) To connect to the web interface of <span class="notranslate">Cloud</span> Ikoula public enter the url https://cloudstack.ikoula.com/client/ then your login details as they were provided to you in the mail to delivery of your account. | + | 1) To connect to the web interface of <span class="notranslate">Cloud</span> Ikoula public enter the url https://cloudstack.ikoula.com/client/ then your login details as they were provided to you in the mail to delivery of your account. |
| Line 21: | Line 42: | ||
| − | After have connected you to your management interface you will face the following screen : | + | After have connected you to your management interface you will face the following screen : |
| Line 27: | Line 48: | ||
| − | 2) Click on 'Bodies' in the vertical left menu : | + | 2) Click on 'Bodies' in the vertical left menu : |
| Line 33: | Line 54: | ||
| − | 3) Click on 'Add an instance' : | + | 3) Click on 'Add an instance' : |
| Line 39: | Line 60: | ||
| − | 4) The deployment wizard opens : | + | 4) The deployment wizard opens : |
| − | Step 1 "Configuration" : | + | Step 1 "Configuration" : |
| − | Select the zone 3 in the drop-down list : | + | Select the zone 3 in the drop-down list : |
| Line 52: | Line 73: | ||
| − | Step 2 "Select a template" : | + | Step 2 "Select a template" : |
| − | Select the operating system you want from the drop-down list of the models proposed in the 'Sponsored' tab : | + | Select the operating system you want from the drop-down list of the models proposed in the 'Sponsored' tab : |
| Line 62: | Line 83: | ||
| − | Step 3 "Provides | + | Step 3 "Provides calculatio : |
| − | Select the calculation offer you want among the proposed configurations : | + | Select the calculation offer you want among the proposed configurations : |
| Line 69: | Line 90: | ||
| − | Step 4 "Offers of data disc" : | + | Step 4 "Offers of data disc" : |
| − | Leave checked "No thanks", your instance will be deployed with a single disc of 50GB called <span class="notranslate">ROOTDISK</span> with a LVM partitioning for you leave the possibility to adjust the size of your partitions. | + | Leave checked "No thanks", your instance will be deployed with a single disc of 50GB called <span class="notranslate">ROOTDISK</span> with a LVM partitioning for you leave the possibility to adjust the size of your partitions. |
| Line 78: | Line 99: | ||
| − | However, if you want to add a data disc | + | However, if you want to add a data disc <span class="notranslate">(DATADISK)</span> In addition to <span class="notranslate">ROOTDISK</span> de 50Go, check <span class="notranslate">« Data disk »</span> then drag your cursor to get the size you want (1) or enter the size directly (2). A <span class="notranslate">DATADISK</span> is limited to 2To. |
| Line 84: | Line 105: | ||
| − | Step 5 "Affinity" : | + | Step 5 "Affinity" : |
| − | Regarding the deployment of our trial, we have no affinity group, so you can click on «Next» : | + | Regarding the deployment of our trial, we have no affinity group, so you can click on «Next» : |
| Line 91: | Line 112: | ||
| − | Step 6 'Network' : | + | Step 6 'Network' : |
| − | Regarding our first deployment, select the | + | Regarding our first deployment, select the {{Template:Sécurité}} group <span class="notranslate">« default »</span> then click on 'Next' : |
| Line 98: | Line 119: | ||
| − | Step 7 "Revise" : | + | Step 7 "Revise" : |
| − | In this last step, give a name to your instance will then appear in your interface <span class="notranslate">Cloud</span> public (Although optional, it is highly recommended ). Then check that all information is good (Provides computing, | + | In this last step, give a name to your instance will then appear in your interface <span class="notranslate">Cloud</span> public (Although optional, it is highly recommended ). Then check that all information is good (Provides computing, {{Template:Sécurité}} groups, etc...;) : |
| Line 105: | Line 126: | ||
| − | Your instance appears in the list of the bodies in State | + | Your instance appears in the list of the bodies in State <span class="notranslate">« Creating »</span> |
| Line 117: | Line 138: | ||
| − | A second pop-up window tells you that the task of adding your instance completes : | + | A second pop-up window tells you that the task of adding your instance completes : |
| Line 123: | Line 144: | ||
| − | Your new instance now appears in State | + | Your new instance now appears in State <span class="notranslate">« running »</span>, is ready to be used : |
| Line 129: | Line 150: | ||
| − | b. Introduction to | + | b. Introduction to {{Template:Sécurité}} groups. |
| − | + | Security groups provide a way to isolate the traffic of the instances. A {{Template:Sécurité}} group is a group that filters incoming and outgoing traffic according to a set of rules, say 'Rules of entry' and "Outbound rules. | |
| − | These rules of network traffic filter based on the IP address or the network that tries to communicate with the instance (s). | + | These rules of network traffic filter based on the IP address or the network that tries to communicate with the instance(s). |
| − | Each CloudStack account comes with a group of default | + | Each CloudStack account comes with a group of default {{Template:Sécurité}} which prohibits all incoming traffic and allows all outbound traffic as long as no rule entry or outbound rule is created. |
| − | Any user can implement a number of additional | + | Any user can implement a number of additional {{Template:Sécurité}} groups. When a new virtual machine is started, it is assigned the {{Template:Sécurité}} group by default unless another user-defined {{Template:Sécurité}} group is specified. |
| − | A virtual machine can be a member of a number of | + | A virtual machine can be a member of a number of {{Template:Sécurité}} groups. Once an instance is assigned to a {{Template:Sécurité}} group, it remains in this group for the whole of its useful life, you cannot move an existing instance of a {{Template:Sécurité}} to another group. |
| − | You can modify a | + | You can modify a {{Template:Sécurité}} group by removing or adding a number of rules for entry and exit. When you do, the new rules apply to all instances in the group, whether they are running or stopped. |
| Line 153: | Line 174: | ||
| − | c. how to allow an SSH connection to your machine | + | c. how to allow an SSH connection to your machine virtual in a {{Template:Sécurité}} group <span class="notranslate">(Direct-Routing)</span>. |
| Line 159: | Line 180: | ||
| − | Click on the name of your instance and then go to the tab "Cards NIC" and note /copy the IP address of your instance (xxx.xxx.xxx | + | Click on the name of your instance and then go to the tab "Cards NIC" and note /copy the IP address of your instance (Xx.xxx.xxx.xxx). |
| Line 165: | Line 186: | ||
| − | 2) Create the rule in the | + | 2) Create the rule in the {{Template:Sécurité}} group to allow SSH connections : |
| − | So that you can connect to your instance via SSH, you need to create a rule of entry allowing the connection. In effect by default, all connections are filtered, input (from the outside to your instance ) and output (your instance outward ). To connect using SSH you will need to open that in entry. | + | So that you can connect to your instance via SSH, you need to create a rule of entry allowing the connection. In effect by default, all connections are filtered, input (from the outside to your instance ) and output (your instance outward ). To connect using SSH you will need to open that in entry. |
| − | + | Click on 'Network' in the vertical left menu : | |
| Line 177: | Line 198: | ||
| − | Arriving on the screen below select the 'Security groups' view : | + | Arriving on the screen below select the 'Security groups' view : |
| Line 183: | Line 204: | ||
| − | Click then on | + | Click then on <span class="notranslate">« default »</span> It is created by default {{Template:Sécurité}} group in which you have deployed your instance : |
| Line 189: | Line 210: | ||
| − | To create the rule, click on the tab 'Rule of entry', leave checked CIDR, select the TCP protocol, enter 22 Start port and end port, and specify the IP address or network from which you want to connect in CIDR format in CIDR field and then click on 'Add' : | + | To create the rule, click on the tab 'Rule of entry', leave checked CIDR, select the TCP protocol, enter 22 Start port and end port, and specify the IP address or network from which you want to connect in CIDR format in CIDR field and then click on 'Add' : |
| Line 198: | Line 219: | ||
| − | d. create rules to allow connections between virtual machines in a | + | d. create rules to allow connections between virtual machines in a {{Template:Sécurité}} group <span class="notranslate">(Direct-Routing)</span>, example |
| − | Log on to the web interface | + | Log on to the web interface <span class="notranslate">Cloud</span> public to Ikoula : https://cloudstack.ikoula.com/client/ |
| − | + | Click on 'Network' in the left vertical menu : | |
| Line 210: | Line 231: | ||
| − | Arriving on the screen below select the 'Security groups' view : | + | Arriving on the screen below select the 'Security groups' view : |
| Line 216: | Line 237: | ||
| − | Click on the name of the | + | Click on the name of the {{Template:Sécurité}} group for which you want to add or remove rules : |
| Line 222: | Line 243: | ||
| − | Click on the "Rule of entry" tab if you want to configure an inbound rule : | + | Click on the "Rule of entry" tab if you want to configure an inbound rule : |
| Line 228: | Line 249: | ||
| − | A. allow ICMP requests (PING ) between your | + | A. allow ICMP requests (PING) between your insta : |
1- Check <span class="notranslate">« Account »</span>. | 1- Check <span class="notranslate">« Account »</span>. | ||
| − | 2- Choose the Protocol to allow amongst TCP/UDP/ICMP. | + | 2- Choose the Protocol to allow amongst TCP/UDP/ICMP. |
3- The start port to allow for TCP /UDP or ICMP Type for ICMP. | 3- The start port to allow for TCP /UDP or ICMP Type for ICMP. | ||
| Line 239: | Line 260: | ||
4- The end port to allow for TCP /UDP or ICMP for ICMP type. | 4- The end port to allow for TCP /UDP or ICMP for ICMP type. | ||
| − | 5- Your account name | + | 5- Your account name CloudStack (your login). |
| − | 6- The name of your | + | 6- The name of your {{Template:Sécurité}} group, in our case <span class="notranslate">« default »</span>. |
| Line 247: | Line 268: | ||
| − | The above rule allows you to authorize the ping between the virtual machines to the | + | The above rule allows you to authorize the ping between the virtual machines to the {{Template:Sécurité}} group <span class="notranslate">« default »</span>. |
| − | Note : to accept only incoming traffic to one another | + | Note : to accept only incoming traffic to one another {{Template:Sécurité}} group, enter the CloudStack account name and the name of a {{Template:Sécurité}} group that has already been defined in this account. |
| − | To enable traffic between virtual machines within the | + | To enable traffic between virtual machines within the {{Template:Sécurité}} group that you now edit, enter the name of the current {{Template:Sécurité}} group. |
| − | B. | + | B. allow SSH connections between your instances (Open port 22) : |
| Line 262: | Line 283: | ||
| − | C. | + | C. allow MySQL connections between your instances (Open port 3306) : |
| Line 268: | Line 289: | ||
| − | D. | + | D. allow all connections between your instances (Open all ports ) : |
| Line 274: | Line 295: | ||
| − | e. how to configure rules Firewall of traffic entering a | + | e. how to configure rules Firewall of traffic entering a {{Template:Sécurité}} group <span class="notranslate">(Direct-Routing)</span>. |
| − | Log on to the web interface | + | Log on to the web interface <span class="notranslate">Cloud</span> public to Ikoula : https://cloudstack.ikoula.com/client/ |
| − | + | Click on 'Network' in the left vertical menu : | |
| Line 286: | Line 307: | ||
| − | Arriving on the screen below select the 'Security groups' view : | + | Arriving on the screen below select the 'Security groups' view : |
| Line 292: | Line 313: | ||
| − | Click on the name of the | + | Click on the name of the {{Template:Sécurité}} group for which you want to add or remove rules : |
| Line 298: | Line 319: | ||
| − | Click on the "Rule of entry" tab if you want to configure an inbound rule : | + | Click on the "Rule of entry" tab if you want to configure an inbound rule : |
| Line 304: | Line 325: | ||
| − | In the example below we create a rule that allows inbound connections on port 80 (http | + | In the example below we create a rule that allows inbound connections on port 80 (http traff) whatever the source (CIDR 0.0.0.0/0 means any source, i.e. all CIDR ). |
| Line 310: | Line 331: | ||
| − | 1 | + | 1 -Check 'CIDR '. |
| − | 2 | + | 2 -Choose the Protocol to allow amongst TCP/UDP/ICMP. |
| − | 3 -Indicate the start port to allow in a port range (If you specify the same port in start port and port end this will only open so this port as in the example below ). | + | 3 -Indicate the start port to allow in a port range (If you specify the same port in start port and port end this will only open so this port as in the example below ). |
| − | 4 -Indicate the end port to allow in a port range (If you specify the same port in start port and port end this will only open so this port as in the example below ). | + | 4 -Indicate the end port to allow in a port range (If you specify the same port in start port and port end this will only open so this port as in the example below ). |
| − | 5 | + | 5 -Indicates the CIDR source to allow, example 0.0.0.0/0 to allow everyone, your public IP address (from which you connect ) followed /32 to allow only your IP address or CIDR network address (XX.XX.XX.X/XX, wit /xx = /16 for a network with a mask 255.255.0.0 eit 16bits for the network e.g. ). |
| Line 324: | Line 345: | ||
| − | Other examples of inbound rules : | + | Other examples of inbound rules : |
| − | 1) To allow incoming connections port TCP 1 à 65535 (all ports ) on all instances of the | + | 1) To allow incoming connections port TCP 1 à 65535 (all ports ) on all instances of the {{Template:Sécurité}} group from a source to a specific public IP address CIDR (Enter your public IP address followed by /32) : |
| Line 333: | Line 354: | ||
| − | 2) To allow SSH connections on port 22 | + | 2) To allow SSH connections on port 22 on all instances of the {{Template:Sécurité}} group since the source of a specific network CIDR : |
| Line 339: | Line 360: | ||
| − | 3) To allow RDP connections /our bodies from any source remote desktop (CIDR 0.0.0.0/0) : | + | 3) To allow RDP connections /our bodies from any source remote desktop (CIDR 0.0.0.0/0) : |
| Line 345: | Line 366: | ||
| − | 4) To allow the ping (ICMP protocol, type 8, code 0) our bodies from any source (CIDR 0.0.0.0/0) : | + | 4) To allow the ping (ICMP protocol, type 8, code 0) our bodies from any source (CIDR 0.0.0.0/0) : |
| Line 351: | Line 372: | ||
| − | f. how to configure rules Firewall's outbound in a | + | f. how to configure rules Firewall's outbound in a {{Template:Sécurité}} group (Direct-Routing). |
| − | Log on to the web interface | + | Log on to the web interface <span class="notranslate">Cloud</span> public to Ikoula : https://cloudstack.ikoula.com/client/ |
| − | + | Click on 'Network' in the left vertical menu : | |
| Line 363: | Line 384: | ||
| − | Arriving on the screen below select the 'Security groups' view : | + | Arriving on the screen below select the 'Security groups' view : |
| Line 369: | Line 390: | ||
| − | Click the | + | Click the {{Template:Sécurité}} group for which you want to add or remove rules : |
| Line 375: | Line 396: | ||
| − | Click on the tab "Outgoing rule" If you want to configure an outbound rule : | + | Click on the tab "Outgoing rule" If you want to configure an outbound rule : |
| − | By default when no outbound rule is created, all the flow from the virtual machines to the | + | By default when no outbound rule is created, all the flow from the virtual machines to the {{Template:Sécurité}} group is allowed as well as relating to this outflow connections. |
| Line 387: | Line 408: | ||
| − | 1 | + | 1 -Check 'CIDR '. |
| − | 2 -Choose the protocol you want to allow amongst TCP/UDP/ICMP. | + | 2 -Choose the protocol you want to allow amongst TCP/UDP/ICMP. |
3 -Indicate the start port to allow. | 3 -Indicate the start port to allow. | ||
| Line 397: | Line 418: | ||
Note : to allow only a single port, specify the same port at the beginning and end. | | Note : to allow only a single port, specify the same port at the beginning and end. | | ||
| − | 5 | + | 5 -Indicate the CIDR destination to allow the connection from your instance to this IP. |
| Line 403: | Line 424: | ||
| − | Examples of outbound rules : | + | Examples of outbound rules : |
| − | 1) Allow ping (ICMP protocol, type 8, code 0) Since the instances to any destination (CIDR 0.0.0.0/0) : | + | 1) Allow ping (ICMP protocol, type 8, code 0) Since the instances to any destination (CIDR 0.0.0.0/0) : |
| Line 412: | Line 433: | ||
| − | 2) Allow http connections | + | 2) Allow http connections (TCP port 80/ typical web navigation ) Since the instances to any web server (CIDR 0.0.0.0/0) : |
| Line 423: | Line 444: | ||
<!-- Fin de l'article --> | <!-- Fin de l'article --> | ||
<br /><br /> | <br /><br /> | ||
| − | This article seemed you to be | + | This article seemed you to be u ? <vote /> |
<!--T:5--> | <!--T:5--> | ||
| Line 429: | Line 450: | ||
| − | <!-- Placez ci-dessous la ou les catégories auxquelles se rapporte votre article. Ex: [[Category: | + | <!-- Placez ci-dessous la ou les catégories auxquelles se rapporte votre article. Ex: [[Category:Contribute]] [[Category:Linux]] --> |
| − | [[Category: | + | [[Category:First_steps_on_the_cloud_public_ikoula]] |
[[Category:Public_cloud]] | [[Category:Public_cloud]] | ||
<br /> | <br /> | ||
<comments /> | <comments /> | ||
Latest revision as of 16:20, 24 September 2021
en:Deploying an instance zone direct-routing
de:
he:פריסה של מופע אזור ישיר ניתוב
ru:Развертывание экземпляра зоны прямого маршрутизации
ja:ルーティングを展開する、インスタンス ゾーン直通-
ar:نشر مثيل منطقة مباشرة توجيه
zh:部署实例区直接路由
ro:Implementarea un exemplu zona directe-circuit
pl:Wdrażanie, wystąpienie strefy bezpośredniego routingu
nl:Een exemplaar zone direct-routering implementeren
it:Distribuzione di un'istanza zona diretta-routing
pt:Implantando uma instância zona direta-roteamento
es:Implementación de una instancia zona directa-encaminamiento
fr:Deploiement d'une instance en zone direct-routing
This article has been created by an automatic translation software. You can view the article source here.
fr::de:Bereitstellen von einer Instanz Zone direkt-routingfr:de:Bereitstellen von einer Instanz Zone direkt-routing
2. Deploying an instance zone Direct-Routing
a. deployment
1) To connect to the web interface of Cloud Ikoula public enter the url https://cloudstack.ikoula.com/client/ then your login details as they were provided to you in the mail to delivery of your account.

After have connected you to your management interface you will face the following screen :

2) Click on 'Bodies' in the vertical left menu :
![]()
3) Click on 'Add an instance' :

4) The deployment wizard opens :
Step 1 "Configuration" :
Select the zone 3 in the drop-down list :

Let the 'Model' checked selection then click on 'next '.
Step 2 "Select a template" : Select the operating system you want from the drop-down list of the models proposed in the 'Sponsored' tab :

Then click 'next '.
Step 3 "Provides calculatio :
Select the calculation offer you want among the proposed configurations :

Step 4 "Offers of data disc" :
Leave checked "No thanks", your instance will be deployed with a single disc of 50GB called ROOTDISK with a LVM partitioning for you leave the possibility to adjust the size of your partitions.

However, if you want to add a data disc (DATADISK) In addition to ROOTDISK de 50Go, check « Data disk » then drag your cursor to get the size you want (1) or enter the size directly (2). A DATADISK is limited to 2To.

Step 5 "Affinity" :
Regarding the deployment of our trial, we have no affinity group, so you can click on «Next» :

Step 6 'Network' : Regarding our first deployment, select the Security group « default » then click on 'Next' :

Step 7 "Revise" :
In this last step, give a name to your instance will then appear in your interface Cloud public (Although optional, it is highly recommended ). Then check that all information is good (Provides computing, Security groups, etc...;) :

Your instance appears in the list of the bodies in State « Creating »


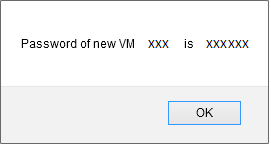
A few seconds later a pop up window opens to show you the password generated for your new instance, you must note /copy it because it's the system password for your instance that you will therefore serve to connect to it.

A second pop-up window tells you that the task of adding your instance completes :

Your new instance now appears in State « running », is ready to be used :

b. Introduction to Security groups.
Security groups provide a way to isolate the traffic of the instances. A Security group is a group that filters incoming and outgoing traffic according to a set of rules, say 'Rules of entry' and "Outbound rules.
These rules of network traffic filter based on the IP address or the network that tries to communicate with the instance(s).
Each CloudStack account comes with a group of default Security which prohibits all incoming traffic and allows all outbound traffic as long as no rule entry or outbound rule is created.
Any user can implement a number of additional Security groups. When a new virtual machine is started, it is assigned the Security group by default unless another user-defined Security group is specified.
A virtual machine can be a member of a number of Security groups. Once an instance is assigned to a Security group, it remains in this group for the whole of its useful life, you cannot move an existing instance of a Security to another group.
You can modify a Security group by removing or adding a number of rules for entry and exit. When you do, the new rules apply to all instances in the group, whether they are running or stopped.
If any entry is created, then no incoming traffic is not allowed, with the exception of responses to all traffic that was cleared out.
c. how to allow an SSH connection to your machine virtual in a Security group (Direct-Routing).
1) You first need to retrieve the ip address of your vm
Click on the name of your instance and then go to the tab "Cards NIC" and note /copy the IP address of your instance (Xx.xxx.xxx.xxx).

2) Create the rule in the Security group to allow SSH connections :
So that you can connect to your instance via SSH, you need to create a rule of entry allowing the connection. In effect by default, all connections are filtered, input (from the outside to your instance ) and output (your instance outward ). To connect using SSH you will need to open that in entry.
Click on 'Network' in the vertical left menu :
![]()
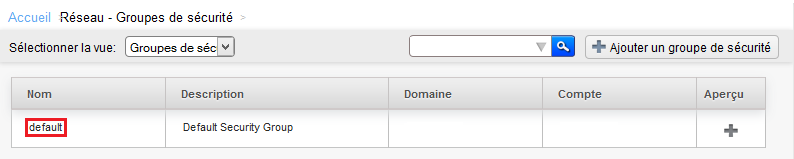
Arriving on the screen below select the 'Security groups' view :

Click then on « default » It is created by default Security group in which you have deployed your instance :

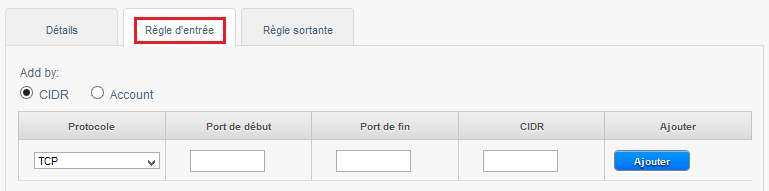
To create the rule, click on the tab 'Rule of entry', leave checked CIDR, select the TCP protocol, enter 22 Start port and end port, and specify the IP address or network from which you want to connect in CIDR format in CIDR field and then click on 'Add' :

You can now connect to your instance via SSH.
d. create rules to allow connections between virtual machines in a Security group (Direct-Routing), example
Log on to the web interface Cloud public to Ikoula : https://cloudstack.ikoula.com/client/
Click on 'Network' in the left vertical menu :

Arriving on the screen below select the 'Security groups' view :


Click on the name of the Security group for which you want to add or remove rules :

Click on the "Rule of entry" tab if you want to configure an inbound rule :

A. allow ICMP requests (PING) between your insta :
1- Check « Account ».
2- Choose the Protocol to allow amongst TCP/UDP/ICMP.
3- The start port to allow for TCP /UDP or ICMP Type for ICMP.
4- The end port to allow for TCP /UDP or ICMP for ICMP type.
5- Your account name CloudStack (your login).
6- The name of your Security group, in our case « default ».
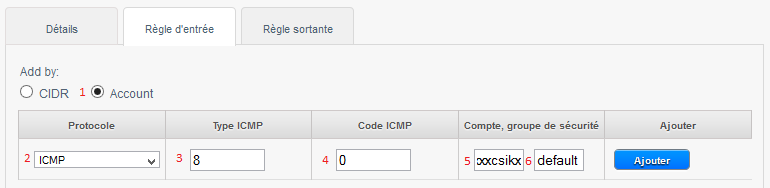

The above rule allows you to authorize the ping between the virtual machines to the Security group « default ».
Note : to accept only incoming traffic to one another Security group, enter the CloudStack account name and the name of a Security group that has already been defined in this account.
To enable traffic between virtual machines within the Security group that you now edit, enter the name of the current Security group.
B. allow SSH connections between your instances (Open port 22) :

C. allow MySQL connections between your instances (Open port 3306) :

D. allow all connections between your instances (Open all ports ) :

e. how to configure rules Firewall of traffic entering a Security group (Direct-Routing).
Log on to the web interface Cloud public to Ikoula : https://cloudstack.ikoula.com/client/
Click on 'Network' in the left vertical menu :
![]()
Arriving on the screen below select the 'Security groups' view :

Click on the name of the Security group for which you want to add or remove rules :

Click on the "Rule of entry" tab if you want to configure an inbound rule :

In the example below we create a rule that allows inbound connections on port 80 (http traff) whatever the source (CIDR 0.0.0.0/0 means any source, i.e. all CIDR ).
If you have a virtual machine as a web server this will be the rule to create so everyone can access your sites.
1 -Check 'CIDR '.
2 -Choose the Protocol to allow amongst TCP/UDP/ICMP.
3 -Indicate the start port to allow in a port range (If you specify the same port in start port and port end this will only open so this port as in the example below ).
4 -Indicate the end port to allow in a port range (If you specify the same port in start port and port end this will only open so this port as in the example below ).
5 -Indicates the CIDR source to allow, example 0.0.0.0/0 to allow everyone, your public IP address (from which you connect ) followed /32 to allow only your IP address or CIDR network address (XX.XX.XX.X/XX, wit /xx = /16 for a network with a mask 255.255.0.0 eit 16bits for the network e.g. ).

Other examples of inbound rules :
1) To allow incoming connections port TCP 1 à 65535 (all ports ) on all instances of the Security group from a source to a specific public IP address CIDR (Enter your public IP address followed by /32) :

2) To allow SSH connections on port 22 on all instances of the Security group since the source of a specific network CIDR :

3) To allow RDP connections /our bodies from any source remote desktop (CIDR 0.0.0.0/0) :

4) To allow the ping (ICMP protocol, type 8, code 0) our bodies from any source (CIDR 0.0.0.0/0) :

f. how to configure rules Firewall's outbound in a Security group (Direct-Routing).
Log on to the web interface Cloud public to Ikoula : https://cloudstack.ikoula.com/client/
Click on 'Network' in the left vertical menu :

Arriving on the screen below select the 'Security groups' view :

Click the Security group for which you want to add or remove rules :

Click on the tab "Outgoing rule" If you want to configure an outbound rule :
By default when no outbound rule is created, all the flow from the virtual machines to the Security group is allowed as well as relating to this outflow connections.

/!\ From the moment where an exit rule is added, any outflow is prohibited except as explicitly allowed by the rules added (s).
1 -Check 'CIDR '.
2 -Choose the protocol you want to allow amongst TCP/UDP/ICMP.
3 -Indicate the start port to allow.
4 -Indicate the end port to allow.
Note : to allow only a single port, specify the same port at the beginning and end. |
5 -Indicate the CIDR destination to allow the connection from your instance to this IP.

Examples of outbound rules :
1) Allow ping (ICMP protocol, type 8, code 0) Since the instances to any destination (CIDR 0.0.0.0/0) :

2) Allow http connections (TCP port 80/ typical web navigation ) Since the instances to any web server (CIDR 0.0.0.0/0) :

This article seemed you to be u ?
Enable comment auto-refresher