Difference between revisions of "Deploying an instance zone advanced-routing"
| (27 intermediate revisions by 2 users not shown) | |||
| Line 1: | Line 1: | ||
| − | |||
| − | |||
| − | + | {{#seo: | |
| + | |title=Deploying an instance zone advanced-routing | ||
| + | |title_mode=append | ||
| + | |keywords=these,are,your,keywords | ||
| + | |description=Deploying an instance zone advanced-routing | ||
| + | |image=Uploaded_file.png | ||
| + | |image_alt=Wiki Logo | ||
| + | }} | ||
| − | < | + | 3. Deploying an instance zone <span class="notranslate">'''Advance -Routing'''</span> |
| − | + | Log on to the web interface <span class="notranslate">Cloud</span> public to Ikoula : https://cloudstack.ikoula.com/client/ and go to the 'Bodies' tab and click on the button "add an instance." | |
| − | |||
| − | |||
| − | |||
| − | |||
| − | Log on to the web interface <span class="notranslate">Cloud</span> public to Ikoula : https://cloudstack.ikoula.com/client/ and go to the 'Bodies' tab and click on the button "add an instance." | ||
| Line 19: | Line 19: | ||
| − | The first step allows | + | The first step allows you to choose the one hosting your instance Zone (five areas are currently available ) and a model (preinstalled system /preconfigured) or an ISO. |
| Line 25: | Line 25: | ||
| − | For this example we will use a model. Select the image | + | For this example we will use a model. Select the image <span class="notranslate">« CentOS 7 – Minimal – 64bits »</span> and click on «next». |
| Line 31: | Line 31: | ||
| − | The next step is to select the instance configuration, descriptions of the various offers are shown. | + | The next step is to select the instance configuration, descriptions of the various offers are shown. |
| Line 37: | Line 37: | ||
| − | In the next step, we can indicate if we want a | + | In the next step, we can indicate if we want a <span class="notranslate">DATADISK</span> (data disc ) and its size. We do not want immediate : then click on the button "next". |
| Line 43: | Line 43: | ||
| − | Then there is the selection of the network, if | + | Then there is the selection of the network, if you already have one or more networks in this area they will appear at the top ("default" in the image below ). |
| − | Otherwise, various offers are available for creating (Depending on the service purchased ) in the lower part : 10/100/200/500/1000 | + | Otherwise, various offers are available for creating (Depending on the service purchased ) in the lower part : 10/100/200/500/1000 |
| − | Once your choice is made, click on «Next» : | + | Once your choice is made, click on «Next» : |
| Line 53: | Line 53: | ||
| − | This page allows | + | This page allows you to define a name and /or a group for your instance, these two parameters are optional and only present to help organize you. Once complete, you can initiate the creation. |
| Line 59: | Line 59: | ||
| − | The interface is asynchronous, it "makes | + | The interface is asynchronous, it "makes you hand" during the deployment of your trial. You can see the current actions, in error or terminated in the 'Message' window at the top in the middle of your interface : |
| Line 65: | Line 65: | ||
| − | Once the deployment is completed, a pop-up will notify | + | Once the deployment is completed, a pop-up will notify you of the password of your new instance : |
| Line 71: | Line 71: | ||
| − | In addition, another, at the bottom of the screen will inform | + | In addition, another, at the bottom of the screen will inform you of the end of : |
| Line 77: | Line 77: | ||
| − | - Examples of network configuration for the instances | + | - Examples of network configuration for the instances |
| − | Once your instance is created, | + | Once your instance is created, you can access it via the KVM available in the window of details of the latter or, for example, to open its port of SSH access (GNU/Linux) or TerminalServe/RDP <span class="notranslate">(Windows)</span>. |
| − | - Accessibility outside for an instance type GNU SSH | + | - Accessibility outside for an instance type GNU SSH /Linux. |
| − | Go to your "Network" tab and click on the name of your network : | + | Go to your "Network" tab and click on the name of your network : |
| Line 92: | Line 92: | ||
| − | Then click on 'See IP addresses' : | + | Then click on 'See IP addresses' : |
| Line 98: | Line 98: | ||
| − | + | You will find the public IP addresses assigned to you, click the one that you want to configure : | |
| Line 104: | Line 104: | ||
| − | Once on the detail of your public address, click on "Configuration" : | + | Once on the detail of your public address, click on "Configuration" : |
| Line 110: | Line 110: | ||
| − | We open the port 22 (SSH | + | We open the port 22 (SSH) on your private virtual router, then click on "See all" in the "Firewall" framework : |
| Line 116: | Line 116: | ||
| − | In this screen | + | In this screen you can add the IP address or the network (CIDR notation, e.g. x.x.x.x /24 ou 0.0.0.0/0 for everyone ) you want to allow to connect to TCP port 22 from the outside (i.e. "Internet" ) : |
| Line 122: | Line 122: | ||
| − | When done, click 'Add' and return to the previous step for, this time, click 'See all' in the setting "Port forwarding" : | + | When done, click 'Add' and return to the previous step for, this time, click 'See all' in the setting "Port forwarding" : |
| Line 128: | Line 128: | ||
| − | In the same way, | + | In the same way, you will specify a port (or a port range ) extern (your public IP address ) to match to a port (or a port range ) intern (on your instance in addressing privat). |
| − | In our example, we have created our Firewall rule on port 22, to indicate public port will be port 22 as for the port private ( | + | In our example, we have created our Firewall rule on port 22, to indicate public port will be port 22 as for the port private (for an instance where the SSH server listens on the default port ). |
| − | After which, you can access your instance | + | After which, you can access your instance in SSH from port 22 your public IP. |
| − | In this way, it is possible to have multiple instances to listen on the private port 22 and access it from different public ports from outside. If | + | In this way, it is possible to have multiple instances to listen on the private port 22 and access it from different public ports from outside. If you only have an instance, specify 22 in public and private port as in our example to access from the port 22 from the outside. |
| Line 143: | Line 143: | ||
| − | - Accessibility TS /RDP from the outside to an instance type MS | + | - Accessibility TS/RDP from the outside to an instance type MS <span class="notranslate">Windows</span>. |
| − | Go to your "Network" tab and click on the name of your network : | + | Go to your "Network" tab and click on the name of your network : |
| Line 152: | Line 152: | ||
| − | Then click on 'See IP addresses' : | + | Then click on 'See IP addresses' : |
| Line 158: | Line 158: | ||
| − | + | You will find the public IP addresses assigned to you, click the one that you want to configure : | |
| Line 164: | Line 164: | ||
| − | Once on the detail of your public address, click on "Configuration" : | + | Once on the detail of your public address, click on "Configuration" : |
| Line 170: | Line 170: | ||
| − | We open the port 22 (SSH | + | We open the port 22 (SSH) on your private virtual router, then click on "See all" in the "Firewall" framework : |
| Line 176: | Line 176: | ||
| − | + | In this screen you can add the IP address or network (CIDR notation, e.g. x.x.x.x /24 ou 0.0.0.0/0 for everyone ) you want to allow to connect to TCP port 3389 from the outside (i.e. "Internet" ) : | |
| Line 182: | Line 182: | ||
| − | When done, click 'Add' and return to the previous step for, this time, click 'See all' in the setting "Port forwarding" : | + | When done, click 'Add' and return to the previous step for, this time, click 'See all' in the setting "Port forwarding" : |
| Line 191: | Line 191: | ||
| − | In the same way, | + | In the same way, you will specify a port (or a port range ) extern (your public IP address ) to match to a port (or a port range ) intern (on your instance in addressing privat). |
| − | In our example, we have created our Firewall rule on port 3389, to indicate public port will be port 3389 as for the port private ( | + | In our example, we have created our Firewall rule on port 3389, to indicate public port will be port 3389 as for the port private (for an instance where the SSH server listens on the default port ). |
| − | After which, you can access your instance en <span class="notranslate">Terminal Server</span> Since the | + | After which, you can access your instance en <span class="notranslate">Terminal Server</span> Since the por 3389 Since your public IP. |
| − | In this way, it is possible to have multiple instances to listen on the private port 3389 | + | In this way, it is possible to have multiple instances to listen on the private port 3389 and access it from different public ports from the outside or if you only have an instance, specify 3389 in public and private port as in our example and access from the port 3389 from the outside. |
| − | See also : | + | See also : |
| − | Authorization | + | Authorization PI (ICMP/Echo) from the outside to its public IP |
| Line 213: | Line 213: | ||
<!-- Fin de l'article --> | <!-- Fin de l'article --> | ||
<br /><br /> | <br /><br /> | ||
| − | This article seemed you to be | + | This article seemed you to be u ? <vote /> |
<!--T:5--> | <!--T:5--> | ||
| Line 219: | Line 219: | ||
| − | <!-- Placez ci-dessous la | + | <!-- Placez ci-dessous la ou les catégories auxquelles se rapporte votre article. Ex: [[Category:Contribute]] [[Category:Linux]] --> |
| − | [[Category: | + | [[Category:First_steps_on_the_cloud_public_ikoula]] |
[[Category:Public_cloud]] | [[Category:Public_cloud]] | ||
<br /> | <br /> | ||
<comments /> | <comments /> | ||
Latest revision as of 15:18, 24 September 2021
3. Deploying an instance zone Advance -Routing
Log on to the web interface Cloud public to Ikoula : https://cloudstack.ikoula.com/client/ and go to the 'Bodies' tab and click on the button "add an instance."
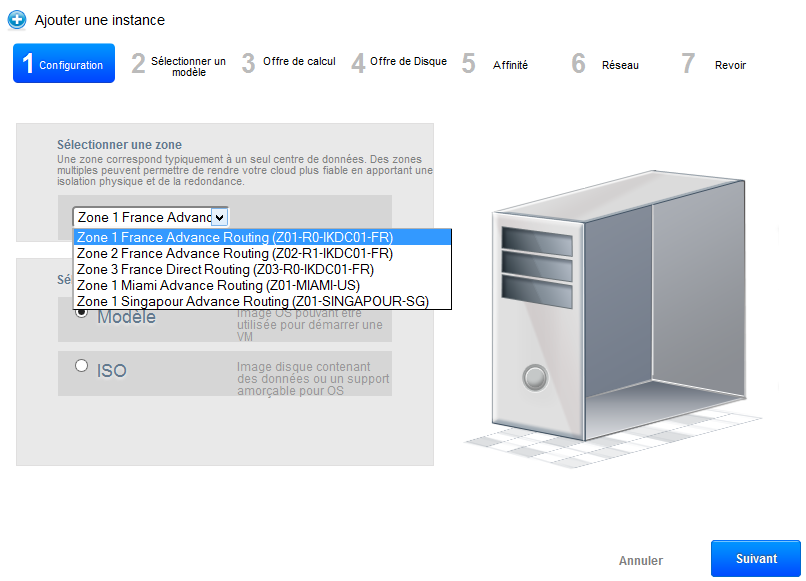
The first step allows you to choose the one hosting your instance Zone (five areas are currently available ) and a model (preinstalled system /preconfigured) or an ISO.
For this example we will use a model. Select the image « CentOS 7 – Minimal – 64bits » and click on «next».
The next step is to select the instance configuration, descriptions of the various offers are shown.
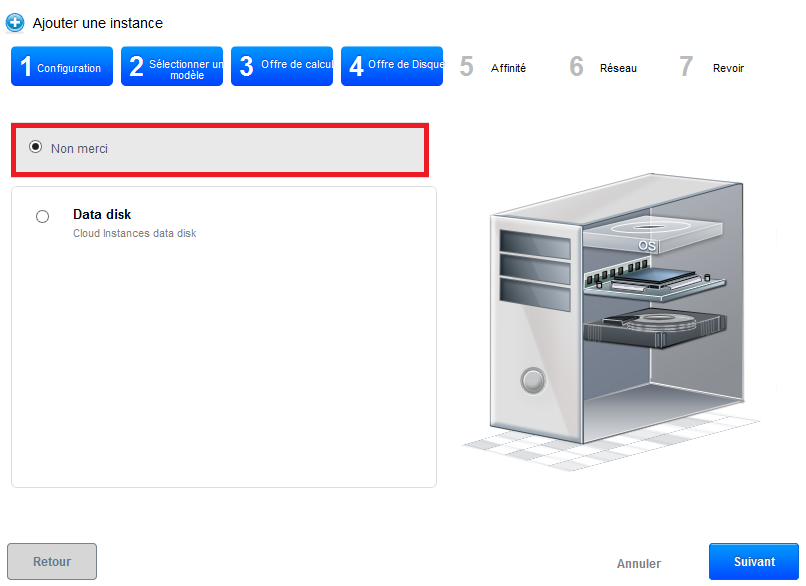
In the next step, we can indicate if we want a DATADISK (data disc ) and its size. We do not want immediate : then click on the button "next".
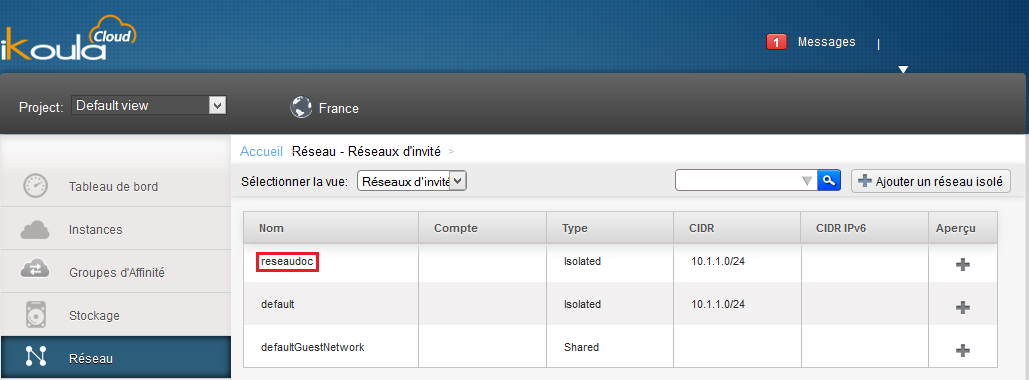
Then there is the selection of the network, if you already have one or more networks in this area they will appear at the top ("default" in the image below ).
Otherwise, various offers are available for creating (Depending on the service purchased ) in the lower part : 10/100/200/500/1000
Once your choice is made, click on «Next» :
This page allows you to define a name and /or a group for your instance, these two parameters are optional and only present to help organize you. Once complete, you can initiate the creation.
The interface is asynchronous, it "makes you hand" during the deployment of your trial. You can see the current actions, in error or terminated in the 'Message' window at the top in the middle of your interface :
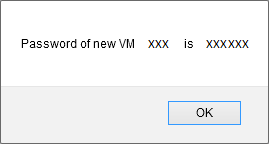
Once the deployment is completed, a pop-up will notify you of the password of your new instance :
In addition, another, at the bottom of the screen will inform you of the end of :
- Examples of network configuration for the instances
Once your instance is created, you can access it via the KVM available in the window of details of the latter or, for example, to open its port of SSH access (GNU/Linux) or TerminalServe/RDP (Windows).
- Accessibility outside for an instance type GNU SSH /Linux.
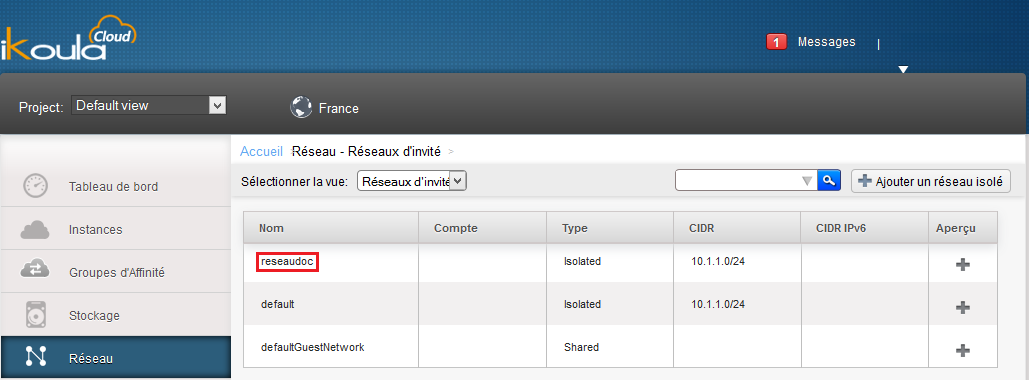
Go to your "Network" tab and click on the name of your network :
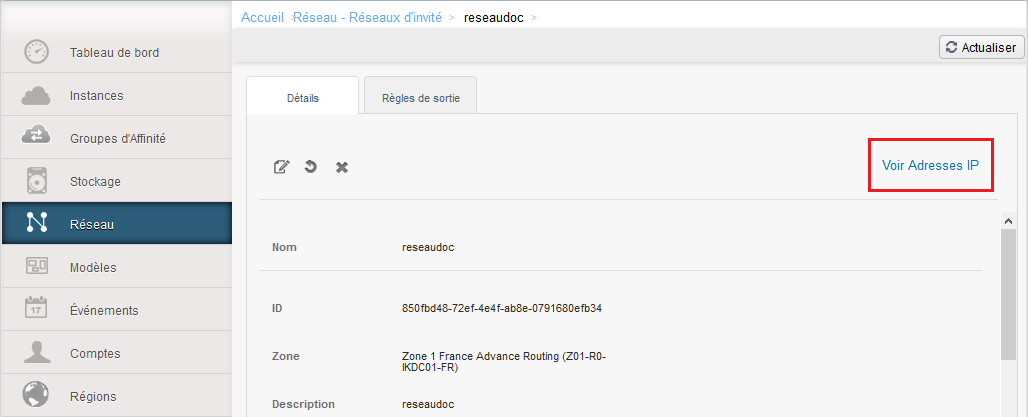
Then click on 'See IP addresses' :
You will find the public IP addresses assigned to you, click the one that you want to configure :
Once on the detail of your public address, click on "Configuration" :
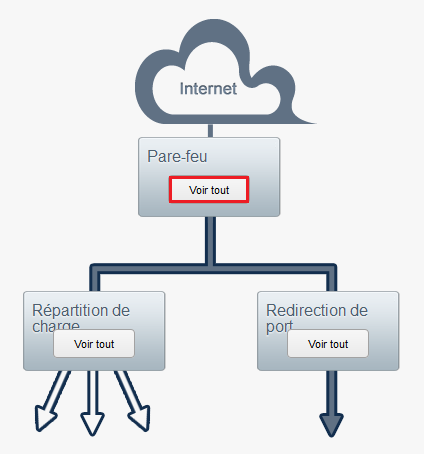
We open the port 22 (SSH) on your private virtual router, then click on "See all" in the "Firewall" framework :
In this screen you can add the IP address or the network (CIDR notation, e.g. x.x.x.x /24 ou 0.0.0.0/0 for everyone ) you want to allow to connect to TCP port 22 from the outside (i.e. "Internet" ) :
When done, click 'Add' and return to the previous step for, this time, click 'See all' in the setting "Port forwarding" :
In the same way, you will specify a port (or a port range ) extern (your public IP address ) to match to a port (or a port range ) intern (on your instance in addressing privat).
In our example, we have created our Firewall rule on port 22, to indicate public port will be port 22 as for the port private (for an instance where the SSH server listens on the default port ).
After which, you can access your instance in SSH from port 22 your public IP.
In this way, it is possible to have multiple instances to listen on the private port 22 and access it from different public ports from outside. If you only have an instance, specify 22 in public and private port as in our example to access from the port 22 from the outside.
- Accessibility TS/RDP from the outside to an instance type MS Windows.
Go to your "Network" tab and click on the name of your network :
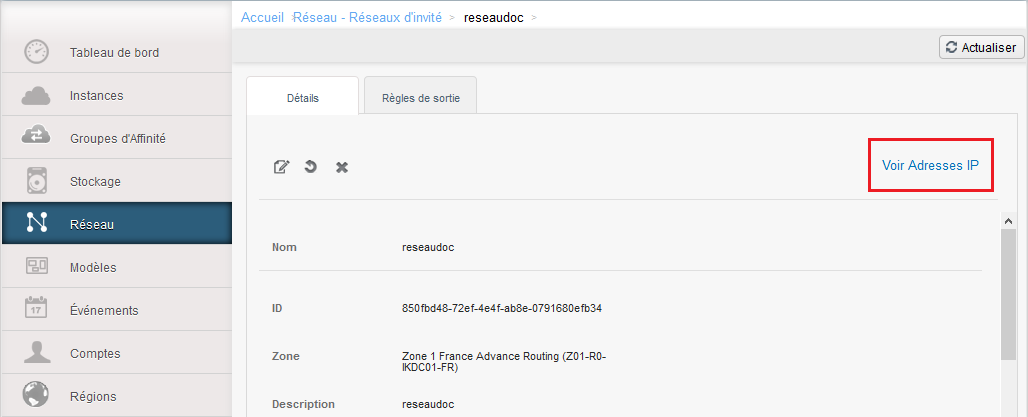
Then click on 'See IP addresses' :
You will find the public IP addresses assigned to you, click the one that you want to configure :
Once on the detail of your public address, click on "Configuration" :
We open the port 22 (SSH) on your private virtual router, then click on "See all" in the "Firewall" framework :
In this screen you can add the IP address or network (CIDR notation, e.g. x.x.x.x /24 ou 0.0.0.0/0 for everyone ) you want to allow to connect to TCP port 3389 from the outside (i.e. "Internet" ) :
When done, click 'Add' and return to the previous step for, this time, click 'See all' in the setting "Port forwarding" :
In the same way, you will specify a port (or a port range ) extern (your public IP address ) to match to a port (or a port range ) intern (on your instance in addressing privat).
In our example, we have created our Firewall rule on port 3389, to indicate public port will be port 3389 as for the port private (for an instance where the SSH server listens on the default port ).
After which, you can access your instance en Terminal Server Since the por 3389 Since your public IP.
In this way, it is possible to have multiple instances to listen on the private port 3389 and access it from different public ports from the outside or if you only have an instance, specify 3389 in public and private port as in our example and access from the port 3389 from the outside.
See also :
Authorization PI (ICMP/Echo) from the outside to its public IP
Allow outbound to the outside network flow
This article seemed you to be u ?












Enable comment auto-refresher