Difference between revisions of "How create a compatible model Cloud Ikoula"
| (One intermediate revision by one other user not shown) | |||
| Line 1: | Line 1: | ||
| + | <br />This article has been created by an automatic translation software. You can view the article source [[:fr:Comment creer un modele compatible Cloud Ikoula|here]].<br /><span data-translate="fr"></span><br /> | ||
<span data-link_translate_fr_title="Comment creer un modele compatible Cloud Ikoula" data-link_translate_fr_url="Comment creer un modele compatible Cloud Ikoula"></span>[[:fr:Comment creer un modele compatible Cloud Ikoula]][[fr:Comment creer un modele compatible Cloud Ikoula]] | <span data-link_translate_fr_title="Comment creer un modele compatible Cloud Ikoula" data-link_translate_fr_url="Comment creer un modele compatible Cloud Ikoula"></span>[[:fr:Comment creer un modele compatible Cloud Ikoula]][[fr:Comment creer un modele compatible Cloud Ikoula]] | ||
| − | |||
<span data-link_translate_he_title="איך ליצור מודל תואם ענן Ikoula" data-link_translate_he_url="%D7%90%D7%99%D7%9A+%D7%9C%D7%99%D7%A6%D7%95%D7%A8+%D7%9E%D7%95%D7%93%D7%9C+%D7%AA%D7%95%D7%90%D7%9D+%D7%A2%D7%A0%D7%9F+Ikoula"></span>[[:he:איך ליצור מודל תואם ענן Ikoula]][[he:איך ליצור מודל תואם ענן Ikoula]] | <span data-link_translate_he_title="איך ליצור מודל תואם ענן Ikoula" data-link_translate_he_url="%D7%90%D7%99%D7%9A+%D7%9C%D7%99%D7%A6%D7%95%D7%A8+%D7%9E%D7%95%D7%93%D7%9C+%D7%AA%D7%95%D7%90%D7%9D+%D7%A2%D7%A0%D7%9F+Ikoula"></span>[[:he:איך ליצור מודל תואם ענן Ikoula]][[he:איך ליצור מודל תואם ענן Ikoula]] | ||
<span data-link_translate_ro_title="Cum pentru a crea un model compatibil nor Ikoula" data-link_translate_ro_url="Cum+pentru+a+crea+un+model+compatibil+nor+Ikoula"></span>[[:ro:Cum pentru a crea un model compatibil nor Ikoula]][[ro:Cum pentru a crea un model compatibil nor Ikoula]] | <span data-link_translate_ro_title="Cum pentru a crea un model compatibil nor Ikoula" data-link_translate_ro_url="Cum+pentru+a+crea+un+model+compatibil+nor+Ikoula"></span>[[:ro:Cum pentru a crea un model compatibil nor Ikoula]][[ro:Cum pentru a crea un model compatibil nor Ikoula]] | ||
| Line 14: | Line 14: | ||
<span data-link_translate_es_title="Cómo crear un modelo compatible nube Ikoula" data-link_translate_es_url="C%C3%B3mo+crear+un+modelo+compatible+nube+Ikoula"></span>[[:es:Cómo crear un modelo compatible nube Ikoula]][[es:Cómo crear un modelo compatible nube Ikoula]] | <span data-link_translate_es_title="Cómo crear un modelo compatible nube Ikoula" data-link_translate_es_url="C%C3%B3mo+crear+un+modelo+compatible+nube+Ikoula"></span>[[:es:Cómo crear un modelo compatible nube Ikoula]][[es:Cómo crear un modelo compatible nube Ikoula]] | ||
<span data-link_translate_en_title="How create a compatible model Cloud Ikoula" data-link_translate_en_url="How+create+a+compatible+model+Cloud+Ikoula"></span>[[:en:How create a compatible model Cloud Ikoula]][[en:How create a compatible model Cloud Ikoula]] | <span data-link_translate_en_title="How create a compatible model Cloud Ikoula" data-link_translate_en_url="How+create+a+compatible+model+Cloud+Ikoula"></span>[[:en:How create a compatible model Cloud Ikoula]][[en:How create a compatible model Cloud Ikoula]] | ||
| + | |||
| + | {{#seo: | ||
| + | |title=How create a compatible model Cloud Ikoula | ||
| + | |title_mode=append | ||
| + | |keywords=these,are,your,keywords | ||
| + | |description=How create a compatible model Cloud Ikoula | ||
| + | |image=Uploaded_file.png | ||
| + | |image_alt=Wiki Logo | ||
| + | }} | ||
| + | |||
The following procedure explains how to create a model compatible with the {{cloud public}} or the {{cloud privé}} starting an installation from scratch (from a iso). | The following procedure explains how to create a model compatible with the {{cloud public}} or the {{cloud privé}} starting an installation from scratch (from a iso). | ||
Latest revision as of 14:10, 24 September 2021
This article has been created by an automatic translation software. You can view the article source here.
fr:Comment creer un modele compatible Cloud Ikoula
he:איך ליצור מודל תואם ענן Ikoula
ro:Cum pentru a crea un model compatibil nor Ikoula
ru:Как создать совместимый модель облачных Ikoula
pl:Jak utworzyć zgodnego modelu Cloud Ikoula
ja:雲 Ikoula の互換性のあるモデルを作成する方法
ar:كيفية إنشاء نموذج متوافق مع "عكلة سحابة"
zh:如何创建一个兼容模型云 Ikoula
de:Wie erstellen Sie ein kompatibles Modell Cloud Ikoula
nl:Hoe maak een compatibel model Cloud Ikoula
it:Come creare un modello compatibile Cloud Ikoula
pt:Como criar um modelo compatível nuvem Ikoula
es:Cómo crear un modelo compatible nube Ikoula
en:How create a compatible model Cloud Ikoula
The following procedure explains how to create a model compatible with the public cloud or the private cloud starting an installation from scratch (from a iso).
In our example, we create a GNU image/Linux Fedora 22.
Sign in to the management interface :
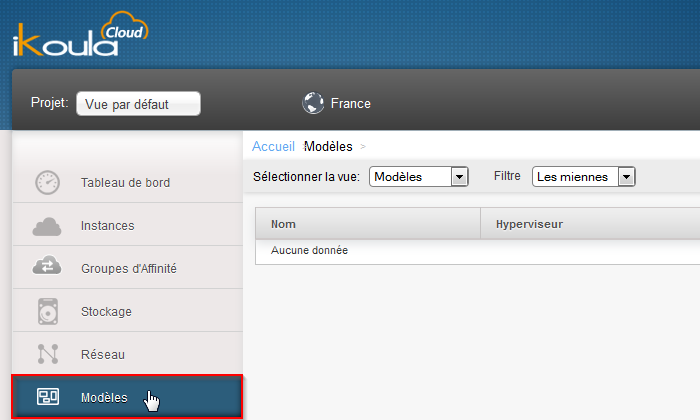
Click "Models" in the left menu :
Select the view "ISO" :
Click on the button "Save ISO" :
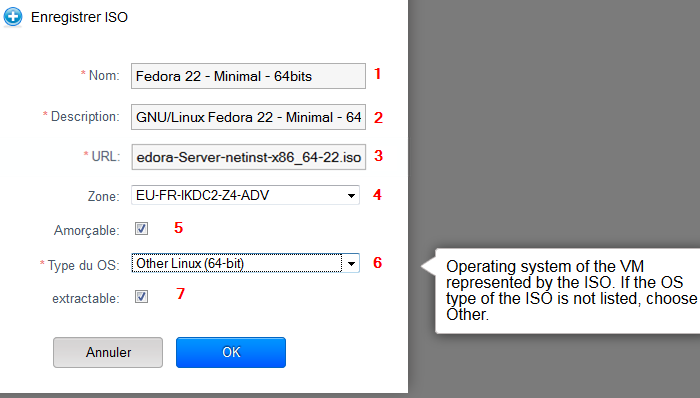
Then fill in the fields :
- Enter the name you want for your image ;
- Enter a description for your image ;
- Enter / Paste the URL HTTP (No https) full ISO file ;
- Select the Cloud Ikoula area for which your image will be available ;
- Check this box if you want an instance to be able to boot from your ISO ;
- Specify the type of your ISO system, if your system and the version of it is in the list select it, otherwise choose one of the type "Other xxx" the most suitable. In our case, Fedora 22 was not available in the list we have so selected "Other Linux (64-bit)" ;
- Check this box if you want your ISO to be downloaded once created.
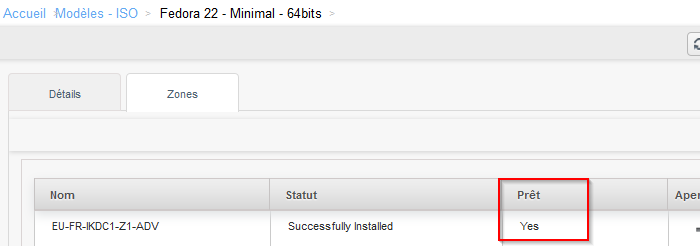
Once your ISO registered, wait until it either in status "Loan : Yes" :
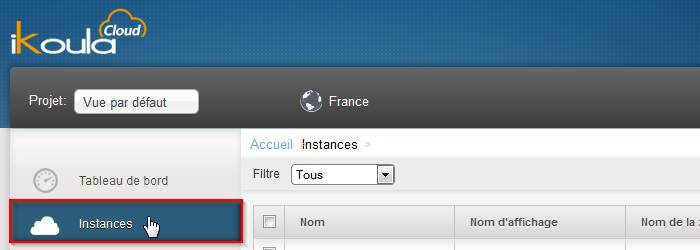
Click "Instances" in the left menu :
Click on the button "Add an instance" :
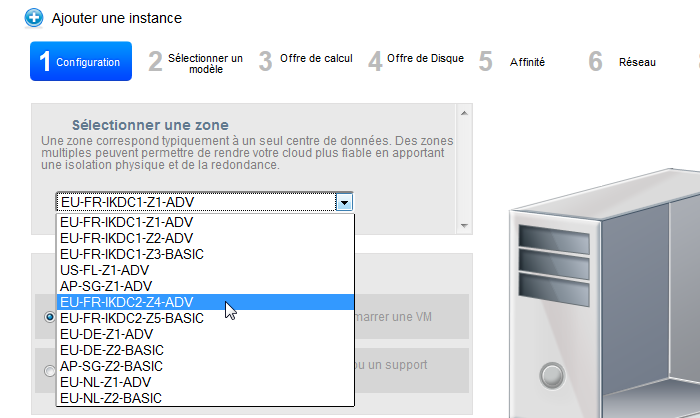
Select the area of your instance deployment :
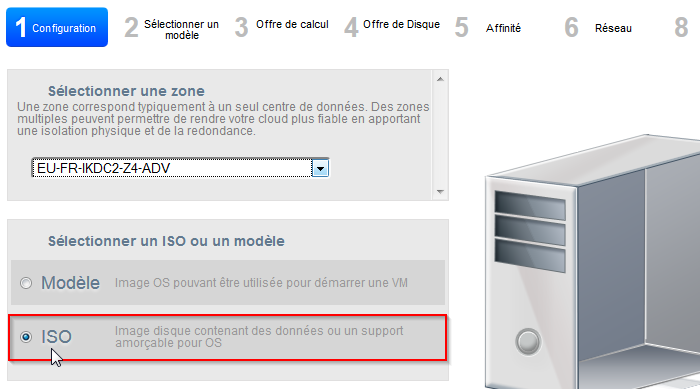
Select ISO and then click "Next" :
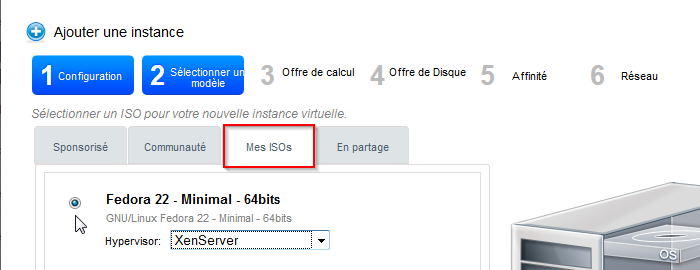
Click on the tab "My ISOs" and check the ISO you just created :
Select the offer for the calculation of your choice and then click "Next" :
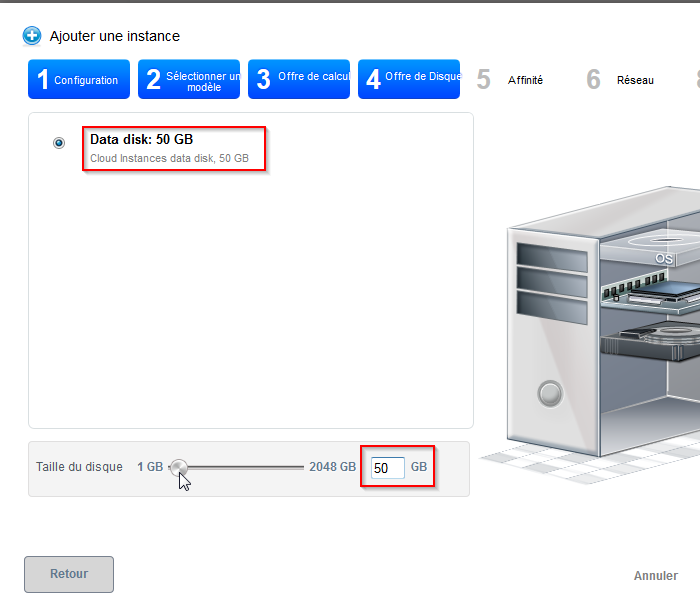
Drag the slider to gand the size of disk (in the UK) that you want for your instance and therefore for your future model or enter the size (in the UK) manually in the fields and validate with the key "Entry" on your keyboard to make the size chosen to appear in description above :
Click "Next" :
Continue with the classic steps of deploying an instance (Affinity network, instance name) by clicking on "Next" at each time to validate and finally on "Start VM".
Once your instance deployed, click on the name of the (from the Instances menu) :
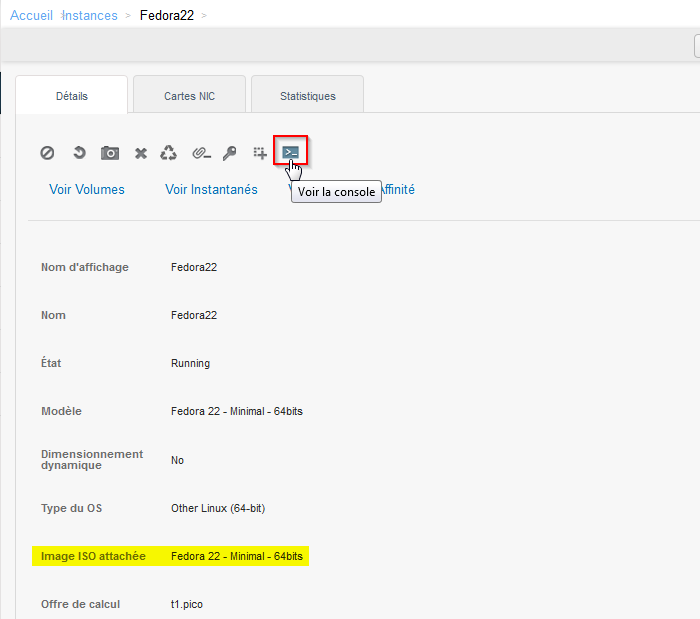
Click on the button "See the console" (Note that you see your ISO image attached to your instance in the details of this) :
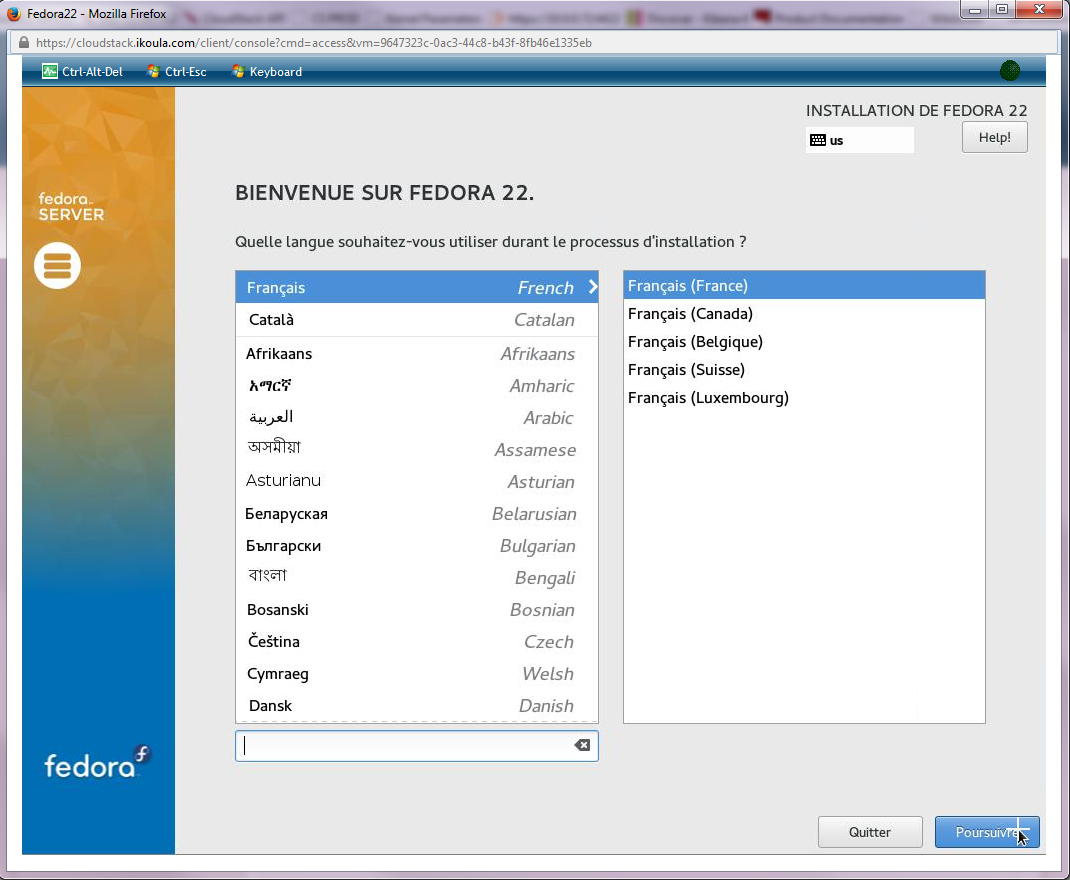
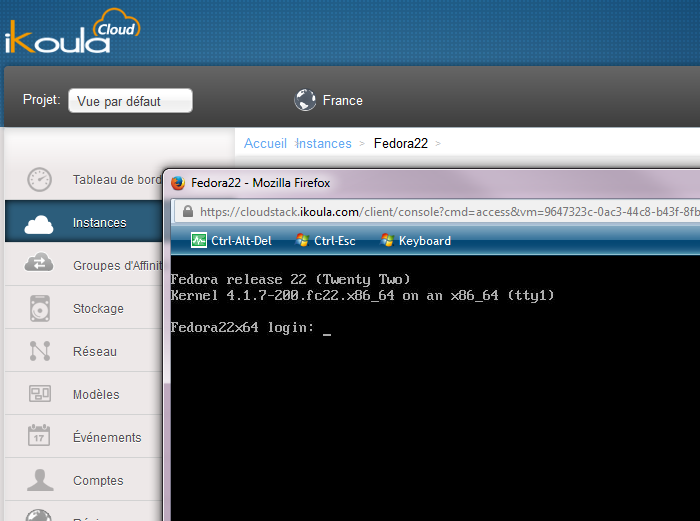
A new pop-up browser window will open (If this is not the case check that you not block the pop up for the Cloud Ikoula interface). This window is actually a web graphical console type VNC/KVM (écran/clavier/souris) your instance that will allow you to install the system on the disk of your instance :
Continue with the installation of your system with the partitioning and configuration you want (install the SSH package if requested)Note however that the keyboard is QWERTY type (so beware of the definition of the password).
At the end of the installation when it is asked to you click on restart, stop your instance to detach the ISO
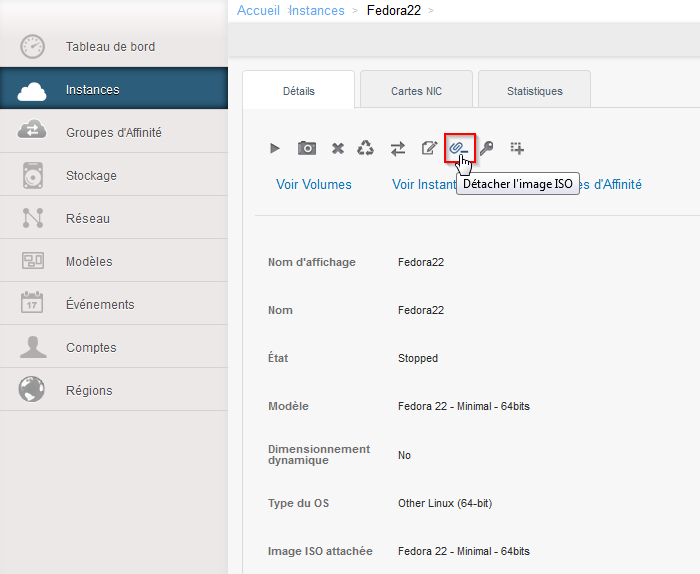
Once your instance stopped, click the name of your instance and then the button "Detach the ISO image" :
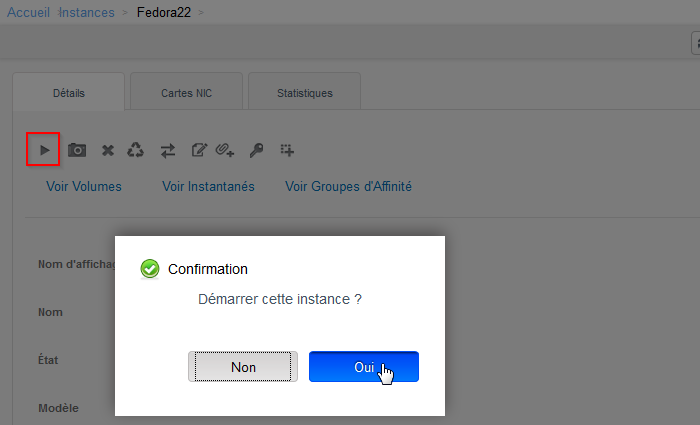
ISO once detached from your instance, you can start it in order to start on the system that you have installed the disk (ROOTDISK) of the latter.
Click on the button "See the console" to see your system start :
Connect in SSH to your instance (You must have create a rule pare fire and redirection of port if your instance is in area/Advanced Networking or an inbound rule for group of Security If it is in the basic zone and not having rules iptables on your instance system) to complete the configuration of the system to make it compatible with the.{Cloud public}}.
Being a virtual context, we relied on a partitioning with LVM (LVM root and swap) so you can easily resize our partitions in case of resizing or adding a virtual disk :
[root@Fedora22x64 ~]# fdisk -l
Disque /dev/xvda : 50 GiB, 53687091200 octets, 104857600 secteurs
Unités : secteur de 1 × 512 = 512 octets
Taille de secteur (logique / physique) : 512 octets / 512 octets
taille d'E/S (minimale / optimale) : 512 octets / 512 octets
Type d'étiquette de disque : dos
Identifiant de disque : 0xa1c87ad9

Périphérique Amorçage  Début       Fin  Secteurs Taille Id Type
/dev/xvda1               2048      4095      2048     1M 83 Linux
/dev/xvda2   *           4096   1955839   1951744   953M 83 Linux
/dev/xvda3            1955840 104857599 102901760  49,1G 8e LVM Linux


Disque /dev/mapper/vg01-root : 48,1 GiB, 51610910720 octets, 100802560 secteurs
Unités : secteur de 1 × 512 = 512 octets
Taille de secteur (logique / physique) : 512 octets / 512 octets
taille d'E/S (minimale / optimale) : 512 octets / 512 octets

Disque /dev/mapper/vg01-swap : 1 GiB, 1073741824 octets, 2097152 secteurs
Unités : secteur de 1 × 512 = 512 octets
Taille de secteur (logique / physique) : 512 octets / 512 octets
taille d'E/S (minimale / optimale) : 512 octets / 512 octets
[root@Fedora22x64 ~]# pvs
  PV         VG   Fmt  Attr PSize  PFree
  /dev/xvda3 vg01 lvm2 a--  49,07g    0
[root@Fedora22x64 ~]# vgs
  VG   #PV #LV #SN Attr   VSize  VFree
  vg01   1   2   0 wz--n- 49,07g    0
[root@Fedora22x64 ~]# lvs
  LV   VG   Attr       LSize  Pool Origin Data%  Meta%  Move Log Cpy%Sync Convert
  root vg01 -wi-ao---- 48,07g
  swap vg01 -wi-ao----  1,00g
Update the system if necessary (to tailor your package manager) :
[root@Fedora22x64 ~]# dnf upgrade
Please install at least packages that may be useful to run commands in settings "UserData" during a deployment to instance with your model : Vim, rsync, curl, wget. cloud-init, puppet, facter :
[root@TM-Fedora22KB ~]# dnf install vim-enhanced rsync curl wget cloud-init puppet facter
Vérification de l'expiration des métadonnées effectuée il y a 0:00:27 sur Thu Nov 26 12:32:31 2015.
Le paquet rsync-3.1.1-6.fc22.x86_64 est déjto installé, ignorer
Le paquet curl-7.40.0-7.fc22.x86_64 est déjà installé, ignorer
Le paquet wget-1.16.3-1.fc22.x86_64 est déjà installé, ignorer
Dépendances résolues.
===============================================================================================================================================================================================================================================================================
Paquet Architecture Version Dépôt Taille
===============================================================================================================================================================================================================================================================================
Installation de :
PyYAML x86_64 3.11-9.fc22 updates 168 k
cloud-init x86_64 0.7.6-3.fc22 fedora 434 k
facter x86_64 2.4.1-1.fc22 fedora 105 k
gpm-libs x86_64 1.20.7-6.fc22 fedora 36 k
hiera noarch 1.3.4-3.fc22 updates 29 k
libselinux-ruby x86_64 2.3-10.fc22 updates 135 k
libyaml x86_64 0.1.6-6.fc22 fedora 58 k
puppet noarch 4.1.0-5.fc22 updates 1.2 M
python-configobj noarch 5.0.5-2.fc22 fedora 65 k
python-jsonpatch noarch 1.2-5.fc22 fedora 19 k
python-jsonpointer noarch 1.9-2.fc22 updates 17 k
python-prettytable noarch 0.7.2-4.fc22 fedora 42 k
ruby x86_64 2.2.3-44.fc22 updates 74 k
ruby-augeas x86_64 0.5.0-6.fc22 fedora 28 k
ruby-irb noarch 2.2.3-44.fc22 updates 93 k
ruby-libs x86_64 2.2.3-44.fc22 updates 2.9 M
ruby-shadow x86_64 1.4.1-26.fc22 fedora 18 k
rubygem-bigdecimal x86_64 1.2.6-44.fc22 updates 86 k
rubygem-io-console x86_64 0.4.3-44.fc22 updates 56 k
rubygem-json x86_64 1.8.3-100.fc22 updates 65 k
rubygem-pathspec noarch 0.0.2-2.fc22 updates 17 k
rubygem-psych x86_64 2.0.8-44.fc22 updates 85 k
rubygem-rdoc noarch 4.2.0-44.fc22 updates 481 k
rubygem-rgen noarch 0.6.6-2.fc21 fedora 84 k
rubygems noarch 2.4.8-100.fc22 updates 269 k
rubypick noarch 1.1.1-4.fc22 updates 11 k
vim-common x86_64 2:7.4.827-1.fc22 updates 6.0 M
vim-enhanced x86_64 2:7.4.827-1.fc22 updates 1.1 M
vim-filesystem x86_64 2:7.4.827-1.fc22 updates 22 k
Résumé de la transaction
===============================================================================================================================================================================================================================================================================
Installation 29 Packages
Taille totale des téléchargements : 14 M
Taille d'installation : 45 M
Est-ce correct [o/N] : o
- Add the line "datasource_list: ['CloudStack']" at the beginning of the configuration file /etc/cloud/cloud.cfg (If you have installed cloud-init as shown above) :
[root@fedora22 ~]# head -n1 /etc/cloud/cloud.cfg
datasource_list: ['CloudStack']
Now you can launch the installation of the XenTools. To do this, you can follow the following article: Installation_des_XenTools_sur_une_instance_CloudStack.
Attention ne rebootez pas votre machine après l'installation dex XenTools contrairement à ce qu'indique l'article.
We add the following lines into /etc/sysctl.conf (We disable IPv6 and applied some optimizations) :
#Disable IPv6
net.ipv6.conf.all.disable_ipv6 = 1
net.ipv6.conf.default.disable_ipv6 = 1
net.ipv6.conf.lo.disable_ipv6 = 1
net.ipv6.conf.eth0.disable_ipv6 = 1

#Disable Swap
vm.swappiness = 0

#Improve memory management
vm.dirty_ratio = 60
vm.dirty_background_ratio = 2
#No overcommitment of available memory
vm.overcommit_ratio = 0
vm.overcommit_memory = 0

#Set maximum amount of memory allocated to shm to 256MB
kernel.shmmax = 268435456
kernel.shmall = 268435456

#Keep at least 64MB of free RAM space available
vm.min_free_kbytes = 65535
Then we execute the command "sysctl -p" :
[root@Fedora22x64 init.d]# sysctl -p
net.ipv4.conf.all.arp_notify = 1
net.ipv6.conf.all.disable_ipv6 = 1
net.ipv6.conf.default.disable_ipv6 = 1
net.ipv6.conf.lo.disable_ipv6 = 1
net.ipv6.conf.eth0.disable_ipv6 = 1
vm.swappiness = 0
vm.dirty_ratio = 60
vm.dirty_background_ratio = 2
vm.overcommit_ratio = 0
vm.overcommit_memory = 0
kernel.shmmax = 268435456
kernel.shmall = 268435456
vm.min_free_kbytes = 65535
Changed SELinux policy to spend it in "enforcing" à "permissive" :
[root@Fedora22x64 ~]# sed -i 's/SELINUX=enforcing/SELINUX=permissive/g' /etc/sysconfig/selinux
[root@Fedora22x64 ~]# setenforce Permissive
[root@Fedora22x64 ~]# sestatus
SELinux status:                 enabled
SELinuxfs mount:                /sys/fs/selinux
SELinux root directory:         /etc/selinux
Loaded policy name:             targeted
Current mode:                   permissive
Mode from config file:          enforcing
Policy MLS status:              enabled
Policy deny_unknown status:     allowed
Max kernel policy version:      29
If your system has rules pare original light, please stop and disable it, in our case example :
[root@Fedora22x64 ~]# systemctl stop firewalld.service
[root@Fedora22x64 ~]# systemctl disable firewalld.service
Removed symlink /etc/systemd/system/dbus-org.fedoraproject.FirewallD1.service.
Removed symlink /etc/systemd/system/basic.target.wants/firewalld.service.
We check that there are more rules loaded :
[root@Fedora22x64 ~]# iptables -vnL
Chain INPUT (policy ACCEPT 34 packets, 2240 bytes)
 pkts bytes target     prot opt in     out     source               destination

Chain FORWARD (policy ACCEPT 0 packets, 0 bytes)
 pkts bytes target     prot opt in     out     source               destination

Chain OUTPUT (policy ACCEPT 32 packets, 3568 bytes)
 pkts bytes target     prot opt in     out     source               destination
We will now install the scripts cloud guests that rely on features of change of password, hostname, the userdata's, SSH keys :
- First get the scripts on our mirror using the wget command (Edit fedora22 by centos7debian8 or ubuntu1404 in the following URL) :
wget http://mirror02.ikoula.com/priv/citrix/scripts/systemd/fedora22/systemd/cloud-set-guest-hostname.service -P /lib/systemd/system/
wget http://mirror02.ikoula.com/priv/citrix/scripts/systemd/fedora22/systemd/cloud-set-guest-password.service -P /lib/systemd/system/
wget http://mirror02.ikoula.com/priv/citrix/scripts/systemd/fedora22/systemd/cloud-set-guest-sshkey.service -P /lib/systemd/system/
wget http://mirror02.ikoula.com/priv/citrix/scripts/systemd/fedora22/systemd/cloud-set-guest-userdata.service -P /lib/systemd/system/
wget http://mirror02.ikoula.com/priv/citrix/scripts/systemd/fedora22/init.d/cloud-set-guest-hostname -P /etc/init.d
wget http://mirror02.ikoula.com/priv/citrix/scripts/systemd/fedora22/init.d/cloud-set-guest-password -P /etc/init.d
wget http://mirror02.ikoula.com/priv/citrix/scripts/systemd/fedora22/init.d/cloud-set-guest-sshkey -P /etc/init.d
wget http://mirror02.ikoula.com/priv/citrix/scripts/systemd/fedora22/init.d/cloud-set-guest-userdata -P /etc/init.d
- We activate our service units :
[root@Fedora22x64 ~]# systemctl enable cloud-set-guest-hostname.service
Created symlink from /etc/systemd/system/multi-user.target.wants/cloud-set-guest-hostname.service to /usr/lib/systemd/system/cloud-set-guest-hostname.service.
[root@Fedora22x64 ~]# systemctl enable cloud-set-guest-password.service
Created symlink from /etc/systemd/system/multi-user.target.wants/cloud-set-guest-password.service to /usr/lib/systemd/system/cloud-set-guest-password.service.
[root@Fedora22x64 ~]# systemctl enable cloud-set-guest-sshkey.service
Created symlink from /etc/systemd/system/multi-user.target.wants/cloud-set-guest-sshkey.service to /usr/lib/systemd/system/cloud-set-guest-sshkey.service.
[root@Fedora22x64 ~]# systemctl enable cloud-set-guest-userdata.service
Created symlink from /etc/systemd/system/multi-user.target.wants/cloud-set-guest-userdata.service to /usr/lib/systemd/system/cloud-set-guest-userdata.service.
[root@Fedora22x64 ~]# systemctl -l | grep cloud-set
  cloud-set-guest-hostname.service                                                          loaded active exited    CloudStack Set Guest Hostname
  cloud-set-guest-password.service                                                          loaded active exited    CloudStack Set Guest Password Reset
  cloud-set-guest-sshkey.service                                                            loaded active exited    CloudStack Set Guest Ssh Key
  cloud-set-guest-userdata.service                                                          loaded active exited    CloudStack Set Guest Userdata
- We purge the DHCP leases file (path and name of file to suit the need) :
[root@fedora22 ~]# > /var/lib/dhclient/dhclient.leases
- On retire la ligne MACADDR du fichier /etc/sysconfig/network-scripts/ifcfg-eth0 (Similarly, to adapt according to your distribution).
[root@fedora22 ~]# grep -v ^MACADDR ifcfg-eth0 > ifcfg-eth0.tmp && rm -f ifcfg-eth0 && mv ifcfg-eth0.tmp ifcfg-eth0
- We purge master logs files and command history :
[root@Fedora22x64 ~]# list=`find /var/log/ -type f`
[root@Fedora22x64 ~]# for arg in $list ; do > $arg ; done
[root@Fedora22x64 ~]# list=`find /var/log/ -name "*.gz"`
[root@Fedora22x64 ~]# for arg in $list ; do /bin/rm $arg ; done
[root@Fedora22x64 ~]# > .bash_history
[root@Fedora22x64 ~]# history -c && shutdown -h now && exit
- We created the model of our instance stopped :
On the Cloud Ikoula interface, go to the "Instances" then click on the name of your instance
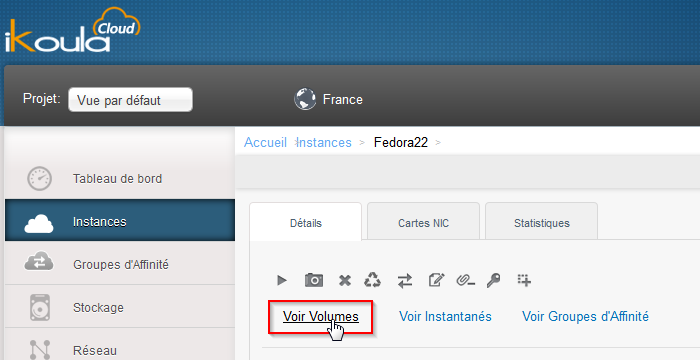
Click "See Volumes" :
Click on the name of your volume ROOTDISK :
Click on the button "Create a template" :
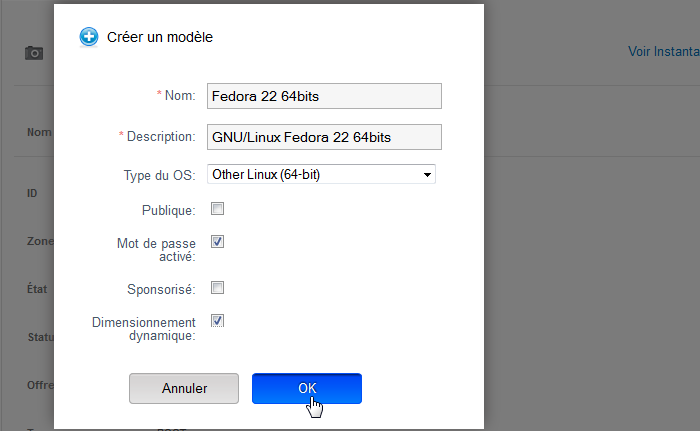
Give the name and the description that you want to your model, choose the same type of bone than that of your instance, check "Password enabled" et "dynamic resizing" (If you have respectively set up the script cloud-set-guest-password and installed the xentools) :
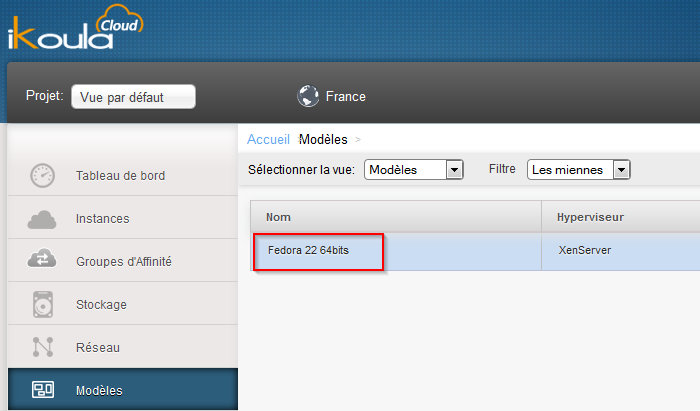
After the creation of your model is finished :
You can find it in "Models" :
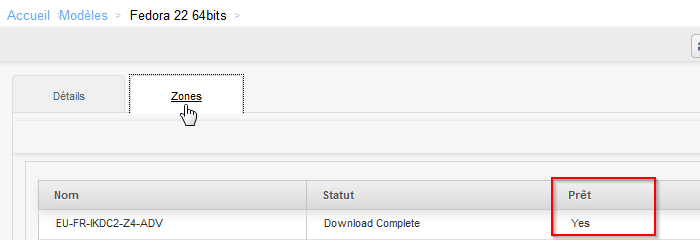
Click your model name and then click the tab "Areas" to verify that its status is ready (Loan : Yes) :
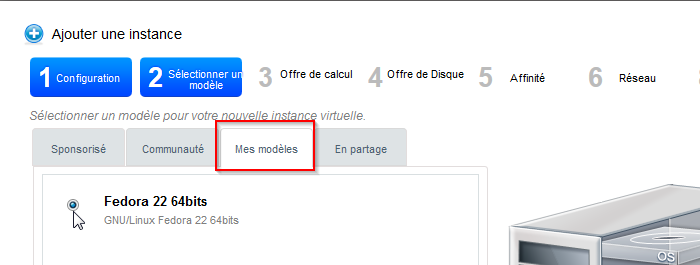
You can now deploy new instances with your compatible model public cloud (you will need to select your model in the tab "My models" the wizard of deploying instance) :
This article seem useful to you ?







Enable comment auto-refresher