Create and configure a vpn site-to-site on the Public Cloud
en:Create and configure a vpn site-to-site on the Public Cloud
pl:Tworzenie i Konfigurowanie sieci vpn site-to-site na chmurze publicznej
ja:作成およびパブリック クラウドに、vpn サイトにサイトを構成します。
zh:创建和配置 vpn 的站点站点的指针在公共云上
de:Erstellen Sie und konfigurieren Sie eines Vpn-Standort-zu-Standort auf der Public Cloud
nl:Maken en configureren van een VPN-site-to-site op de Public Cloud
it:Creare e configurare una vpn site-to-site su Cloud pubblico
he:ליצור ולהגדיר של vpn כדי אתר על הענן הציבורי
ro:Crearea şi configurarea un vpn site-la-site pe Cloud publice
ru:Создайте и настройте vpn site-to-site на общедоступных облаках
ar:إنشاء وتكوين vpn موقع إلى موقع في "سحابة عامة"
pt:Criar e configurar uma vpn site-to-site sobre a nuvem pública
es:Crear y configurar una vpn de sitio a sitio en la nube pública
fr:Créer et Configurer un vpn site à site sur le Cloud Public
This article has been created by an automatic translation software. You can view the article source here.
Lexicon
IKE : Internet key Exchange
ESP : encapsulation security protocol
Hash : sequence of numbers generated from a sequence of letters, irreversible.
Step 1 Create a VPN gateway
Left click on the menu "network"
1. Choose View "Gateway VPN client"
2. Click on "Add a client VPN gateway"
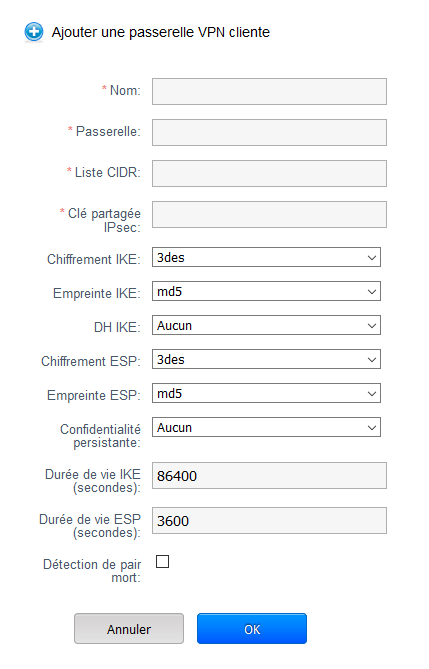
The screen following appears
Name : Choose a name for the VPN, it will appear under this name in menu "VPN gateway ".
Gateway : Indicate here the public IP address of your gateway (as your physical router at your premises overlooking externally ).
List CIDR : Remote private networks separated by a comma, should not overlap private networks public Cloud.
Shared key IPsec : Encryption for authentication encryption key, choose something long enough and complicated.
Encryption IKE : Encryption algorithm used for the encryption of authentication (It is better to place the AES if your equipment supports ).
Fingerprint IKE : The authentication data hashing algorithm (It is better to put SHA 1 If your equipment supports ).
DH IKE : Public key encryption protocol
Encryption ESP : Encryption algorithm used for encrypting the data circulating in the vpn (It is better to place the AES if your equipment supports ).
Imprint ESP : Algorithm for hashing of data for data encryption (It is better to put SHA 1 If your equipment supports ).
Persistent confidentiality : Parameter used to enhance security.
Both parties must be able to generate ephemeral keys.
An ephemeral key pair is generated at each session so even if an attacker has the private key it will not be able to decrypt the data.
Caution If this setting is enabled, it will slow down trade.
Life expectancy IKE (seconds ) : Life of the phase 1 (by default a day ).
Lifetime ESP (seconds ) : Life of the phase 2 (default 1 hour ).
Dead peer detection : sends a packet at regular intervals to verify that the gateway at the other end is up, it is recommended that you enable this setting on each of two gateways.
Step 2 Create a VPC
Open the network page by clicking on the button on the left.
In the network menu
1. Select VPC in "select view"
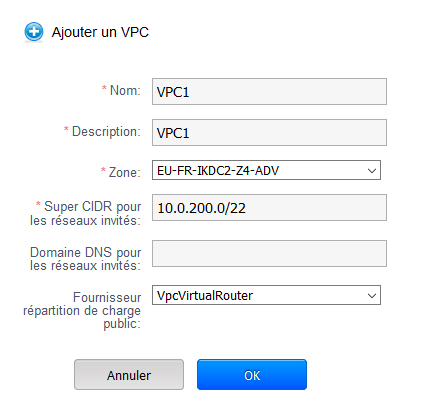
2. Add a VPC
We use a netmask in 255.255.252.0 (/22) in order to have the possibility to create future networks /24 and to meet all needs of evolution.
It creates the VPC in the forward area of our choice.
To confirm click on 'OK'
From the network menu
1. Select the view VPC
2. Click the 'Configure' button to configure the VPC
Step 3 Add and configure a party for your VPC
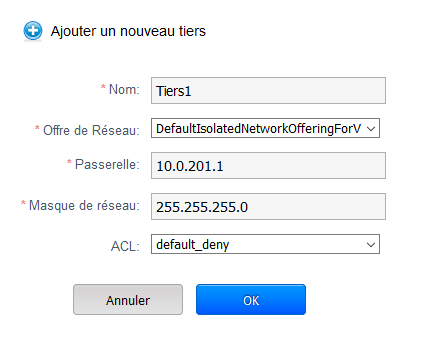
Provide the following information :
[a] Network DefaultIsolatedNetworkOfferingForVpcNetworks offer is selected by default
This network offer to subsequently implement load balancing rules.
You can leave this setting but that subsequently if you create a new third you can add that the offer of network DefaultIsolatedNetworkOfferingForVpcNetworksNoLB
[b] Gateway : should include an ip for the gateway of the third parties who must take in super CIDR.
[c] ACL : It's set policy of rule firewall what is behind one-third.
By default both policies are available (You can create others and assign them to one-third ) :
Default deny : nothing fit anything doesn't come out
Default allow : any past input and output
Create a VM in your third
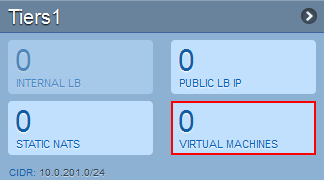
You can therefore create a vm by clicking on 'VIRTUAL MACHINES'
Click on 'Add an instance' :
The deployment wizard opens, the creation is done in seven steps :
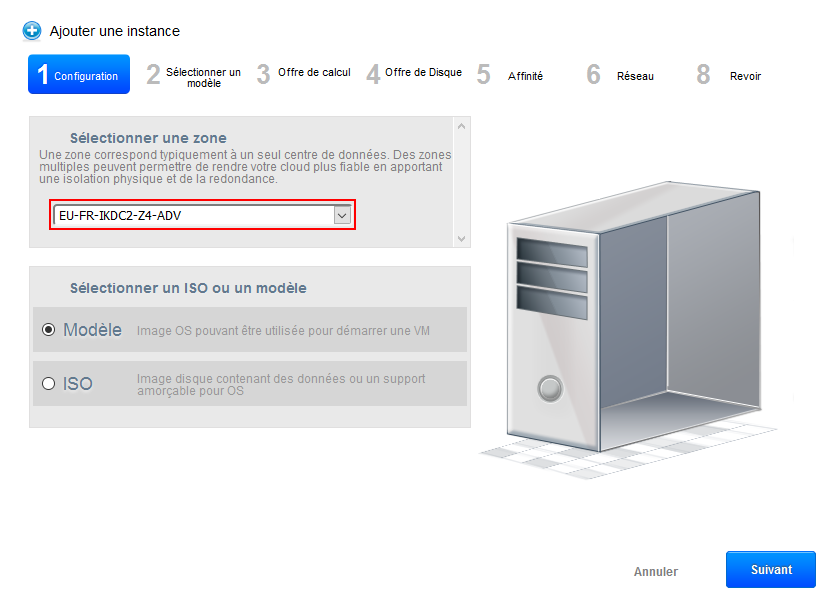
- Step 1 "Configuration" : Select an area from the drop-down list :
Let the 'Model' checked selection then click on 'next '.
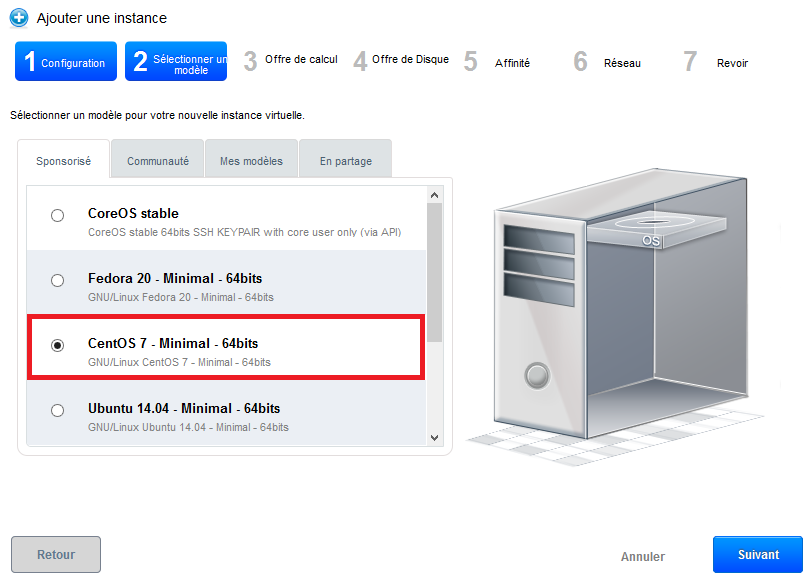
- Step 2 "Select a template" : Select the operating system you want from the drop-down list of the models proposed in the 'Sponsored' tab :
Then click 'next '.
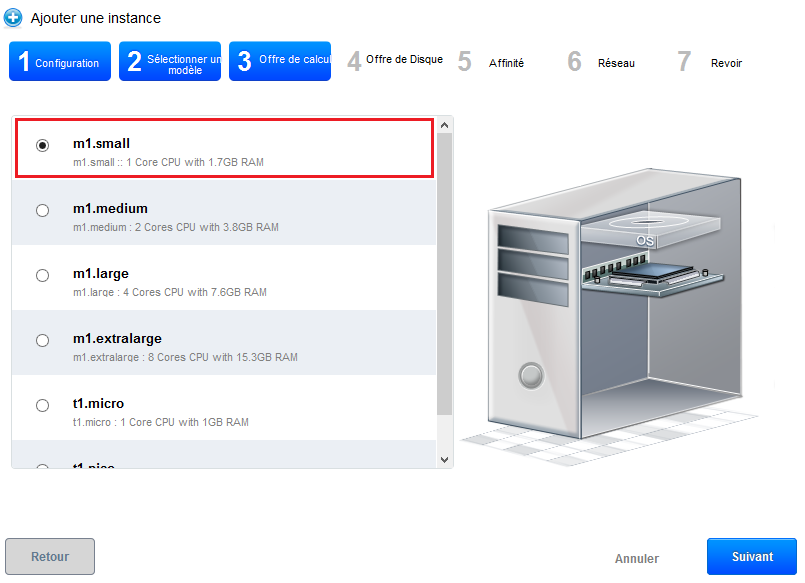
- Step 3 "Provides calculation" : Select the calculation offer you want among the proposed configurations :
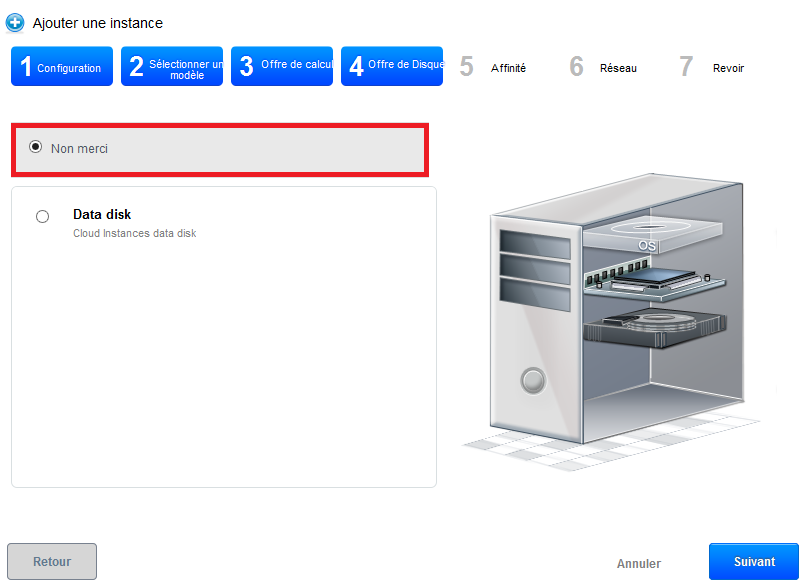
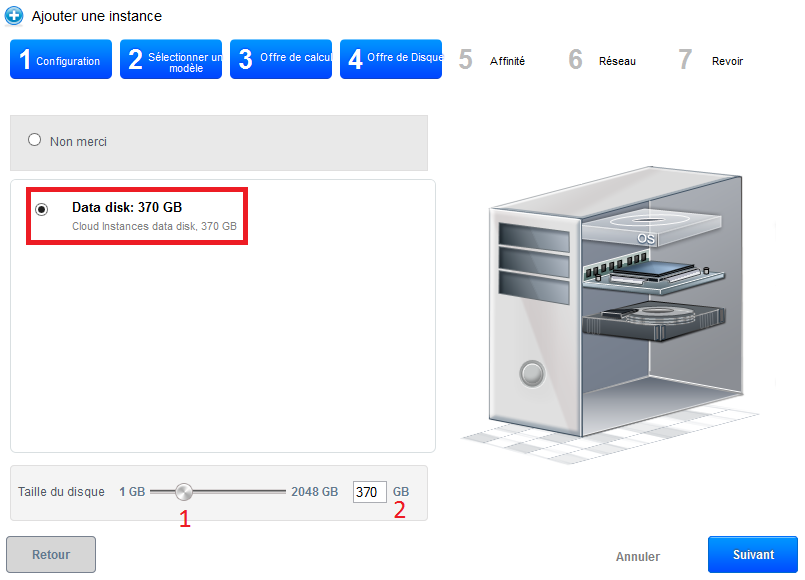
- Step 4 "Offers of data disc" :
Leave checked "No thanks", your instance will be deployed with a single disc of 50GB called ROOTDISK LVM partitioning lets you the possibility to adjust the size of your partitions later.
However, if you want to add a data disc (DATADISK ) In addition to your ROOTDISK de 50Go, select 'Data disk' then drag your cursor to get the size you want (1) or enter the size directly (2). A DATADISK is limited to 2To.
- Step 5 "Affinity" : Regarding the deployment of our trial, we have no affinity group, so you can click on «Next» :
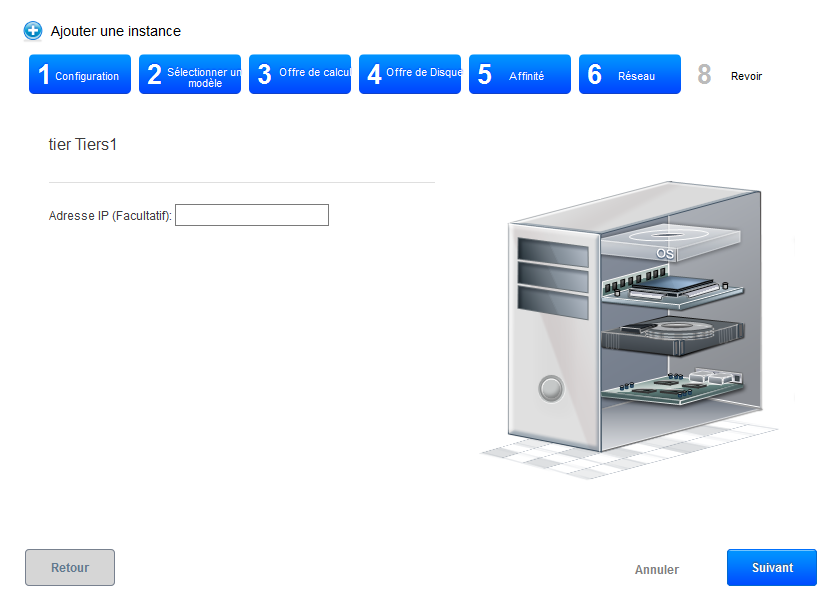
- Step 6 'Network' : You can enter an ip within your third CIDR. If you are not the system will do it for you and then click on «Next» :
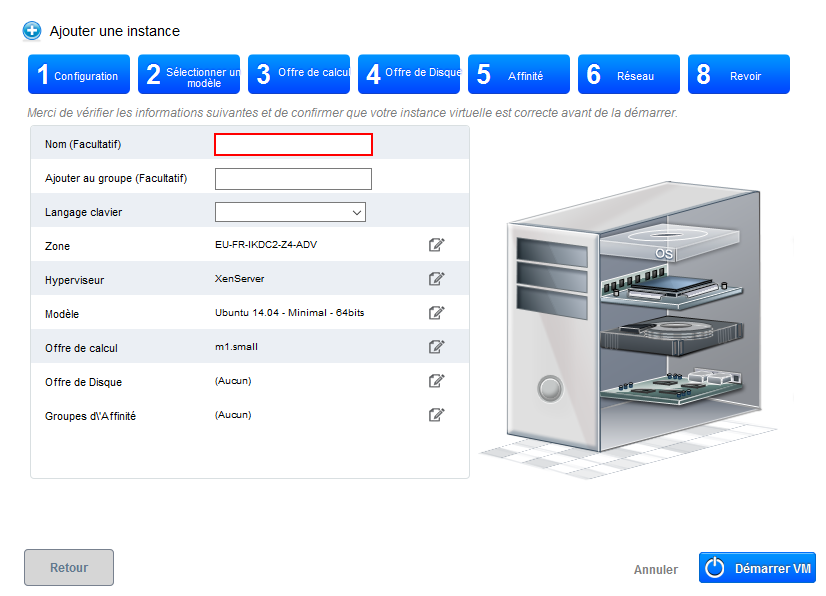
- Step 8 "Revise" : In this last step, give a name to your VM as it will then appear in your interface in the menu "instances " (Although optional, it is highly recommended ). Then check that all information is good (Provides calculation, zone, etc...;) :
Your instance appears in the list of the bodies in State "Creating"
A few seconds later a pop up window opens to show you the password generated for your new instance, you must note /copy it because it's the system password for your instance that you will therefore serve to connect to it.
A second pop-up window tells you that the task of adding your instance completes :
Step 4 Add a site-to-site VPN
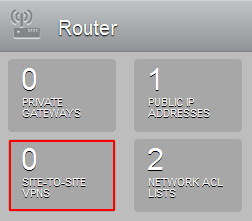
Click on "SITE-TO-SITE VPNS"
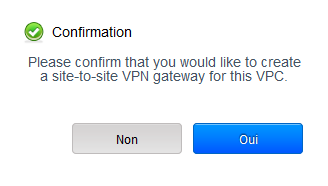
Confirm the creation of the site-to-site VPN :
VPN site to site appears in this way :
1. Switch to view "VPN connection"
2. Create a vpn connection
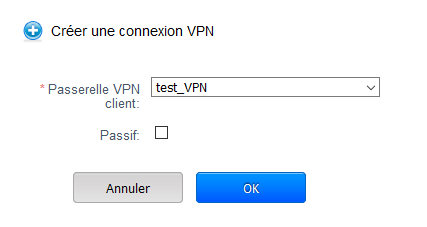
This window appears so choose the gateway creates previously.
If the "Passive" option is checked the connection will not pop up if it is interrupted
Refresh the page by selecting the view VPN gateway and then returning to the VPN connection view to ensure that the connection is in State "connected".
The configuration of a VPN site-to-site is complete side Cloud Public Ikoula.
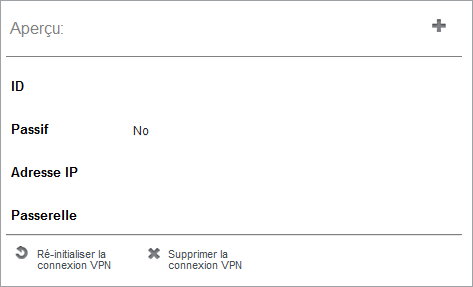
You can restart or remove the connection, passing your mouse cursor over the most at the end of line in the column "Preview" the next window appears then :










Enable comment auto-refresher