FTP Transfer Guide
de:Anleitung zur FTP-Übertragung nl:FTP Overdracht Gids it:Guida al trasferimento FTP fr:Guide du transfert par FTP en:FTP Transfer Guide
Server Ftp what's this ?
File Transfer Protocol (FTP) is an easy and convenient way to send files from a local station to an accommodation, or recovering files stored remotely in order to work on them. We will see in this guide the configuration of an FTP account on shared hosting Ikoula, connection through several heavy clients (FileZilla and WinSCP); in a second part, we will focus on setting up an FTP server on a Linux dedicated server.
Web Hosting
The Ikoula hosting packages (IK and IKL ranges) systematically offer the possibility of creating FTP accounts allowing the transfer of files. These accesses are easy to configure and have no time limit.
Account creation and configuration
The configuration is done in two steps :
- Connect to the Ikoula control panel
- Configure FTP access
The connection to the Ikoula control panel is done through the email address and password defined when creating your account Ikoula; in case of forgotten password, the eponymous function is available on the login page. For information, the identifiers have been sent to the registration email address in a welcome email.
The address of the control panel is the following (to keep in favorites) : https://order.ikoula.com/cp
Once connected, choose the hosting package in the drop-down list at the top right of the screen :
Then in the subpart that appears after the selection, choose "Acces FTP" :
Dans la nouvelle page qui apparaît, vous devriez à minima constater la présence d'un utilisateur au nom d'aléatoire - It is the default user.
Warning : in some IK / IKL packages, only an FTP account is available. We invite you to check the specifications of each pack on the next page: https://www.ikoula.com/en/web-hosting
In case you can add a new account, three parameters are to be determined :
- Where account name will be the FTP account login
- Where "Main Directory" will be the path in which the user will land when connecting.
- Where "Password" and "Confirm Password" will be the password associated with the account.
Once validated, the FTP account is immediately created and we can now switch to the connection.
User Login
By FileZilla
FileZilla is one of the popular software ; he supports many protocol including FTP and secure FTP (FTPS). We will see in this documentation information about the configuration of FileZilla allowing you to connect to send your files on your hosting. Note that a user must be created and configured, as indicated in the previous part of this page.
Download and install FileZilla
FileZilla is free and available for almost all current OS ; to install it, just go to the official website and select your OS, in order to recover the executable file. Its installation is done simply by executing the file recovered during the download; this software does not contain any add-ons and is reliable. Note that a portable version also exists for environments not allowing the installation of software.
Site official : https://filezilla-project.org/download.php?show_all=1
Once the installation is done, it is advisable to perform the updates if requested when opening the software for security purposes and additions of functions.
Explanations of the software
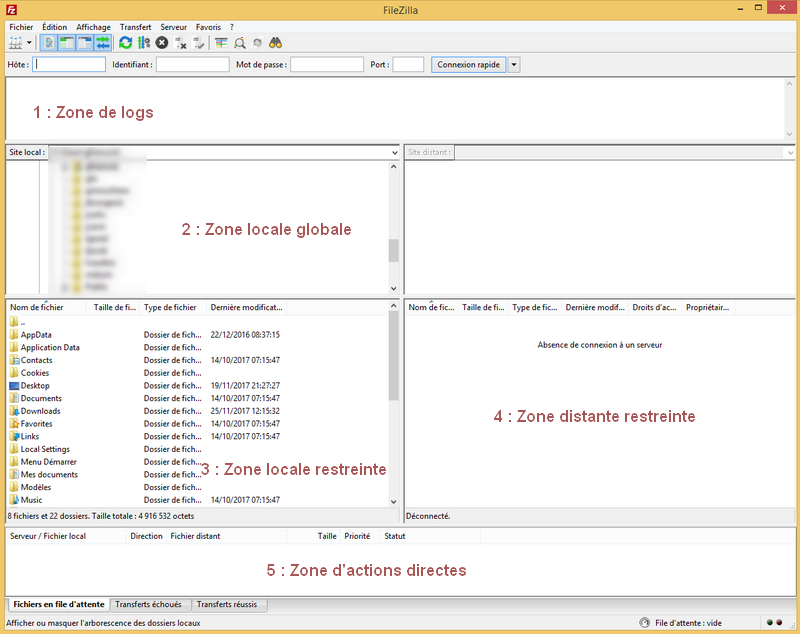
FileZilla is composed of 5 zones of which we will try to explain the functions :
- 1. The log area provides valuable information about the connection to the server, transfer errors, and alert messages. In case of problems, please provide us with the messages here.
- 2. The global local area allows file search on all disks and connected network devices, if present.
- 3. The restricted local area allows searching for files on a restricted area of the disks and defaults to Windows general folders, for example.
- 4. The remote remote zone is the display of the files present on the remote hosting.
- 5. The direct actions area shows current transfers, failed transfers and their rate of progress.
Once connected, a simple "drag-and-drop" between the local area (once the good folder to transfer localized) allows sending to the server (remote zone restricted).
Config FileZilla for his web hosting
We will now configure FileZilla so that it can connect to the FTP server and more specifically to the account configured at the beginning of the page.
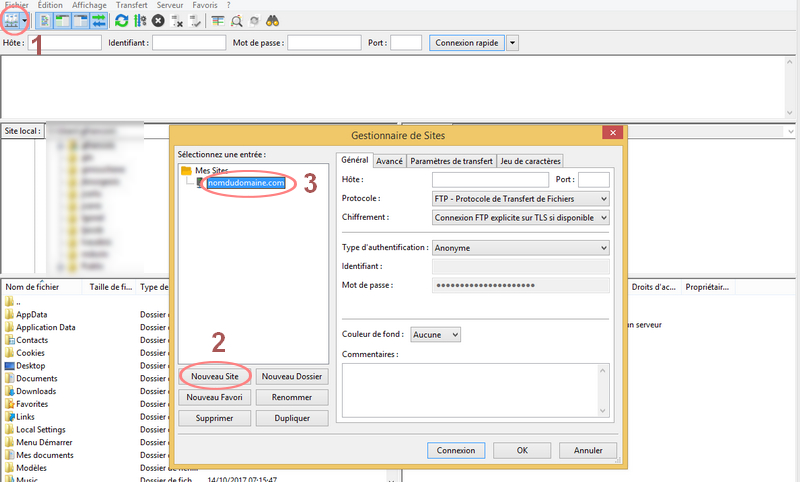
For this, we click on the button on the far left of the software menu.
A pane opens, we click on "New Site", to which we give a name easy to memorize.
In the right column of this new window are the connection information :
- Host: choose the IP address of your hosting or your domain name.
- Port: 21 (This is the FTP port)
- Protocol: FTP - File Transfer Protocol
- Encryption: Optional "FTP connection explicit on TLS if available" or "Simple FTP connection (unsecured)
- Authentication type: select normal (that is, a couple identifier + password)
- Identifier: The username of the FTP account created in the first section of this documentation
- Password: The password associated with the FTP user creates.
In the third "Transfer Settings" tab, we recommend that you select the "Passive" transfer mode.
Dedicated servers
We will see in this section the installation of a minimalist FTP server for sending and retrieving files on a dedicated server. We will take as an example an installation under Debian Stretch 9.
Installation
The first step is to make sure the machine is up to date :
$ apt update && apt upgrade -y
We will use the lightweight vsftpd secure FTP server. For now on Debian 9, the following command is enough :
$ apt install vsftpd
Once installed, we can check that the service listens on port 21 (default ftp port) :
$ lsof -i :21
COMMAND   PID USER   FD   TYPE DEVICE SIZE/OFF NODE NAME
vsftpd  10882 root    3u  IPv6 208338      0t0  TCP *:ftp (LISTEN)
If a firewall is configured on the machine or upstream (in Cloudstack offerings for example), it may be necessary to allow the port in TCP inputs and outputs.
Config
All configuration of the FTP server is done in the file "/etc/vsftpd.conf" We will authorize the transfer in ascii, by the following commands :
$ sed -i 's/#ascii_upload_enable=YES/ascii_upload_enable=YES/g' /etc/vsftpd.conf
$ sed -i 's/#ascii_download_enable=YES/ascii_download_enable=YES/g' /etc/vsftpd.conf
It also allows the right of writing to the users connecting :
$ sed -i 's/#write_enable=YES/write_enable=YES/g' /etc/vsftpd.conf
Finally, we enable SSL to optimize server security :
$ sed -i 's/#ssl_enable=YES/ssl_enable=YES/g' /etc/vsftpd.conf
Restart server vsftpd :
$ systemctl restart vsftpd
Create user
You can easily create new vsftpd ftp server users, which by default are similar to system users. To add a user, you just need to create a new user by useradd and give it a default directory if desired (otherwise it will connect to / home / user):
# Create the user and assign him a password
$ adduser user
# Edit user home
$ usermod -d /root/of/the/user folder
# Then give him the right rights
$ chown user /root/of/the/folder
Connection
The connection is similar to the method described earlier in this documentation.
The host will be the IP address or the A-field of the server
The identifier the system user creates (in our example: "user")
The password that is created during the user creation step (adduser command)
The port will be 21, (lsof -i: 21 to confirm on the machine)


