Difference between revisions of "Setting up a Hosted Exchange account on iPhone"
⧼vector-jumptonavigation⧽
⧼vector-jumptosearch⧽
| Line 1: | Line 1: | ||
| − | |||
| − | |||
| − | |||
| − | |||
| − | |||
| − | |||
<br /> | <br /> | ||
This article has been created by an automatic translation software. You can view the article source [[:fr:Configuration d'un compte Hosted Exchange sur iPhone|here]].<br /><span data-translate="fr"></span> | This article has been created by an automatic translation software. You can view the article source [[:fr:Configuration d'un compte Hosted Exchange sur iPhone|here]].<br /><span data-translate="fr"></span> | ||
| + | |||
| + | <span data-link_translate_de_title="Hosted Exchange Konto auf dem iPhone einrichten" data-link_translate_de_url="Hosted+Exchange+Konto+auf+dem+iPhone+einrichten"></span>[[:fr::de:Hosted Exchange Konto auf dem iPhone einrichten]][[:fr:de:Hosted Exchange Konto auf dem iPhone einrichten]] | ||
| + | |||
| + | |||
| + | |||
| Line 13: | Line 12: | ||
<!--T:1--> | <!--T:1--> | ||
| − | By following this tutorial step by step, you can configure your account <span class="notranslate">Exchange</span> on your iPhone. | + | By following this tutorial step by step, you can configure your account <span class="notranslate">Exchange</span> on your iPhone. |
<!--T:2--> | <!--T:2--> | ||
| − | # When you are on the home screen of your iPhone, you must then click on the button '''Settings ''' | + | # When you are on the home screen of your iPhone, you must then click on the button '''Settings''' |
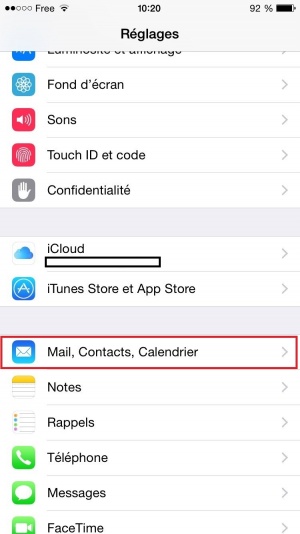
| − | # | + | # In the settings menu choose '''Mail''' > '''Contacts''' > '''Calendar ''' <br />[[File:Ex10_iphone_0.jpg|300px]]<br /> |
| − | # Then select '''Add an account....''' | + | # Then select '''Add an account....''' |
| − | # Then choose <span class="notranslate">'''Exchange'''</span> in the drop-down list <br />[[File:Ex10_iphone_1.jpg|300px]]<br /> | + | # Then choose <span class="notranslate">'''Exchange'''</span> in the drop-down list <br />[[File:Ex10_iphone_1.jpg|300px]]<br /> |
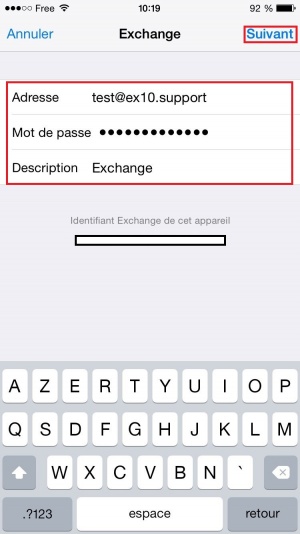
| − | # Fill out your account information and select a description for the account <br />[[File:Ex10_iphone_2.jpg|300px]]<br /> | + | # Fill out your account information and select a description for the account <br />[[File:Ex10_iphone_2.jpg|300px]]<br /> |
| − | # Simply click continue <br />[[File:Ex10_iphone_3.jpg|300px]]<br /> | + | # Simply click continue <br />[[File:Ex10_iphone_3.jpg|300px]]<br /> |
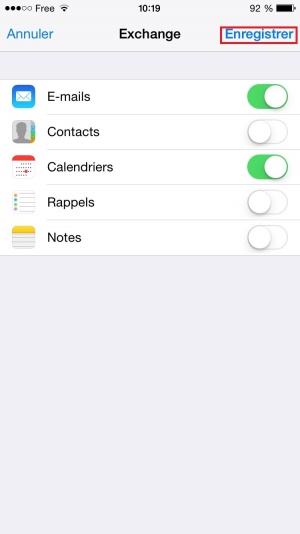
| − | # Select the data to be synchronized among the proposed list and press on '''Save '''. The account will synchronize and retrieve selected data. <br />[[File:Ex10_iphone_4.jpg|300px]] | + | # Select the data to be synchronized among the proposed list and press on '''Save '''. The account will synchronize and retrieve selected data. <br />[[File:Ex10_iphone_4.jpg|300px]] |
<!--T:3--> | <!--T:3--> | ||
<br /> | <br /> | ||
| − | You can at any time change the synchronization parameters by repeating the steps 1 | + | You can at any time change the synchronization parameters by repeating the steps 1 et 2 and then selecting the account configured in step 5.<br /> |
[[File:Ex10_iphone_5.jpg|300px]] | [[File:Ex10_iphone_5.jpg|300px]] | ||
<br /><br /> | <br /><br /> | ||
<!--T:4--> | <!--T:4--> | ||
| − | + | This article seemed you to be u ? <vote /> | |
[[Category:Hosted_Exchange]] | [[Category:Hosted_Exchange]] | ||
[[Category:iPhone]] | [[Category:iPhone]] | ||
| + | <br /> | ||
<comments /> | <comments /> | ||
Revision as of 15:46, 6 October 2015
This article has been created by an automatic translation software. You can view the article source here.
fr::de:Hosted Exchange Konto auf dem iPhone einrichtenfr:de:Hosted Exchange Konto auf dem iPhone einrichten
By following this tutorial step by step, you can configure your account Exchange on your iPhone.
- When you are on the home screen of your iPhone, you must then click on the button Settings
- In the settings menu choose Mail > Contacts > Calendar
- Then select Add an account....
- Then choose Exchange in the drop-down list

- Fill out your account information and select a description for the account
- Simply click continue

- Select the data to be synchronized among the proposed list and press on Save . The account will synchronize and retrieve selected data.


You can at any time change the synchronization parameters by repeating the steps 1 et 2 and then selecting the account configured in step 5.

This article seemed you to be u ?
0
Enable comment auto-refresher