Difference between revisions of "Configuring Outlook 2010 - MAPI"
| Line 1: | Line 1: | ||
| − | |||
| − | |||
| − | |||
| − | |||
| − | |||
| − | |||
<br /> | <br /> | ||
This article has been created by an automatic translation software. You can view the article source [[:fr:Configuration Outlook 2010 - MAPI|here]].<br /><span data-translate="fr"></span> | This article has been created by an automatic translation software. You can view the article source [[:fr:Configuration Outlook 2010 - MAPI|here]].<br /><span data-translate="fr"></span> | ||
| + | <span data-link_translate_de_title="Konfigurieren von Outlook 2010 - MAPI" data-link_translate_de_url="Konfigurieren+von+Outlook+2010+-+MAPI"></span>[[:fr::de:Konfigurieren von Outlook 2010 - MAPI]][[:fr:de:Konfigurieren von Outlook 2010 - MAPI]] | ||
| − | |||
| − | |||
| − | + | ||
| + | '''''How to configure his Outlook mail client 2010 for a MAPI connection (ie: <span class="notranslate">Exchange</span> with synchronization of mail, contacts, Clendars, etc.)''''' | ||
| + | |||
| + | |||
| + | 1. Select the "Mail" from the control panel of your PC icon. | ||
| + | |||
| + | If you already have one or several mail accounts on your PC click 'Show profiles'. | ||
[[File:EX10 ConfOutl10mapi 0.png|EX10_ConfOutl10mapi_0.png]] | [[File:EX10 ConfOutl10mapi 0.png|EX10_ConfOutl10mapi_0.png]] | ||
| Line 27: | Line 26: | ||
| − | 3. The window "Choose a service " | + | 3. The window "Choose a service " is displayed. Check the box "Email account" and then click NCt. |
[[File:EX10 ConfOutl10mapi 2.png|EX10_ConfOutl10mapi_2.png]] | [[File:EX10 ConfOutl10mapi 2.png|EX10_ConfOutl10mapi_2.png]] | ||
| − | 4. Then select "Manually configure server settings and additional server types ". Click on | + | 4. Then select "Manually configure server settings and additional server types ". Click on next. |
[[File:EX10 ConfOutl10mapi 3.png|EX10_ConfOutl10mapi_3.png]] | [[File:EX10 ConfOutl10mapi 3.png|EX10_ConfOutl10mapi_3.png]] | ||
| − | 5. Select "Microsoft <span class="notranslate">Exchange</span> or a | + | 5. Select "Microsoft <span class="notranslate">Exchange</span> or a compatible serivce". Click on next. |
[[File:EX10 ConfOutl10mapi 4.png|EX10_ConfOutl10mapi_4.png]] | [[File:EX10 ConfOutl10mapi 4.png|EX10_ConfOutl10mapi_4.png]] | ||
| − | 6. In the field "Server ", inform " | + | 6. In the field "Server", inform "cas.ex10"Pr". Uncheck "Use mode <span class="notranslate">Exchange</span> cached ". |
| − | The user name to learn is that was provided to you by your provider (the form utilisateur@domaine. | + | The user name to learn is that was provided to you by your provider (the form utilisateur@domaine.com). |
[[File:EX10 ConfOutl10mapi 5.png|EX10_ConfOutl10mapi_5.png]] | [[File:EX10 ConfOutl10mapi 5.png|EX10_ConfOutl10mapi_5.png]] | ||
| − | 7. Click then on '''"Additional settings" '''. The window | + | 7. Click then on '''"Additional settings" '''. The access to the server configuration window <span class="notranslate">Exchange</span> appears : |
[[File:EX10 ConfOutl10mapi 6.gif|EX10_ConfOutl10mapi_6.gif]] | [[File:EX10 ConfOutl10mapi 6.gif|EX10_ConfOutl10mapi_6.gif]] | ||
| − | 8. Go to the tab '''"Connection" ''' | + | 8. Go to the tab '''"Connection" ''' and check the bo '''"To connect to the mailbox |! _" with HTTP" <span class="notranslate">Exchange</span> . Then clic'''"Setting proxy |! _" ex '''. Under 'Connectio <span class="notranslate">Exchange</span>”'''. |
[[File:EX10 ConfOutl10mapi 7.gif|EX10_ConfOutl10mapi_7.gif]] | [[File:EX10 ConfOutl10mapi 7.gif|EX10_ConfOutl10mapi_7.gif]] | ||
| − | 9 | + | 9.biz : ex10.biz |
| − | a ''' | + | a '''"Basic authentication" ''' Al '''On fast networks, connect... |'''. |
| − | + | Then, click OK. "Once back on the screen " | |
| − | click Next. | + | click Next. |
[[File:EX10 ConfOutl10mapi 8.png|EX10_ConfOutl10mapi_8.png]] | [[File:EX10 ConfOutl10mapi 8.png|EX10_ConfOutl10mapi_8.png]] | ||
| − | . Your password will be asked. Fill it in, and then click OK.6 . The end of configuration appears window. Click Finish. | + | . Your password will be asked. Fill it in, and then click OK. 6 . The end of configuration appears window. Click Finish. |
| − | 10The new profile will appear in the profiles window. If you want this | + | 10The new profile will appear in the profiles window. If you want this |
| − | + | 11Always use this profile | |
[[File:EX10 ConfOutl10mapi 8.jpg|EX10_ConfOutl10mapi_8.jpg]] | [[File:EX10 ConfOutl10mapi 8.jpg|EX10_ConfOutl10mapi_8.jpg]] | ||
| − | + | in the profiles window. Click OK to close the window. "Once your account is confi" | |
| − | + | <span class="notranslate">Exchange</span>. | |
[[Category:Hosted_Exchange]] | [[Category:Hosted_Exchange]] | ||
| + | <br /> | ||
<comments /> | <comments /> | ||
Revision as of 14:42, 6 October 2015
This article has been created by an automatic translation software. You can view the article source here.
fr::de:Konfigurieren von Outlook 2010 - MAPIfr:de:Konfigurieren von Outlook 2010 - MAPI
How to configure his Outlook mail client 2010 for a MAPI connection (ie: Exchange with synchronization of mail, contacts, Clendars, etc.)
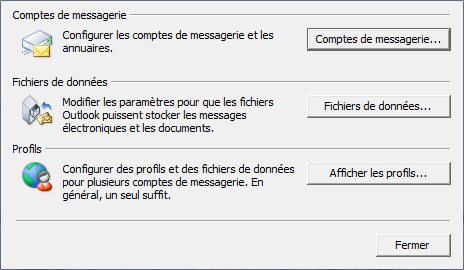
1. Select the "Mail" from the control panel of your PC icon.
If you already have one or several mail accounts on your PC click 'Show profiles'.
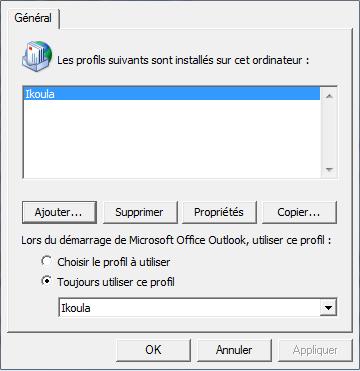
2. Create a new profile by clicking on 'Add'.
Write the name of this new profile, and click OK.
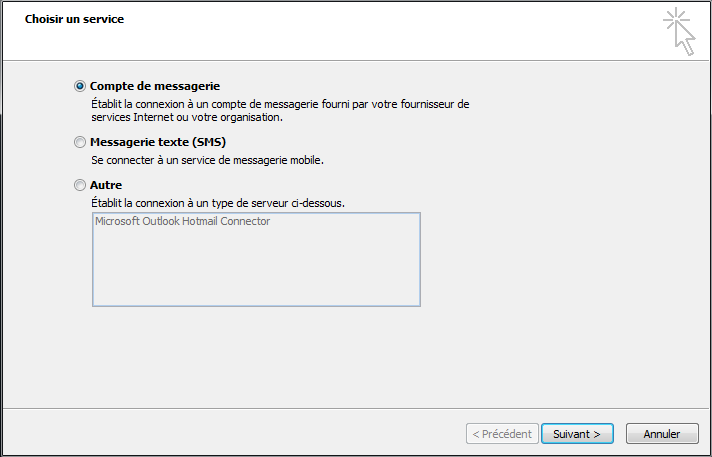
3. The window "Choose a service " is displayed. Check the box "Email account" and then click NCt.
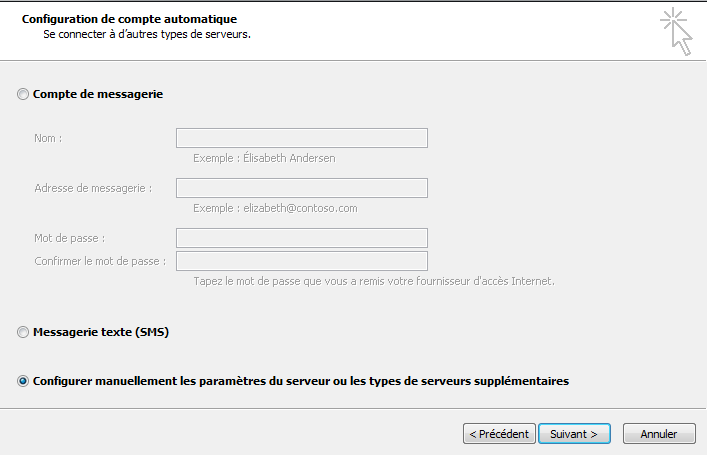
4. Then select "Manually configure server settings and additional server types ". Click on next.
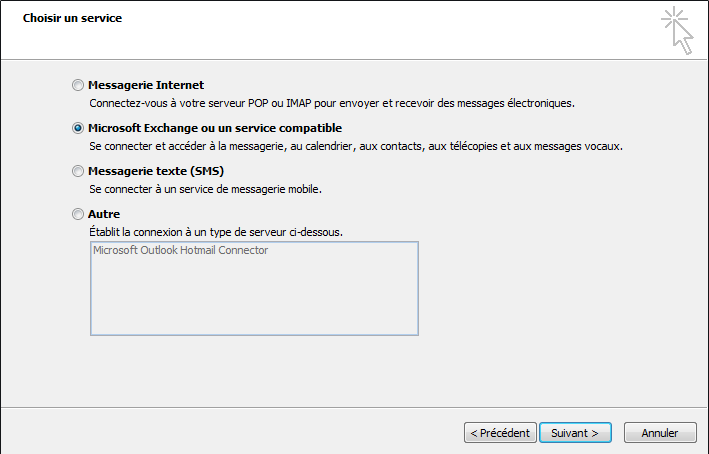
5. Select "Microsoft Exchange or a compatible serivce". Click on next.
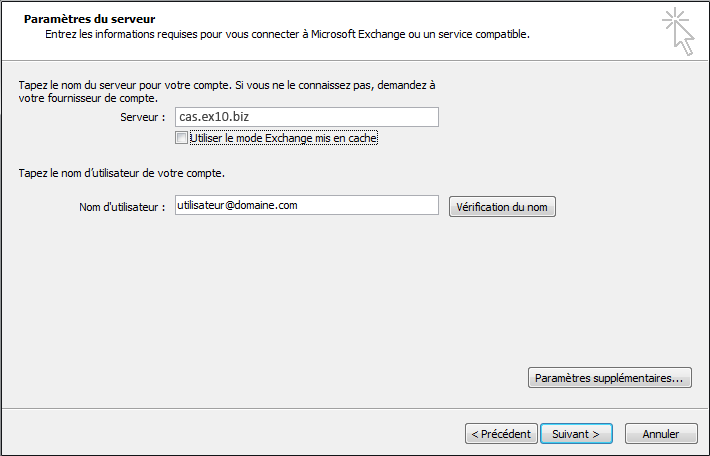
6. In the field "Server", inform "cas.ex10"Pr". Uncheck "Use mode Exchange cached ".
The user name to learn is that was provided to you by your provider (the form utilisateur@domaine.com).
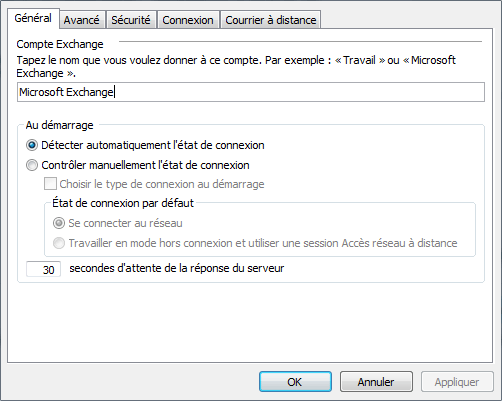
7. Click then on "Additional settings" . The access to the server configuration window Exchange appears :
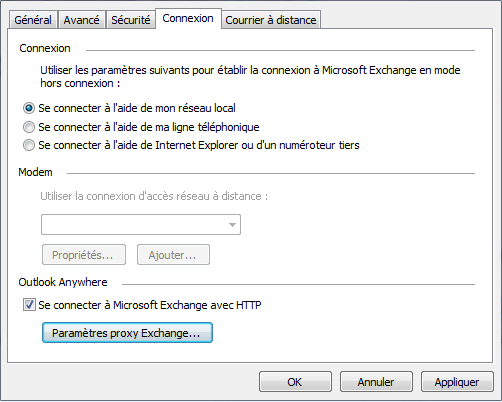
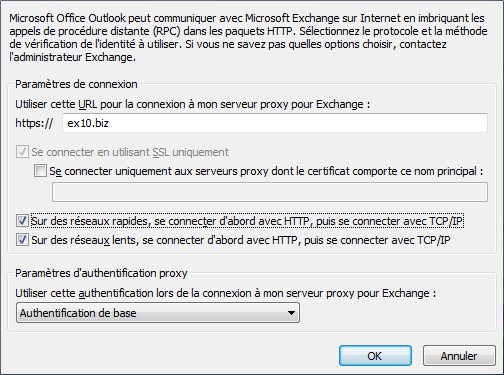
8. Go to the tab "Connection" and check the bo "To connect to the mailbox |! _" with HTTP" Exchange . Then clic"Setting proxy |! _" ex . Under 'Connectio Exchange”.
9.biz : ex10.biz
a "Basic authentication" Al On fast networks, connect... |.
Then, click OK. "Once back on the screen "
click Next.
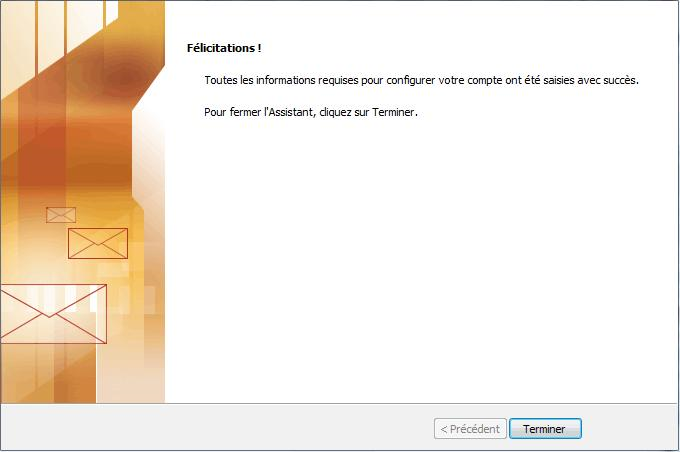
. Your password will be asked. Fill it in, and then click OK. 6 . The end of configuration appears window. Click Finish.
10The new profile will appear in the profiles window. If you want this
11Always use this profile
in the profiles window. Click OK to close the window. "Once your account is confi"
Exchange.
Enable comment auto-refresher