Difference between revisions of "Configuring Outlook 2010 - POP"
| Line 1: | Line 1: | ||
| − | |||
| − | |||
| − | '''''How to configure a mailbox <span class="notranslate">Exchange</span> on your Outlook application 2010 for a | + | This article has been created by an automatic translation software. You can view the article source [[:fr:Configuration Outlook 2010 - POP|here]].<br /><span data-translate="fr"></span> |
| + | |||
| + | '''''How to configure a mailbox <span class="notranslate">Exchange</span> on your Outlook application 2010 for a POP connection ?''''' | ||
Select the "Mail" from the control panel of your PC icon. | Select the "Mail" from the control panel of your PC icon. | ||
| Line 11: | Line 11: | ||
| − | If you want to associate the | + | If you want to associate the POP account with the default Outlook profile |
| − | If you want to create a new profile for the | + | If you want to create a new profile for the POP account |
| − | '''1. If you want to associate the | + | '''1. If you want to associate the POP account with the default Outlook profile ''' |
| − | - Click on ' | + | - Click on 'E-mail accounts' |
[[File:EX10 ConfOutl10pop 0.png|EX10_ConfOutl10pop_0.png]] | [[File:EX10 ConfOutl10pop 0.png|EX10_ConfOutl10pop_0.png]] | ||
| Line 28: | Line 28: | ||
The "Choose a messaging service" window appears. | The "Choose a messaging service" window appears. | ||
| − | Select "Microsoft <span class="notranslate">Exchange</span> | + | Select "Microsoft <span class="notranslate">Exchange</span>'. POP 3«, IMAP or http "and click"Nex t": |
[[File:EX10 ConfOutl10pop 1.png|EX10_ConfOutl10pop_1.png]] | [[File:EX10 ConfOutl10pop 1.png|EX10_ConfOutl10pop_1.png]] | ||
| Line 36: | Line 36: | ||
| − | '''1.1 -If you want to create a new profile for the | + | '''1.1 -If you want to create a new profile for the POP account ''' |
| − | - Click | + | - Click 'Show profiles' |
[[File:EX10 ConfOutl10pop 2.png|EX10_ConfOutl10pop_2.png]] | [[File:EX10 ConfOutl10pop 2.png|EX10_ConfOutl10pop_2.png]] | ||
| − | - Create a new profile by clicking | + | - Create a new profile by clicking 'Add' |
Write the name of the new profile and click OK : | Write the name of the new profile and click OK : | ||
| Line 52: | Line 52: | ||
2- The "Automatic Configuration" window appears. | 2- The "Automatic Configuration" window appears. | ||
| − | Fill in the different fields and check the | + | Fill in the different fields and check the "Manually configure server settings or additional server types" |
Then click Nex t : | Then click Nex t : | ||
| Line 65: | Line 65: | ||
Enter your name and email address. | Enter your name and email address. | ||
| − | Account type : ''' | + | Account type : '''POP 3''' |
Incoming mail server : '''ex 10.biz ''' | Incoming mail server : '''ex 10.biz ''' | ||
| − | Outgoing mail server : ''' | + | Outgoing mail server : ''''. SMTP .ex 10.biz ''' |
Username : '''indicate your login ''' | Username : '''indicate your login ''' | ||
Password : '''specify your password ''' | Password : '''specify your password ''' | ||
| − | Then click on " | + | Then click on "Additional settings" : |
[[File:EX10 ConfOutl10pop 6.png|EX10_ConfOutl10pop_6.png]] | [[File:EX10 ConfOutl10pop 6.png|EX10_ConfOutl10pop_6.png]] | ||
| − | - Go to the "Outgoing server" tab and check the box "my server outgoing | + | - Go to the "Outgoing server" tab and check the box "my server outgoing ('. SMTP ) requires authentication |
| − | + | Then check the box "Use same settings as my mail server incoming" | |
[[File:EX10 ConfOutl10pop 7.png|EX10_ConfOutl10pop_7.png]] | [[File:EX10 ConfOutl10pop 7.png|EX10_ConfOutl10pop_7.png]] | ||
| − | - | + | - Then go to the 'Advanced Options' tab |
| − | Cochez la case « Ce serveur nécessite une connex ion chiffrées ( | + | Cochez la case « Ce serveur nécessite une connex ion chiffrées ('. SSL ). » |
| − | + | Incoming server (POP 3) : '''995''' | |
| − | + | Outgoing server ('. SMTP ) : '''587''' | |
| − | « Utiliser le type de connex ion chiffrée suivant » : ''' | + | « Utiliser le type de connex ion chiffrée suivant » : '''TLS ''' |
Cochez la case « Laisser un ex emplaire des messages sur le serveur » | Cochez la case « Laisser un ex emplaire des messages sur le serveur » | ||
| − | + | Click OK. | |
[[File:EX10 ConfOutl10pop 8.png|EX10_ConfOutl10pop_8.png]] | [[File:EX10 ConfOutl10pop 8.png|EX10_ConfOutl10pop_8.png]] | ||
| Line 99: | Line 99: | ||
[[Category:Hosted_Exchange]] | [[Category:Hosted_Exchange]] | ||
| − | + | <comments /> | |
Revision as of 15:36, 23 September 2015
This article has been created by an automatic translation software. You can view the article source here.
How to configure a mailbox Exchange on your Outlook application 2010 for a POP connection ?
Select the "Mail" from the control panel of your PC icon.
You have two possibilities of configuration :
If you want to associate the POP account with the default Outlook profile
If you want to create a new profile for the POP account
1. If you want to associate the POP account with the default Outlook profile
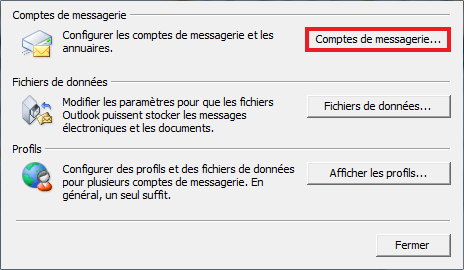
- Click on 'E-mail accounts'
The 'E-mail accounts' window appears. In the 'Mail' tab, click New.
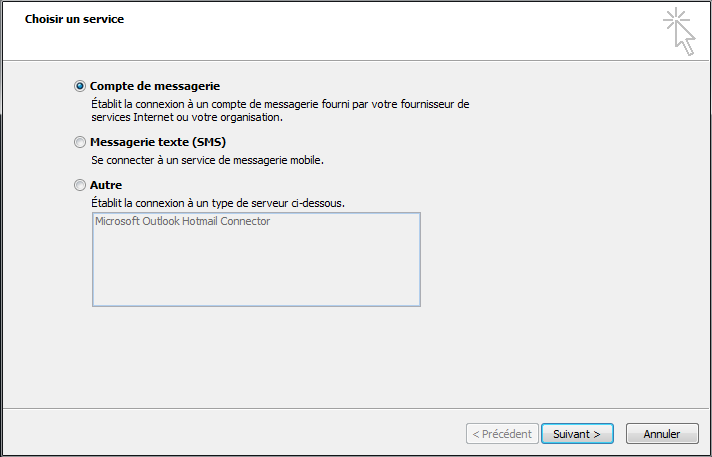
The "Choose a messaging service" window appears. Select "Microsoft Exchange'. POP 3«, IMAP or http "and click"Nex t":
Proceed to the nex t step.
1.1 -If you want to create a new profile for the POP account
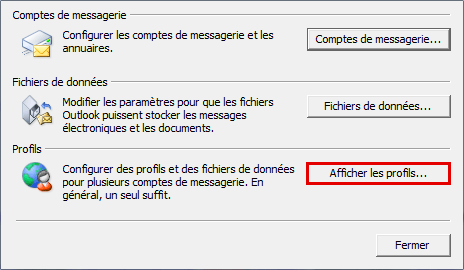
- Click 'Show profiles'
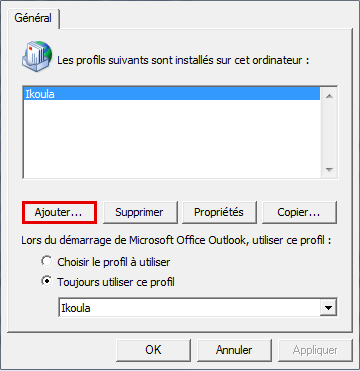
- Create a new profile by clicking 'Add' Write the name of the new profile and click OK :
Proceed to the nex t step.
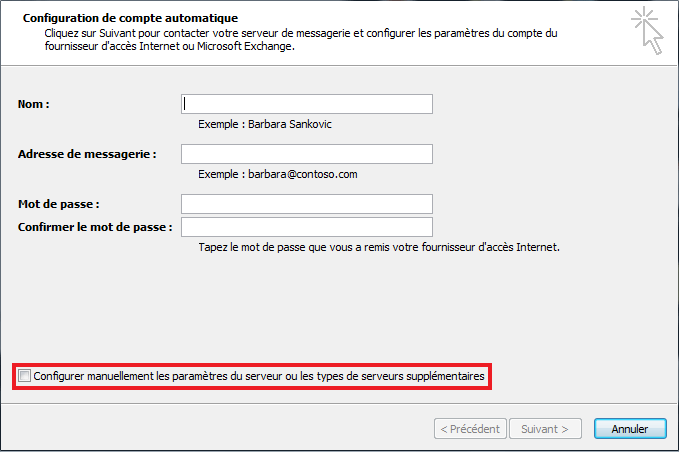
2- The "Automatic Configuration" window appears.
Fill in the different fields and check the "Manually configure server settings or additional server types" Then click Nex t :
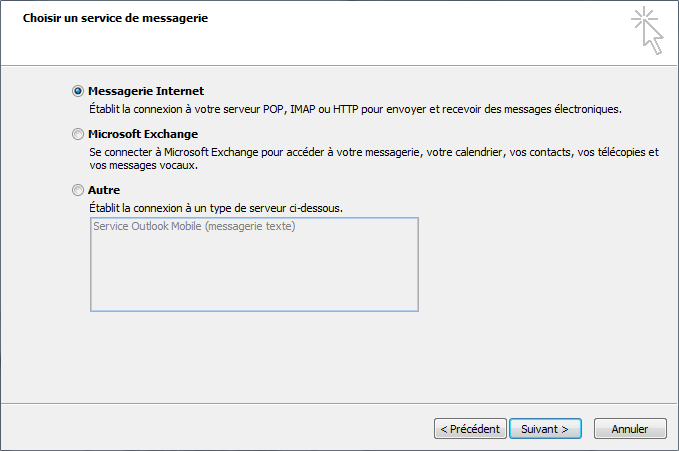
- The "Choose a messaging service" window appears. Cocher la case « Messagerie Internet » puis cliquer sur Suivant :
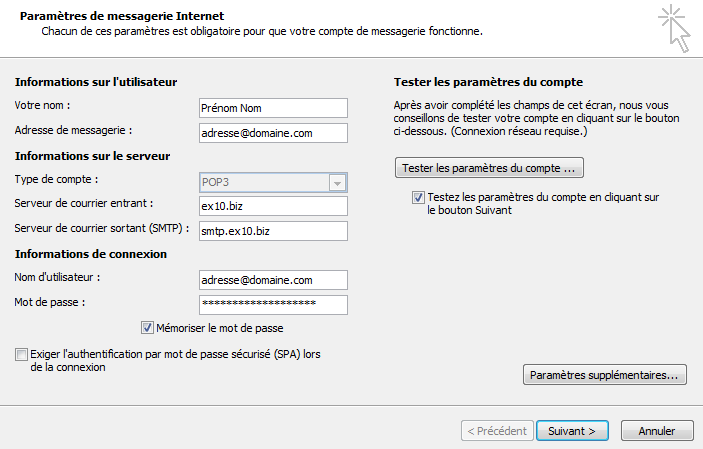
- The "Internet e-mail settings" window appears. Enter your name and email address.
Account type : POP 3 Incoming mail server : ex 10.biz Outgoing mail server : '. SMTP .ex 10.biz
Username : indicate your login Password : specify your password
Then click on "Additional settings" :
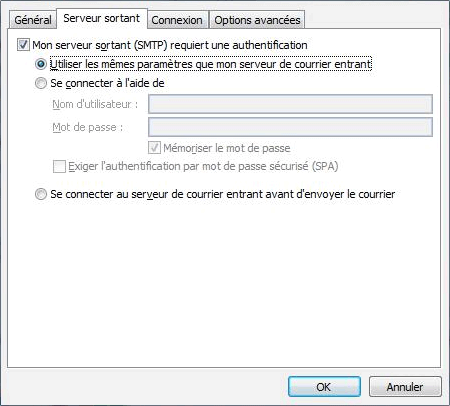
- Go to the "Outgoing server" tab and check the box "my server outgoing ('. SMTP ) requires authentication
Then check the box "Use same settings as my mail server incoming"
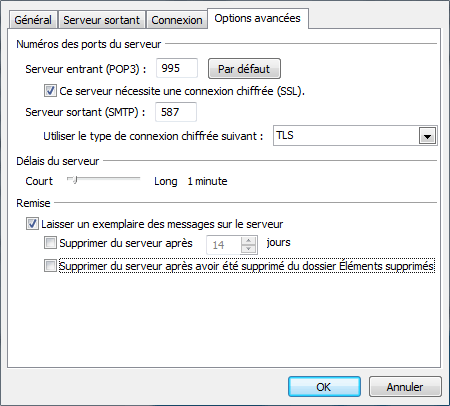
- Then go to the 'Advanced Options' tab
Cochez la case « Ce serveur nécessite une connex ion chiffrées ('. SSL ). »
Incoming server (POP 3) : 995 Outgoing server ('. SMTP ) : 587
« Utiliser le type de connex ion chiffrée suivant » : TLS
Cochez la case « Laisser un ex emplaire des messages sur le serveur »
Click OK.
Enable comment auto-refresher