Difference between revisions of "Configuring Outlook 2010 - MAPI"
| Line 1: | Line 1: | ||
| − | |||
| − | This article has been created by an automatic translation software. You can view the article source [[:fr:Configuration Outlook 2010 - MAPI|here]].<br /> | + | |
| + | This article has been created by an automatic translation software. You can view the article source [[:fr:Configuration Outlook 2010 - MAPI|here]].<br /><span data-translate="fr"></span> | ||
'''''How to configure his Outlook mail clIE nt 2010 for a MAPI connection (IE : <span class="notranslate">Exchange</span> avec synchronisation de mails, contacts, calendrIE rs, etc.)''''' | '''''How to configure his Outlook mail clIE nt 2010 for a MAPI connection (IE : <span class="notranslate">Exchange</span> avec synchronisation de mails, contacts, calendrIE rs, etc.)''''' | ||
| − | 1. Sélectionnez l’icône “CourrIE | + | 1. Sélectionnez l’icône “CourrIE rChoose then under du Panneau de Configuration de votre PC . |
| − | Si vous disposez déjà d'un ou de plusIE urs cOM ptes mails sur votre PC cliquez sur “Afficher | + | Si vous disposez déjà d'un ou de plusIE urs cOM ptes mails sur votre PC cliquez sur “Afficher profilsChoose then under . |
[[File:EX10 ConfOutl10mapi 0.png|EX10_ConfOutl10mapi_0.png]] | [[File:EX10 ConfOutl10mapi 0.png|EX10_ConfOutl10mapi_0.png]] | ||
| Line 20: | Line 20: | ||
| − | 3. The window "Choose a service " s'affiche. Cocher la case “COM pte de messagerIE | + | 3. The window "Choose a service " s'affiche. Cocher la case “COM pte de messagerIE Choose then under puis . The end of configuration appears window. Click Finish. |
[[File:EX10 ConfOutl10mapi 2.png|EX10_ConfOutl10mapi_2.png]] | [[File:EX10 ConfOutl10mapi 2.png|EX10_ConfOutl10mapi_2.png]] | ||
| − | 4. Then select "Manually configure server settings and additional server types ". Click on | + | 4. Then select "Manually configure server settings and additional server types ". Click on nChoose then under t. |
[[File:EX10 ConfOutl10mapi 3.png|EX10_ConfOutl10mapi_3.png]] | [[File:EX10 ConfOutl10mapi 3.png|EX10_ConfOutl10mapi_3.png]] | ||
| − | 5. Select "Microsoft <span class="notranslate">Exchange</span> or a cOM patible serivce ". Click on | + | 5. Select "Microsoft <span class="notranslate">Exchange</span> or a cOM patible serivce ". Click on nChoose then under t. |
[[File:EX10 ConfOutl10mapi 4.png|EX10_ConfOutl10mapi_4.png]] | [[File:EX10 ConfOutl10mapi 4.png|EX10_ConfOutl10mapi_4.png]] | ||
| − | 6. In the field "Server ", inform "CAs. | + | 6. In the field "Server ", inform "CAs.Choose then under 10"Proxy authentication settings" ". Uncheck "Use mode <span class="notranslate">Exchange</span> cached ". |
The user name to learn is that was provided to you by your provider (the form utilisateur@domaine.cOM ). | The user name to learn is that was provided to you by your provider (the form utilisateur@domaine.cOM ). | ||
| Line 47: | Line 47: | ||
| − | 8. Go to the tab '''"Connection" ''' and check the box '''"To connect to the mailbox <span class="notranslate">Exchange</span> | + | 8. Go to the tab '''"Connection" ''' and check the box '''"To connect to the mailbox |! _" with HTTP"<span class="notranslate">Exchange</span> . Then click on the button '''. Click then on le bouton '''. Under 'Connection settings', enter the HTTPS address <span class="notranslate">Exchange</span>Choose then under '''. |
[[File:EX10 ConfOutl10mapi 7.gif|EX10_ConfOutl10mapi_7.gif]] | [[File:EX10 ConfOutl10mapi 7.gif|EX10_ConfOutl10mapi_7.gif]] | ||
| − | 9 | + | 9"Proxy authentication settings" : Choose then under 10"Proxy authentication settings" |
| − | Choose then under | + | a '''"Basic authentication" ''' Also check the '''On fast networks, connect... |'''. |
| − | Also | + | Then, click OK. "Once back on the screen " |
| − | Then, click OK. | + | click Next. |
[[File:EX10 ConfOutl10mapi 8.png|EX10_ConfOutl10mapi_8.png]] | [[File:EX10 ConfOutl10mapi 8.png|EX10_ConfOutl10mapi_8.png]] | ||
| − | + | . Your password will be asked. Fill it in, and then click OK.6 . The end of configuration appears window. Click Finish. | |
| − | + | 10The new profile will appear in the profiles window. If you want this profile to be the default to opening Outlook, select the option | |
| Line 71: | Line 71: | ||
| − | Le nouveau profil appears ra dans la fenêtre des profils. Si vous désirez que ce profil soit celui par défaut à l'ouverture d'Outlook, sélectionnez alors l’option " | + | Le nouveau profil appears ra dans la fenêtre des profils. Si vous désirez que ce profil soit celui par défaut à l'ouverture d'Outlook, sélectionnez alors l’option "Once your account is configured, open your Outlook client software. A user name and a password you will be asked, insert the data of your e-mail account. If everything is correct, you will be able to access your account on the server " |
| Line 78: | Line 78: | ||
[[Category:Hosted_Exchange]] | [[Category:Hosted_Exchange]] | ||
| − | + | <comments /> | |
Revision as of 15:36, 23 September 2015
This article has been created by an automatic translation software. You can view the article source here.
How to configure his Outlook mail clIE nt 2010 for a MAPI connection (IE : Exchange avec synchronisation de mails, contacts, calendrIE rs, etc.)
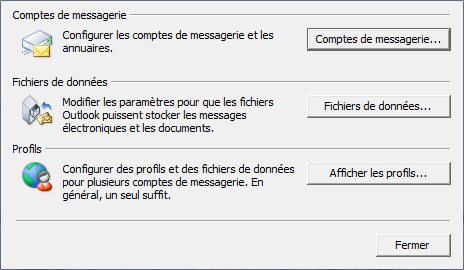
1. Sélectionnez l’icône “CourrIE rChoose then under du Panneau de Configuration de votre PC .
Si vous disposez déjà d'un ou de plusIE urs cOM ptes mails sur votre PC cliquez sur “Afficher profilsChoose then under .
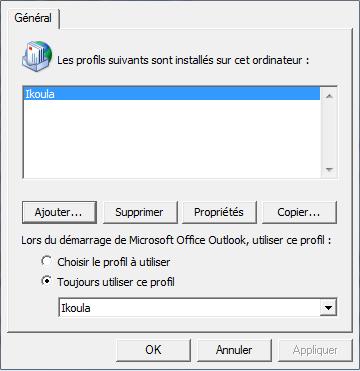
2. Create a new profile by clicking on 'Add'.
Write the name of this new profile, and click OK.
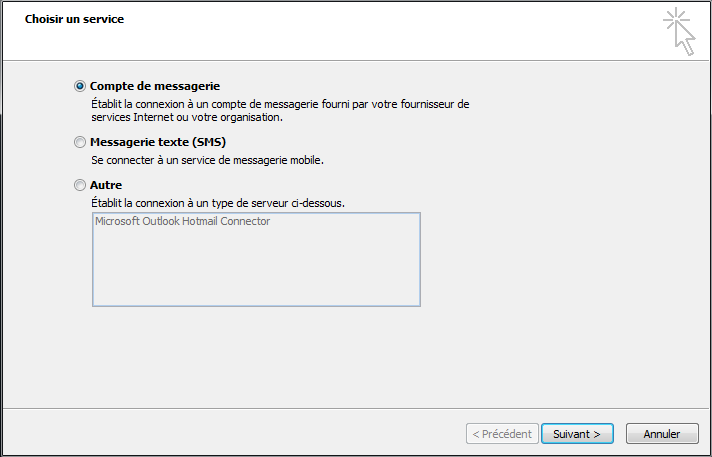
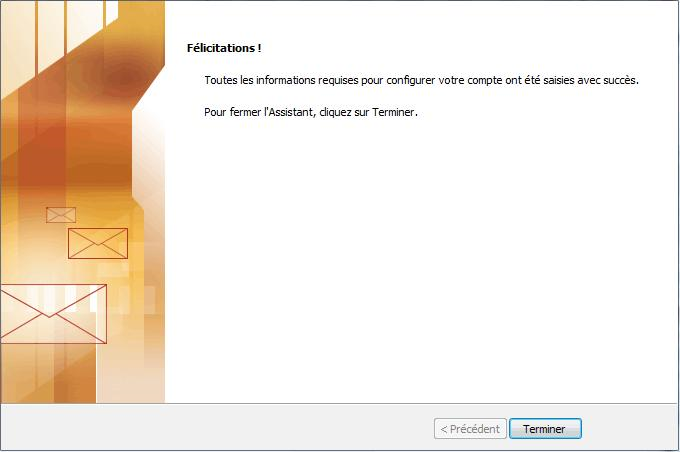
3. The window "Choose a service " s'affiche. Cocher la case “COM pte de messagerIE Choose then under puis . The end of configuration appears window. Click Finish.
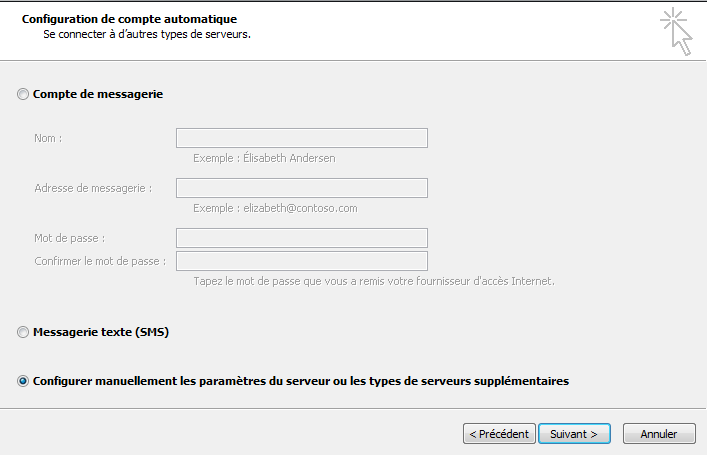
4. Then select "Manually configure server settings and additional server types ". Click on nChoose then under t.
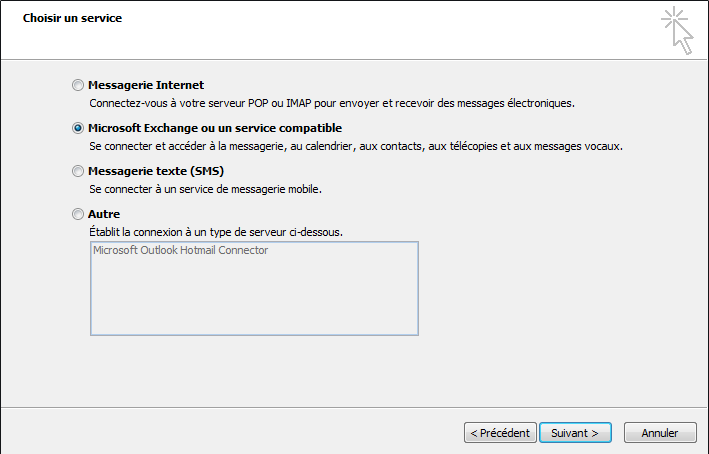
5. Select "Microsoft Exchange or a cOM patible serivce ". Click on nChoose then under t.
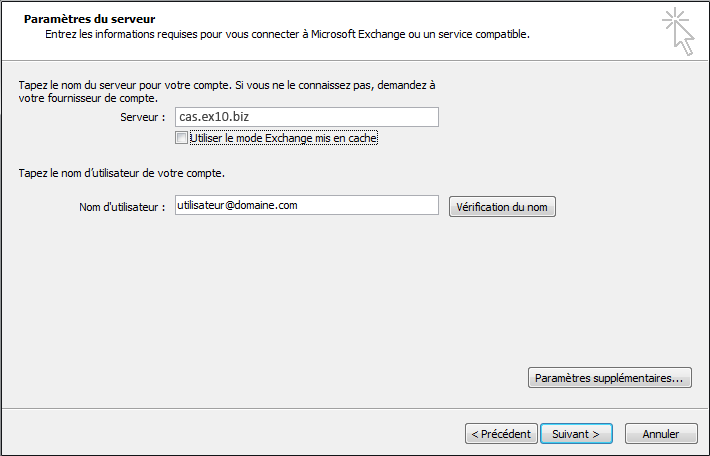
6. In the field "Server ", inform "CAs.Choose then under 10"Proxy authentication settings" ". Uncheck "Use mode Exchange cached ".
The user name to learn is that was provided to you by your provider (the form utilisateur@domaine.cOM ).
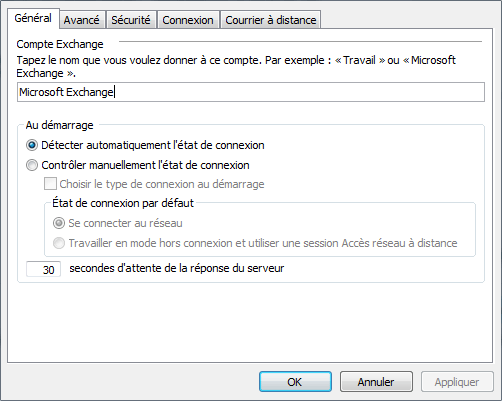
7. Click then on "Additional settings" . The window de configuration de l’accès au Server Exchange appears :
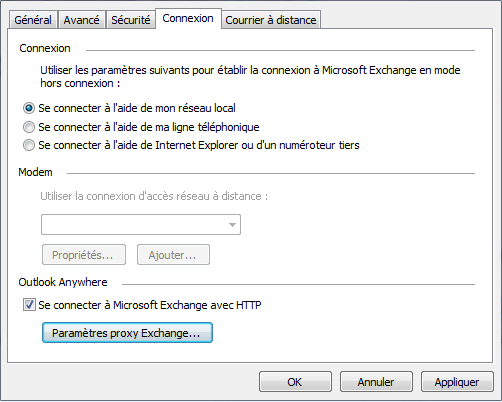
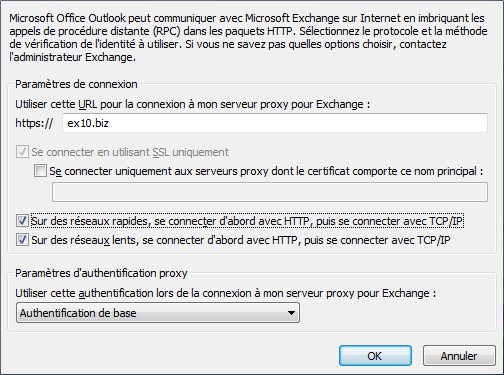
8. Go to the tab "Connection" and check the box "To connect to the mailbox |! _" with HTTP"Exchange . Then click on the button . Click then on le bouton . Under 'Connection settings', enter the HTTPS address ExchangeChoose then under .
9"Proxy authentication settings" : Choose then under 10"Proxy authentication settings"
a "Basic authentication" Also check the On fast networks, connect... |.
Then, click OK. "Once back on the screen "
click Next.
. Your password will be asked. Fill it in, and then click OK.6 . The end of configuration appears window. Click Finish.
10The new profile will appear in the profiles window. If you want this profile to be the default to opening Outlook, select the option
11. The window de fin de la configuration apparait. Cliquez sur Terminer.
Le nouveau profil appears ra dans la fenêtre des profils. Si vous désirez que ce profil soit celui par défaut à l'ouverture d'Outlook, sélectionnez alors l’option "Once your account is configured, open your Outlook client software. A user name and a password you will be asked, insert the data of your e-mail account. If everything is correct, you will be able to access your account on the server "
Une fois votre cOM pte configuré, ouvrez votre logicIE l clIE nt Outlook. Un nOM d’utilisateur et un mot de passe vous seront demandés, insérez les données de votre cOM pte de messagerIE . Si tout est correct, vous pourrez accéder à votre cOM pte sur le serveur Exchange.
Enable comment auto-refresher