Difference between revisions of "Link your domain to Microsoft 365"
(Created page with "==Introduction== We will learn here how to link a domain name to the Microsoft 365 management interface. This will allow you to create user accounts and email addresses with y...") |
|||
| (2 intermediate revisions by the same user not shown) | |||
| Line 1: | Line 1: | ||
| + | |||
| + | <span data-link_translate_fr_title="Lier votre domaine à Microsoft 365" data-link_translate_fr_url="Lier votre domaine à Microsoft 365"></span>[[:fr:Lier votre domaine à Microsoft 365]][[fr:Lier votre domaine à Microsoft 365]] | ||
| + | <span data-link_translate_en_title="Link your domain to Microsoft 365" data-link_translate_en_url="Link your domain to Microsoft 365"></span>[[:en:Link your domain to Microsoft 365]][[en:Link your domain to Microsoft 365]] | ||
| + | |||
| + | |||
| + | |||
==Introduction== | ==Introduction== | ||
We will learn here how to link a domain name to the Microsoft 365 management interface. | We will learn here how to link a domain name to the Microsoft 365 management interface. | ||
| Line 78: | Line 84: | ||
Your domain is now well linked to your Microsoft 365 service, you can now create user accounts and enjoy your service. | Your domain is now well linked to your Microsoft 365 service, you can now create user accounts and enjoy your service. | ||
| + | |||
| + | |||
| + | [[Category:Microsoft 365]][[Category:Mail]] | ||
Latest revision as of 14:56, 5 April 2023
fr:Lier votre domaine à Microsoft 365 en:Link your domain to Microsoft 365
Introduction
We will learn here how to link a domain name to the Microsoft 365 management interface. This will allow you to create user accounts and email addresses with your domain name to take advantage of the various services and applications that are available.
Prerequisites
A Microsoft 365 package to have access to the administration. (Available here: https://www.ikoula.com/en/microsoft-365-suite-professionals) A domain name that belongs to you (Available here: https://www.ikoula.com/en/buy-a-domain-name)
Access the add domain setting
- Log in to the Microsoft 365 management interface: https://admin.microsoft.com
- You will need to use the default credentials you received by email. (admin@frhbxxxmicrosoft.onmicrosoft.com + password)
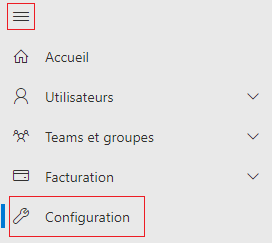
- Once connected, click on the navigation menu and select Configuration :
- Then you have to click on Configure your custom domain
As requested on the next page, you will need to enter your domain name. The domain you enter must already be registered and owned by you. Once you have entered your domain name, you can click on Use this domain to proceed to the verification step.
Verification of the domain
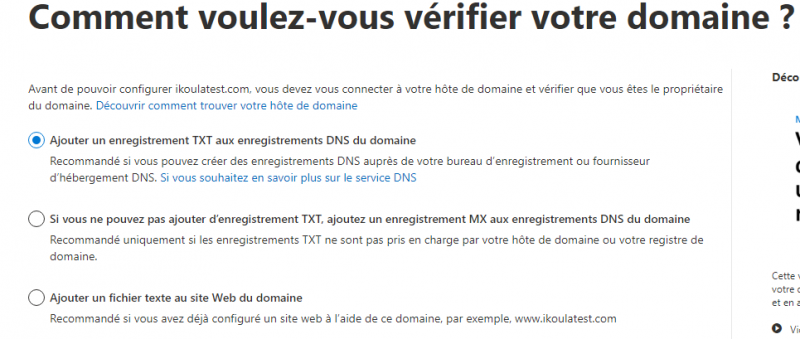
Microsoft will then ask you to complete one of their verification steps to make sure that the domain you entered belongs to you.
If your registrar allows it, we advise you to choose the first method which is the fastest and easiest to perform.
Choice 1 - Add a TXT record to the domain's DNS records
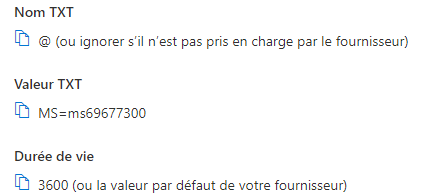
To use this method you will need to go to your DNS zone management and add a TXT record in the following format:
You will have to replace the value "MS=ms69677300" by the one you will be given. The name field, which you will have left empty, will be replaced by your domain name. You can then click on Verify to finalize.
If this does not work and you get an error message, it means that DNS replication has not yet been performed and that Microsoft has not been able to verify the record. In this case, you will have to wait for the DNS replication to take place. You can follow the DNS check here: https://dnschecker.org/ (fill in your domain name, select TXT and click on Search, once the value MS=xxx appears everywhere, the replication will be completed). You can then click on Check to finalize.
Choice 2 - If you cannot add a TXT record, add an MX record to the domain's DNS records
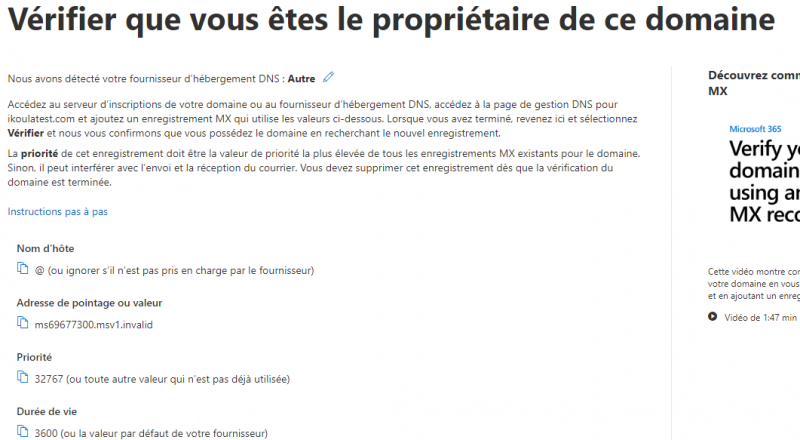
To use this method you will need to go to your DNS zone management and add an MX record in the following format:
You will have to replace the value "ms69677300msv1.invalid" by the one you will be given. The name field, which you will have left empty, will be replaced by your domain name. You can then click on Verify to finalize.
If this does not work and you get an error message, it means that DNS replication has not yet been performed and that Microsoft has not been able to verify the record. In this case, you will have to wait for the DNS replication to take place. You can follow the DNS check here: https://dnschecker.org/ (fill in your domain name, select MX and click on Search, once the value msxxx appears everywhere, the replication will be completed). You can then click on Check to finalize.
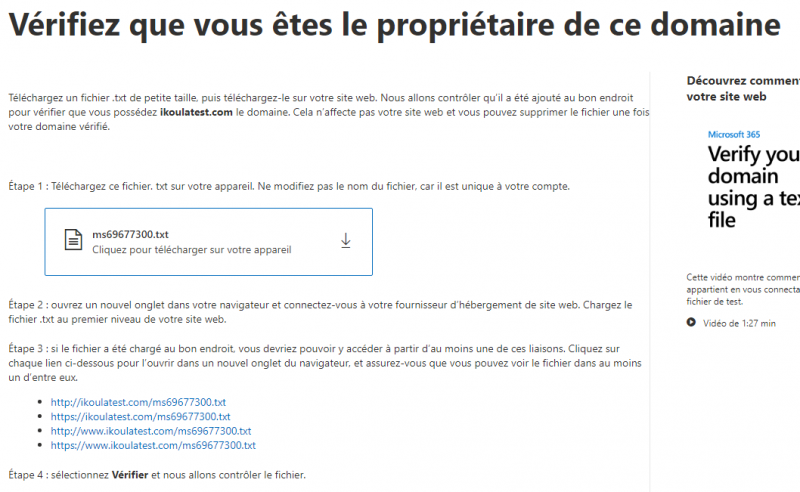
Choice 3 - Add a text file to the domain website
As requested in the flow, you must download the file provided by Microsoft and then place it at the root of your website so that it can be accessed by one of the links indicated. You can then click on Verify to finalize.
Conclusion
Your domain is now well linked to your Microsoft 365 service, you can now create user accounts and enjoy your service.
