Difference between revisions of "Setting up a Hosted Exchange account on iPhone"
⧼vector-jumptonavigation⧽
⧼vector-jumptosearch⧽
| Line 1: | Line 1: | ||
| + | <span data-link_translate_fr_title="Configuration d'un compte Hosted Exchange sur iPhone" data-link_translate_fr_url="Configuration_d%27un_compte_Hosted_Exchange_sur_iPhone"></span>[[:fr:Configuration d'un compte Hosted Exchange sur iPhone]][[fr:Configuration d'un compte Hosted Exchange sur iPhone]] | ||
<br /> | <br /> | ||
Revision as of 17:17, 23 September 2015
fr:Configuration d'un compte Hosted Exchange sur iPhone
This article has been created by an automatic translation software. You can view the article source here.
By following this tutorial step by step, you can configure your account Exchange on your iPhone.
- When you are on the home screen of your iPhone, you must then click on the button Settings
- Dans le menu Settings choisissez Mail > Contacts > Calendar
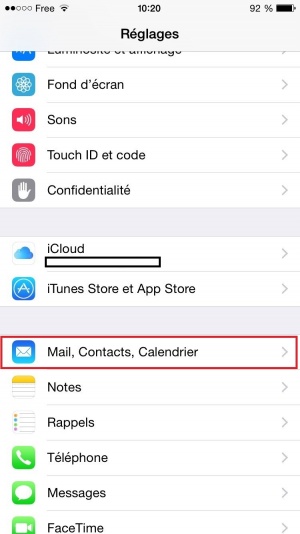
- Then select Add an account....
- Then choose Exchange in the drop-down list

- Fill out your account information and select a description for the account
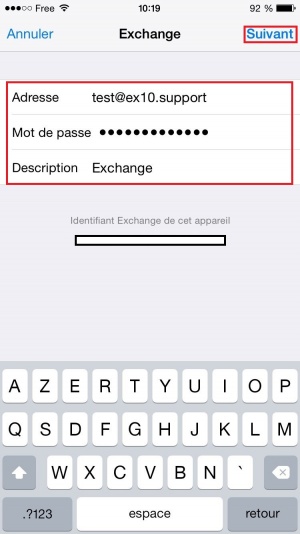
- Simply click continue

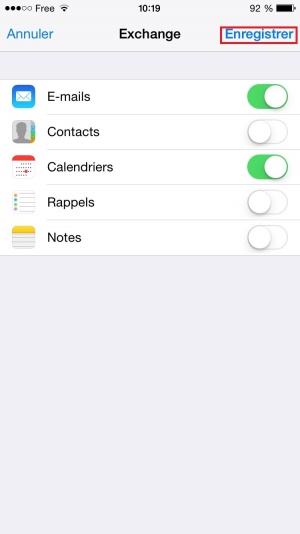
- Select the data to be synchronized among the proposed list and press on Save . The account will synchronize and retrieve selected data.


You can at any time change the synchronization parameters by repeating the steps 1 and 2 and en choisissant ensuite le compte configuré à l'étape 5.

Cand article vous a semblé utile ?
0
Enable comment auto-refresher