Difference between revisions of "Creating SQL with Storage 2012R2 iSCSI cluster"
| Line 1: | Line 1: | ||
| − | |||
| − | |||
| − | |||
| − | |||
| − | |||
| − | |||
<br /> | <br /> | ||
This article has been created by an automatic translation software. You can view the article source [[:fr:Creation cluster SQL avec Storage iSCSI sur 2012R2|here]].<br /><span data-translate="fr"></span> | This article has been created by an automatic translation software. You can view the article source [[:fr:Creation cluster SQL avec Storage iSCSI sur 2012R2|here]].<br /><span data-translate="fr"></span> | ||
| − | <span data-link_Tanslate_de_titt="Erstellen von SQL mit Storage 2012R2 iSCSI cluster" data-link_Tanslate_de_url="Erstellen+von+SQL+mit+Storage+2012R2+iSCSI+cluster"></span>[[: | + | <span data-link_Tanslate_de_titt="Erstellen von SQL mit Storage 2012R2 iSCSI cluster" data-link_Tanslate_de_url="Erstellen+von+SQL+mit+Storage+2012R2+iSCSI+cluster"></span>[[:de:Erstellen von SQL mit Storage 2012R2 iSCSI cluster]] |
| Line 17: | Line 11: | ||
== Problem == | == Problem == | ||
| − | We want to mount a cluster | + | We want to mount a cluster <span class="notranslate">SQL</span> wit a <span class="notranslate">storage</span> on a server accessible en <span class="notranslate">iSCSI</span>, all on servers in <span class="notranslate">Windows</span> 2012 R2. |
== Debug == | == Debug == | ||
This platform requires 3 servers : | This platform requires 3 servers : | ||
| − | * 2 | + | * 2 <span class="notranslate">Windows</span> 2012R2 wit <span class="notranslate">SQL</span> 2014 wit 5 ports <span class="notranslate">Eterna</span> (This number can be retced according to te needs ) : ServSQ01 and ServS02 |
| − | * 1 | + | * 1 <span class="notranslate">Windows</span> 2012R2 in storage server wit 9 ports <span class="notranslate">Eterna</span> (This number can be reduced according to te needs ) ServSto01 |
== Solution == | == Solution == | ||
| − | In prerequisites, install | + | In prerequisites, install <span class="notranslate">Windows</span> 2012 R2 on te 3 servers and it updates. |
| − | te two servers | + | te two servers <span class="notranslate">SQL</span> must be on te same domain. |
| − | Diagram nawor "simplifie" platform (Th | + | Diagram nawor "simplifie" platform (Th <span class="notranslate">switchs</span> are not present to monitor which is connected to what ) : |
| − | < | + | <span class="notranslate"> |
=== ServStor Serve Configuration 01 === | === ServStor Serve Configuration 01 === | ||
| Line 38: | Line 32: | ||
On tis server we have 9 port naworks used. | On tis server we have 9 port naworks used. | ||
1 dedicated to manageme | 1 dedicated to manageme | ||
| − | 2 x 4 dedicated ports to <span | + | 2 x 4 dedicated ports to </span>iSCSI[[File:schema_reseau_simple.PNG]]. |
| − | + | <span class="notranslate">NIC</span>1, <span class="notranslate">NIC</span>2 a <span class="notranslate">NIC</span>3 correspond to te tree present networks cards, each wit 4 ports <span class="notranslate">gigabits</span>. | |
(See diagram to identify te connections ) | (See diagram to identify te connections ) | ||
| − | For te networ | + | For te networ <span class="notranslate">iSCSI</span>, we will use a <span class="notranslate"> IP </span>en 192.168.0.0/24 |
| − | Here te | + | Here te<span class="notranslate"> IP </span>configured on te server ServStor 01 : |
| − | < | + | <span class="notranslate"> |
NIC1 port 1 : Votre IP de votre serveur | NIC1 port 1 : Votre IP de votre serveur | ||
NIC1 port 2 : Non utilisé | NIC1 port 2 : Non utilisé | ||
| Line 60: | Line 54: | ||
NIC3 Port 3 : 192.168.0.17 | NIC3 Port 3 : 192.168.0.17 | ||
NIC3 Port 4 : 192.168.0.18 | NIC3 Port 4 : 192.168.0.18 | ||
| + | </span> | ||
| + | |||
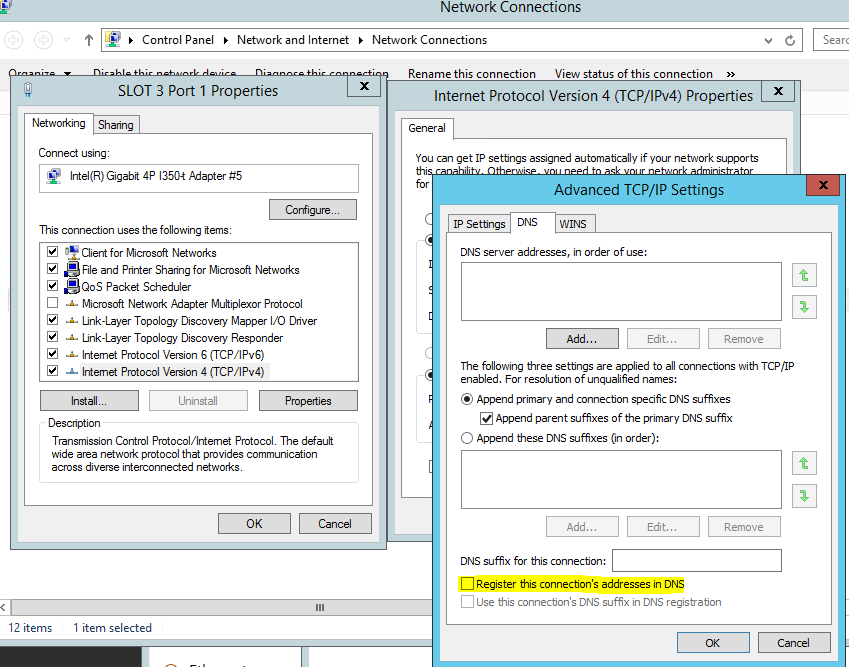
| + | For all cards in 192.168.0.x will in te Advanced Settings tab <pre>DNS</pre>, and on te box unchec "<span class="notranslate">Register tis connection's addresses in </span><span class="notranslate">DNS</span>" | ||
| + | |||
<span class="notranslate"> | <span class="notranslate"> | ||
| − | + | On te server ServStor01, it installs te rol </span>[[File:register_dns.PNG]]iSCSI'' <span class="notranslate">Target</span><span class="notranslate"> Server</span><span class="notranslate"> | |
</span> | </span> | ||
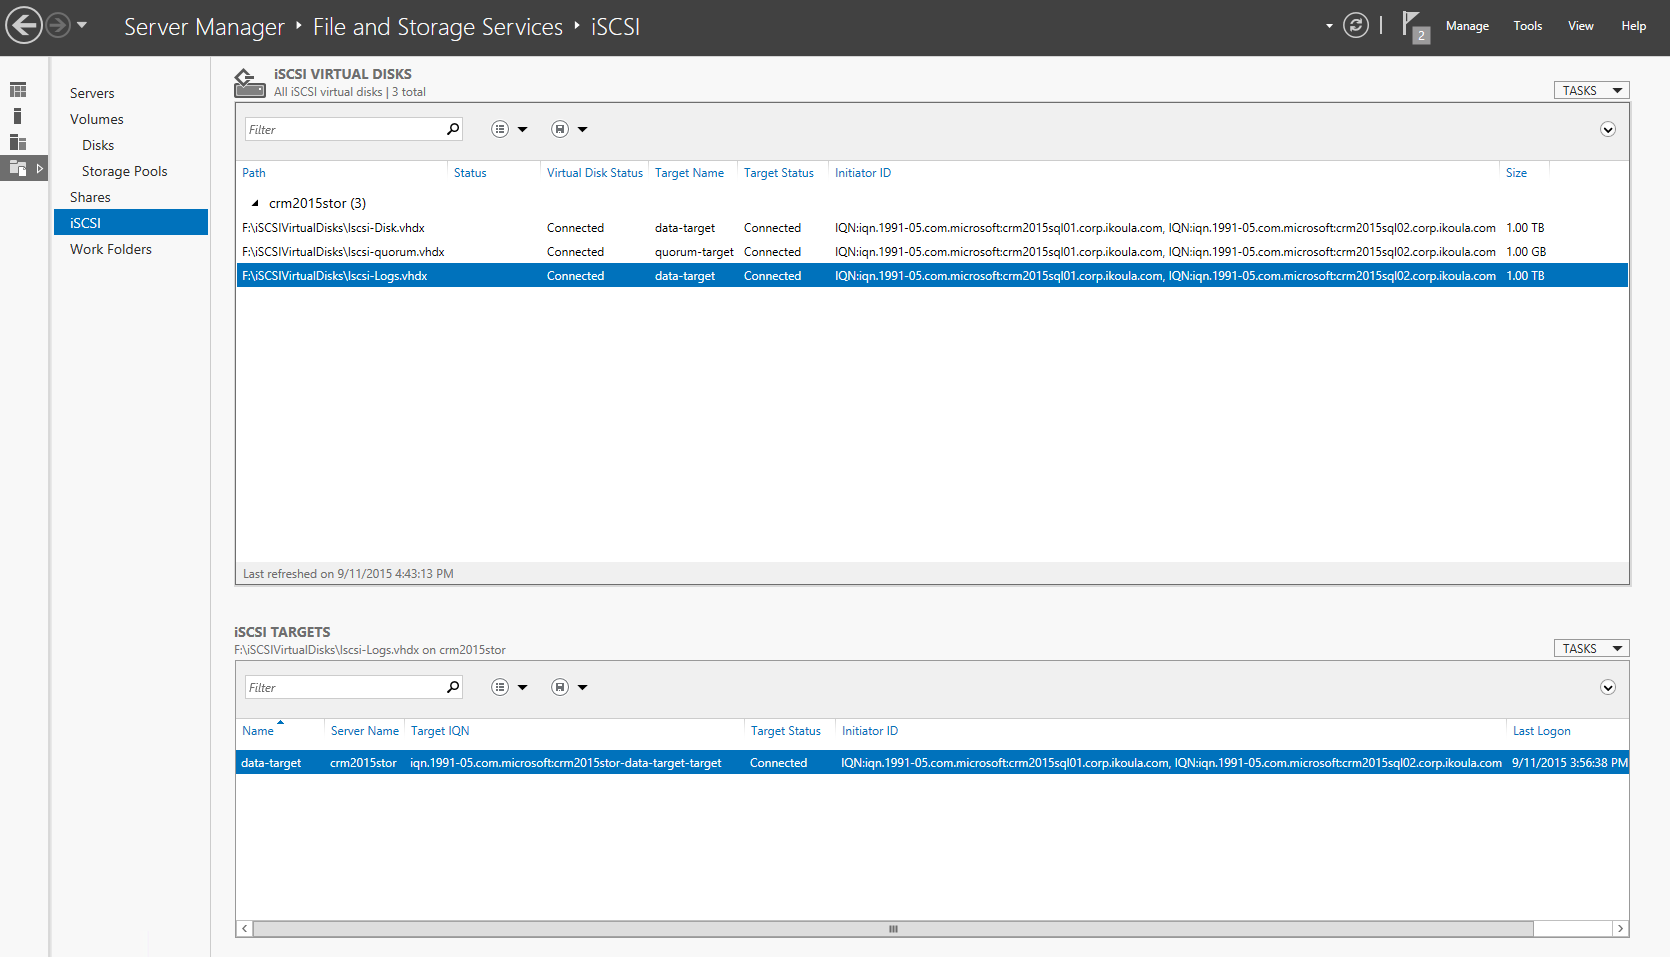
| − | + | In the ''Server Manager[[File:roles_servstor01.PNG]], we will create disks <span class="notranslate">iSCSI</span> (who are at the end of the) and t <span class="notranslate">Target</span> <span class="notranslate">iSCSI</span> that go them with : | |
<span class="notranslate"> | <span class="notranslate"> | ||
| − | |||
| − | |||
| − | |||
| − | |||
It therefor : | It therefor : | ||
| − | * <span | + | * </span>task / New iSCSI virtual disk[[File:iSCSI_servstor01.PNG]] |
* Select the volume | * Select the volume | ||
* It gives it a name (one can notice its future path down ) | * It gives it a name (one can notice its future path down ) | ||
| − | * Choose the size in | + | * Choose the size in <span class="notranslate">"Fixed Size"</span> (Leave <span class="notranslate">"Clear the virtual disk on allocation"</span>) |
| − | * One choos < | + | * One choos <span class="notranslate">"New iSCSI Target</span>" |
| − | * We give a name to this " | + | * We give a name to this "<span class="notranslate">iSCSI</span> <span class="notranslate">Target</span>" |
| − | * Click on | + | * Click on <span class="notranslate">ADD</span> in part "<span class="notranslate">access Servers</span>" |
| − | * In the choice of the method of identification of the initiator, soldarity bottom | + | * In the choice of the method of identification of the initiator, soldarity bottom <span class="notranslate"> IP </span>and put a <span class="notranslate"> IP</span>It will change it later. |
| − | * Leave | + | * Leave <span class="notranslate"> CHAP</span> et <span class="notranslate"> Reverse CHAP</span> unchecke |
| − | * We finish by < | + | * We finish by <span class="notranslate">"Create"</span> The <span class="notranslate">"close"</span> Once completed |
| − | From the, you have a shared disk en | + | From the, you have a shared disk en <span class="notranslate">iSCSI</span>. |
Repeat the operation as many times as necessary. | Repeat the operation as many times as necessary. | ||
In our case we create 3 discs : | In our case we create 3 discs : | ||
* 1 for databases | * 1 for databases | ||
* 1 for the logs | * 1 for the logs | ||
| − | * 1 for th | + | * 1 for th <span class="notranslate">quorum</span> (1GB will s) |
| − | === Configuration | + | === Configuration <span class="notranslate">iSCSI</span> servers ServSQ 01 et 02 === |
| − | In this part, we will connect the two servers | + | In this part, we will connect the two servers <span class="notranslate">SQL</span> to the serve <span class="notranslate">storage</span> by links <span class="notranslate">iSCSI</span>. |
| − | We will use the | + | We will use the <span class="notranslate">MPIO</span> in order to use ou 4 links networks and to share the load. |
| − | Configuration | + | Configuration<span class="notranslate"> IP </span>servers : |
| − | + | <span class="notranslate">NIC</span>1 et <span class="notranslate">NIC</span>2 correspond to the two network adapters on servers. <span class="notranslate">NIC</span>1 owns 4 ports, <span class="notranslate">NIC</span>2 a 2. | |
Here is the configura : | Here is the configura : | ||
ServSQ01 : | ServSQ01 : | ||
| − | < | + | <span class="notranslate"> |
NIC1 port 1 : 192.168.0.22 | NIC1 port 1 : 192.168.0.22 | ||
NIC1 port 2 : 192.168.0.26 | NIC1 port 2 : 192.168.0.26 | ||
| Line 112: | Line 106: | ||
NIC2 port 1 : 192.168.0.25 | NIC2 port 1 : 192.168.0.25 | ||
NIC2 port 2 : 192.168.0.21 | NIC2 port 2 : 192.168.0.21 | ||
| − | <span | + | </span> |
ServSQ02 : | ServSQ02 : | ||
| − | < | + | <pre> |
NIC1 port 1 : 192.168.0.24 | NIC1 port 1 : 192.168.0.24 | ||
NIC1 port 2 : 192.168.0.28 | NIC1 port 2 : 192.168.0.28 | ||
| Line 122: | Line 116: | ||
NIC2 port 1 : 192.168.0.27 | NIC2 port 1 : 192.168.0.27 | ||
NIC2 port 2 : 192.168.0.23 | NIC2 port 2 : 192.168.0.23 | ||
| − | <pre> | + | </pre> |
| − | For all cards in 192.168.0.x will in the Advanced Settings tab < | + | For all cards in 192.168.0.x will in the Advanced Settings tab <pre>DNS</pre>, and on the box unchec "<span class="notranslate">Register this connection's addresses in </span><span class="notranslate">DNS</span>" |
| − | < | + | <span class="notranslate"> |
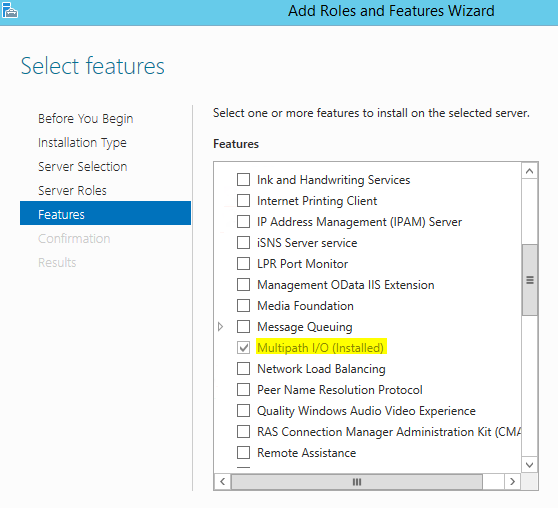
| − | * On both servers, installing the feature <span | + | * On both servers, installing the feature </span>"Multipath I/O"[[File:Register dns.PNG]]. |
| − | + | <span class="notranslate"> | |
| − | * Once installed in the interface <span | + | * Once installed in the interface </span>metro[[File:Feature_mpio.PNG]] de 2012R2 (started so click ) just type "<span class="notranslate">MPIO</span>" and click on the result : |
| − | < | + | <span class="notranslate"> |
| − | * In the tab <span | + | * In the tab </span>"Discover Multipaths"[[File:Mpio.PNG]] on coche <span class="notranslate">"Add Support for iSCSI devices"</span> then clicked on <span class="notranslate">ADD</span>. It proposes to restart, is done. |
| − | * Once restarted, it relaunches | + | * Once restarted, it relaunches <span class="notranslate">MPIO</span>, and this ensures "MSF2005<span class="notranslate">iSCSI</span>BusType0x9" is present in the "device hardware i". |
| − | * It then launche " | + | * It then launche "<span class="notranslate">iSCSIinitiator</span> " on both servers <span class="notranslate">SQL</span> |
| − | * One goes on the tab "Configuratio" and it retrieves t < | + | * One goes on the tab "Configuratio" and it retrieves t <span class="notranslate">"Initiator Name"</span> (the form <span class="notranslate">"iqn.1991-05.com.microsoft:ServSQ01.domain.tld"</span>) |
* It returns on the server ServSTOR 01 | * It returns on the server ServSTOR 01 | ||
| − | * In < | + | * In <span class="notranslate">Server Manager</span>, "File and <span class="notranslate">storage</span> Service", "<span class="notranslate">iSCSI</span>", right click on the <span class="notranslate">Target</span> to go to its properties and then in <span class="notranslate">initiators</span> |
| − | * Clicked on | + | * Clicked on <span class="notranslate">ADD</span> |
| − | * On coche < | + | * On coche <span class="notranslate">"Enter a value for the selected type"</span> |
| − | * One sets type < | + | * One sets type <span class="notranslate">"IQN"</span> and we put the address found earlier on the server <span class="notranslate">SQL</span>. |
| − | * You click on OK, repeat the operation to add the < | + | * You click on OK, repeat the operation to add the <span class="notranslate">"IQN"</span> of the <span class="notranslate">SQL</span> on all the <span class="notranslate">Targets</span> |
| − | * Removing th | + | * Removing th<span class="notranslate">IP</span> It was previously put here. |
| − | * Once validated, it returns on our servers | + | * Once validated, it returns on our servers <span class="notranslate">SQL</span>, always in the <span class="notranslate">iSCSI initiator</span>, we go in the tab "<span class="notranslate">Targets</span>" and it connects to the server <span class="notranslate">storage</span>. |
| − | * We go in the tab < | + | * We go in the tab <span class="notranslate">"Favorite Targets</span>", is on will <span class="notranslate">Target</span> visible then it mad <span class="notranslate">remove</span>. |
| − | * Returns the tab " | + | * Returns the tab "<span class="notranslate">Targets</span>" then we go on properties for one of <span class="notranslate">Target</span> |
| − | * The switching off the current session, and then clicke | + | * The switching off the current session, and then clicke <span class="notranslate">Add Session</span>. On coche <span class="notranslate">enable Multipath</span>, clicked on <span class="notranslate">advanced</span>. One choos <span class="notranslate">"Microsoft iSCSI initiator"</span> in <span class="notranslate">"local adapter"</span>. En <span class="notranslate">initiator IP </span>it chooses the first <span class="notranslate"> IP </span><span class="notranslate">iSCSI</span> du serveur <span class="notranslate">SQL</span>. En <span class="notranslate">Target portal IP </span>it chooses the first <span class="notranslate"> IP </span><span class="notranslate">iSCSI</span> Server of <span class="notranslate">storage</span>. It valid 2 times. Repeat the operation for each network adapter in passing to the <span class="notranslate">ip</span> following the |
| − | In the end must be the | + | In the end must be the <span class="notranslate">IPs</span> related to this form : |
| − | < | + | <span class="notranslate">Initiator IP</span><table border="1"> |
<tr> | <tr> | ||
| − | <th><span class="notranslate"> | + | <th><span class="notranslate"> |
| − | <th><span class="notranslate" | + | <th></span>Target</th> Portal IP<span class="notranslate"> |
| − | <th>On the server<span | + | <th>On the server</span> |
| − | </ | + | </th> |
<tr> | <tr> | ||
<th>192.168.0.21</th> | <th>192.168.0.21</th> | ||
| − | <th>192.168.0.11</ | + | <th>192.168.0.11</tr> |
| − | <th>ServSQ01</ | + | <th>ServSQ01</th> |
</th> | </th> | ||
<tr> | <tr> | ||
<th>192.168.0.22</th> | <th>192.168.0.22</th> | ||
| − | <th>192.168.0.12</ | + | <th>192.168.0.12</tr> |
| − | <th>ServSQ01</ | + | <th>ServSQ01</th> |
</th> | </th> | ||
<tr> | <tr> | ||
<th>192.168.0.23</th> | <th>192.168.0.23</th> | ||
| − | <th>192.168.0.13</ | + | <th>192.168.0.13</tr> |
| − | <th>ServSQ02</ | + | <th>ServSQ02</th> |
</th> | </th> | ||
<tr> | <tr> | ||
<th>192.168.0.24</th> | <th>192.168.0.24</th> | ||
| − | <th>192.168.0.14</ | + | <th>192.168.0.14</tr> |
| − | <th>ServSQ02</ | + | <th>ServSQ02</th> |
</th> | </th> | ||
<tr> | <tr> | ||
<th>192.168.0.25</th> | <th>192.168.0.25</th> | ||
| − | <th>192.168.0.15</ | + | <th>192.168.0.15</tr> |
| − | <th>ServSQ01</ | + | <th>ServSQ01</th> |
</th> | </th> | ||
<tr> | <tr> | ||
<th>192.168.0.26</th> | <th>192.168.0.26</th> | ||
| − | <th>192.168.0.16</ | + | <th>192.168.0.16</tr> |
| − | <th>ServSQ01</ | + | <th>ServSQ01</th> |
</th> | </th> | ||
<tr> | <tr> | ||
<th>192.168.0.27</th> | <th>192.168.0.27</th> | ||
| − | <th>192.168.0.17</ | + | <th>192.168.0.17</tr> |
| − | <th>ServSQL02</ | + | <th>ServSQL02</th> |
</th> | </th> | ||
<tr> | <tr> | ||
<th>192.168.0.28</th> | <th>192.168.0.28</th> | ||
| − | <th>192.168.0.18</ | + | <th>192.168.0.18</tr> |
| − | <th>ServSQL02</ | + | <th>ServSQL02</th> |
</th> | </th> | ||
</th> | </th> | ||
| − | * It returns in </ | + | * It returns in </tr>"Favorite Targets</table>" and you look at the details of these. We check that there are good relations with <span class="notranslate">IP</span> in the preceding table |
| − | === Configuration o | + | === Configuration o <span class="notranslate">Failover</span> servers ServSQL 01 et 02 === |
| − | We begin by installing the | + | We begin by installing the <span class="notranslate">feature Failover</span> <span class="notranslate">cluster</span>ing on the 2 servers <span class="notranslate">SQL</span>. |
| − | During this time you can go in the < | + | During this time you can go in the <span class="notranslate">disk management</span> (right click on the me <span class="notranslate">Windows, "disk management"</span>). |
| − | From here we pass disks in < | + | From here we pass disks in <span class="notranslate">"online"</span> and it initializes (<span class="notranslate">GPT</span>). It also created the partitions and formats i |
| − | It then launche < | + | It then launche <span class="notranslate">"Failover cluster Manager"</span> and it po <span class="notranslate">Validate Configuration</span> to verify that everything is ok. Some warnings may be present at the network level. |
| − | Is then < | + | Is then <span class="notranslate">"Create cluster</span>" : |
| − | * You enter the name of the two se | + | * You enter the name of the two se <span class="notranslate">SQL</span> |
| − | * You enter the nam | + | * You enter the nam <span class="notranslate">cluster</span>, in our example we'll take <span class="notranslate">clusterSQL</span>01 |
* It puts the cluster I | * It puts the cluster I | ||
| − | * Leave < | + | * Leave <span class="notranslate">"Add all eligible storage to the cluster</span>" check |
* It valid | * It valid | ||
| − | You must now configure the | + | You must now configure the <span class="notranslate">quorum</span>. To do this, you click on the na <span class="notranslate">cluster</span>and t <span class="notranslate">"more actions"</span> et <span class="notranslate">"configure cluster</span> <span class="notranslate">quorum settings"</span>. |
| − | * Been | + | * Been <span class="notranslate">next</span> |
| − | * < | + | * <span class="notranslate">Select the quorum witness</span> |
| − | + | * <span class="notranslate">Configure a disk witness</span> | |
| − | * We check the corresponding disk to | + | * We check the corresponding disk to <span class="notranslate">quorum</span> |
| − | * been | + | * been <span class="notranslate">next</span> The <span class="notranslate">finish</span>. |
| − | * The other two discs, it pointed < | + | * The other two discs, it pointed <span class="notranslate">"add to clustershared volume" </span> (In <span class="notranslate">"disks"</span>, it selects discs in questions in order to ) |
| − | We get the disc a | + | We get the disc a <span class="notranslate">logs</span> volume 1 and the disc a <span class="notranslate">BDD</span> volume 2 in our case. |
| − | We now have a | + | We now have a <span class="notranslate">cluster</span> configured |
| − | === Installation o | + | === Installation o <span class="notranslate">SQL</span> 2014 en <span class="notranslate">cluster</span> === |
| − | We begin by | + | We begin by <span class="notranslate">ServSQL01</span> |
| − | * It installs the feature < | + | * It installs the feature <span class="notranslate">.net 3.5</span> |
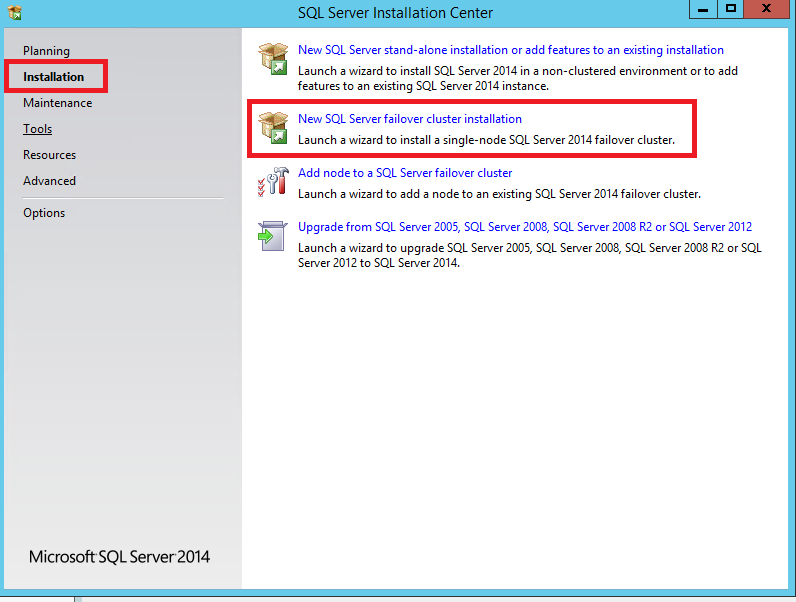
| − | * We start the installation, choose < | + | * We start the installation, choose <span class="notranslate">"New SQL Server Failover cluster installation"</span> |
| − | < | + | <span class="notranslate"> |
| − | * The choice of features, in our case (future use with <span | + | * The choice of features, in our case (future use with </span>CRM 2015[[File:Install_SQL1.PNG]]) Let's check <span class="notranslate">Database Engine Services</span>, <span class="notranslate">SQL Server Replication, Full-Text and Semantic Extractions for Search, reporting services-native, management Tools basic / complete</span> |
| − | * Choose a network name for the | + | * Choose a network name for the <span class="notranslate">SQL</span>. In our case we will use <span class="notranslate">SQLServ</span> |
| − | * On < | + | * On <span class="notranslate">cluster Disk Selection </span>You can choose those you want to use. In our case, we take the <span class="notranslate">cluster Disk</span> 1 et 3 (le 2 being th <span class="notranslate">quorum</span>, le 1 et 2 being volumes <span class="notranslate">databases</span> et <span class="notranslate">logs</span>) |
| − | * It then chooses the | + | * It then chooses the <span class="notranslate">ip</span> du <span class="notranslate">failover</span> <span class="notranslate">SQL</span> |
* We choose the accounts and passwords for services (in our case we have created dedicated services accounts ) | * We choose the accounts and passwords for services (in our case we have created dedicated services accounts ) | ||
| − | * In part < | + | * In part <span class="notranslate">"Database engine Configuration"</span> in our case we use the <span class="notranslate">Mixed mode.</span> Also click on add the current user. |
| − | * Always in the same part in the tab < | + | * Always in the same part in the tab <span class="notranslate">Data Directories</span>, you specify the database records (We therefore choose our volum <span class="notranslate">iSCSI</span>) |
| − | * For th < | + | * For th <span class="notranslate">reporting Services</span> one p <span class="notranslate">"Install & configure"</span> |
* It launches the Setup | * It launches the Setup | ||
| Line 255: | Line 249: | ||
If you encounter the following error during installation : | If you encounter the following error during installation : | ||
| + | <span class="notranslate"> | ||
</span> | </span> | ||
| − | |||
The following error has occurre: | The following error has occurre: | ||
| Line 263: | Line 257: | ||
Click 'Retry to retry the failed action, or click 'Cancel to cancel this action and continue setup. | Click 'Retry to retry the failed action, or click 'Cancel to cancel this action and continue setup. | ||
| − | For help, clic: | + | For help, clic: <span class="notranslate"><pre>SQLhttp://go.microsoft.com/fwlink?LinkID=20476&ProdName=Microsoft%20%20Server&EvtSr=Setup.rl&EvtI=50000&Collec=12.0.2000.8&EvtTyp=0x0AD5303%25400xB814387 |
| − | |||
<span class="notranslate"> | <span class="notranslate"> | ||
| + | </span> | ||
| − | You should go in the volume concerned with Explorer </ | + | You should go in the volume concerned with Explorer </pre>windows</span>to display the hidden files and protected system files and change the rights on the folder <span class="notranslate">system volume information</span>. |
| − | Once the intervention is finished, we go to | + | Once the intervention is finished, we go to <span class="notranslate">ServSQL02</span>. |
| − | * Installing th < | + | * Installing th <span class="notranslate">.net framework 3.5</span> |
| − | * It launches the Setup with < | + | * It launches the Setup with <span class="notranslate">"Add a node to a SQL Server Failover cluster</span>" |
| − | < | + | <span class="notranslate"> |
* It follows the steps, most being pre-filled | * It follows the steps, most being pre-filled | ||
| Line 280: | Line 274: | ||
| − | Once the installation is complete, you have your <span | + | Once the installation is complete, you have your </span>SQL[[File:Install_SQL2.PNG]] 2014 en <span class="notranslate">failover</span> wit <span class="notranslate">storage</span> logged in <span class="notranslate">iSCSI</span> on a <span class="notranslate">Windows</span> 2012 R2. |
| − | You can make improvements, as a link between the 2 servers for the | + | You can make improvements, as a link between the 2 servers for the <span class="notranslate">heartbeat</span> for example, but it is optional. |
| + | |||
| + | <span class="notranslate"> | ||
</span> | </span> | ||
| − | |||
| − | |||
<br /> | <br /> | ||
<comments /> | <comments /> | ||
Revision as of 09:06, 9 October 2015
This article has been created by an automatic translation software. You can view the article source here.
de:Erstellen von SQL mit Storage 2012R2 iSCSI cluster
Problem
We want to mount a cluster SQL wit a storage on a server accessible en iSCSI, all on servers in Windows 2012 R2.
Debug
This platform requires 3 servers :
- 2 Windows 2012R2 wit SQL 2014 wit 5 ports Eterna (This number can be retced according to te needs ) : ServSQ01 and ServS02
- 1 Windows 2012R2 in storage server wit 9 ports Eterna (This number can be reduced according to te needs ) ServSto01
Solution
In prerequisites, install Windows 2012 R2 on te 3 servers and it updates. te two servers SQL must be on te same domain.
Diagram nawor "simplifie" platform (Th switchs are not present to monitor which is connected to what ) :
ServStor Serve Configuration 01
On tis server we have 9 port naworks used.
1 dedicated to manageme
2 x 4 dedicated ports to iSCSI .
.
NIC1, NIC2 a NIC3 correspond to te tree present networks cards, each wit 4 ports gigabits. (See diagram to identify te connections )
For te networ iSCSI, we will use a IP en 192.168.0.0/24 Here te IP configured on te server ServStor 01 : NIC1 port 1 : Votre IP de votre serveur NIC1 port 2 : Non utilisé NIC1 port 3 : Non utilisé NIC1 port 4 : Non utilisé
NIC2 Port 1 : 192.168.0.11 NIC2 Port 2 : 192.168.0.12 NIC2 Port 3 : 192.168.0.13 NIC2 Port 4 : 192.168.0.14
NIC3 Port 1 : 192.168.0.15 NIC3 Port 2 : 192.168.0.16 NIC3 Port 3 : 192.168.0.17 NIC3 Port 4 : 192.168.0.18
For all cards in 192.168.0.x will in te Advanced Settings tab
DNS
, and on te box unchec "Register tis connection's addresses in DNS"
On te server ServStor01, it installs te rol  iSCSI Target Server
In the Server Manager , we will create disks iSCSI (who are at the end of the) and t Target iSCSI that go them with :
It therefor :
- task / New iSCSI virtual disk
- Select the volume
- It gives it a name (one can notice its future path down )
- Choose the size in "Fixed Size" (Leave "Clear the virtual disk on allocation")
- One choos "New iSCSI Target"
- We give a name to this "iSCSI Target"
- Click on ADD in part "access Servers"
- In the choice of the method of identification of the initiator, soldarity bottom IP and put a IPIt will change it later.
- Leave CHAP et Reverse CHAP unchecke
- We finish by "Create" The "close" Once completed

From the, you have a shared disk en iSCSI. Repeat the operation as many times as necessary. In our case we create 3 discs :
- 1 for databases
- 1 for the logs
- 1 for th quorum (1GB will s)
Configuration iSCSI servers ServSQ 01 et 02
In this part, we will connect the two servers SQL to the serve storage by links iSCSI. We will use the MPIO in order to use ou 4 links networks and to share the load.
Configuration IP servers :
NIC1 et NIC2 correspond to the two network adapters on servers. NIC1 owns 4 ports, NIC2 a 2. Here is the configura :
ServSQ01 : NIC1 port 1 : 192.168.0.22 NIC1 port 2 : 192.168.0.26 NIC1 port 3 : IP Server NIC1 port 4 : non utilisé
NIC2 port 1 : 192.168.0.25 NIC2 port 2 : 192.168.0.21 ServSQ02 :
NIC1 port 1 : 192.168.0.24
NIC1 port 2 : 192.168.0.28
NIC1 port 3 : IP du serveur
NIC1 port 4 : non utilisé

NIC2 port 1 : 192.168.0.27
NIC2 port 2 : 192.168.0.23
For all cards in 192.168.0.x will in the Advanced Settings tab
DNS
, and on the box unchec "Register this connection's addresses in DNS"
- On both servers, installing the feature "Multipath I/O"
 .
.
- Once installed in the interface metro
 de 2012R2 (started so click ) just type "MPIO" and click on the result :

- In the tab "Discover Multipaths"
 on coche "Add Support for iSCSI devices" then clicked on ADD. It proposes to restart, is done.
 - Once restarted, it relaunches MPIO, and this ensures "MSF2005iSCSIBusType0x9" is present in the "device hardware i".

- It then launche "iSCSIinitiator " on both servers SQL
- One goes on the tab "Configuratio" and it retrieves t "Initiator Name" (the form "iqn.1991-05.com.microsoft:ServSQ01.domain.tld")
- It returns on the server ServSTOR 01
- In Server Manager, "File and storage Service", "iSCSI", right click on the Target to go to its properties and then in initiators
- Clicked on ADD
- On coche "Enter a value for the selected type"
- One sets type "IQN" and we put the address found earlier on the server SQL.
- You click on OK, repeat the operation to add the "IQN" of the SQL on all the Targets
- Removing thIP It was previously put here.
- Once validated, it returns on our servers SQL, always in the iSCSI initiator, we go in the tab "Targets" and it connects to the server storage.
- We go in the tab "Favorite Targets", is on will Target visible then it mad remove.
- Returns the tab "Targets" then we go on properties for one of Target
- The switching off the current session, and then clicke Add Session. On coche enable Multipath, clicked on advanced. One choos "Microsoft iSCSI initiator" in "local adapter". En initiator IP it chooses the first IP iSCSI du serveur SQL. En Target portal IP it chooses the first IP iSCSI Server of storage. It valid 2 times. Repeat the operation for each network adapter in passing to the ip following the
In the end must be the IPs related to this form :
Initiator IP
Portal IP- It returns in
| Target | On the server | |
|---|---|---|
| 192.168.0.21 | 192.168.0.11 | |
| ServSQ01 | ||
| 192.168.0.22 | 192.168.0.12 | |
| ServSQ01 | ||
| 192.168.0.23 | 192.168.0.13 | |
| ServSQ02 | ||
| 192.168.0.24 | 192.168.0.14 | |
| ServSQ02 | ||
| 192.168.0.25 | 192.168.0.15 | |
| ServSQ01 | ||
| 192.168.0.26 | 192.168.0.16 | |
| ServSQ01 | ||
| 192.168.0.27 | 192.168.0.17 | |
| ServSQL02 | ||
| 192.168.0.28 | 192.168.0.18 | |
| ServSQL02 |
" and you look at the details of these. We check that there are good relations with IP in the preceding table
Configuration o Failover servers ServSQL 01 et 02
We begin by installing the feature Failover clustering on the 2 servers SQL.
During this time you can go in the disk management (right click on the me Windows, "disk management"). From here we pass disks in "online" and it initializes (GPT). It also created the partitions and formats i
It then launche "Failover cluster Manager" and it po Validate Configuration to verify that everything is ok. Some warnings may be present at the network level.
Is then "Create cluster" :
- You enter the name of the two se SQL
- You enter the nam cluster, in our example we'll take clusterSQL01
- It puts the cluster I
- Leave "Add all eligible storage to the cluster" check
- It valid
You must now configure the quorum. To do this, you click on the na clusterand t "more actions" et "configure cluster quorum settings".
- Been next
- Select the quorum witness
- Configure a disk witness
- We check the corresponding disk to quorum
- been next The finish.
- The other two discs, it pointed "add to clustershared volume" (In "disks", it selects discs in questions in order to )
We get the disc a logs volume 1 and the disc a BDD volume 2 in our case.
We now have a cluster configured
Installation o SQL 2014 en cluster
We begin by ServSQL01
- It installs the feature .net 3.5
- We start the installation, choose "New SQL Server Failover cluster installation"
- The choice of features, in our case (future use with CRM 2015
 ) Let's check Database Engine Services, SQL Server Replication, Full-Text and Semantic Extractions for Search, reporting services-native, management Tools basic / complete
 - Choose a network name for the SQL. In our case we will use SQLServ
- On cluster Disk Selection You can choose those you want to use. In our case, we take the cluster Disk 1 et 3 (le 2 being th quorum, le 1 et 2 being volumes databases et logs)
- It then chooses the ip du failover SQL
- We choose the accounts and passwords for services (in our case we have created dedicated services accounts )
- In part "Database engine Configuration" in our case we use the Mixed mode. Also click on add the current user.
- Always in the same part in the tab Data Directories, you specify the database records (We therefore choose our volum iSCSI)
- For th reporting Services one p "Install & configure"
- It launches the Setup

If you encounter the following error during installation :
The following error has occurre:
Updating permission setting for folder 'C:\clusterstorag\Volum2' failed. The folder permission setting were supposed to be set to 'D:P(A;ERE;F;;;B)(A;ERE;F;;;S)(A;ERE;F;;;C)(A;ERE;F;;;S-1-5-80-3880718306-3832830129-1677859214-2598158968-1052248003)'.
Click 'Retry to retry the failed action, or click 'Cancel to cancel this action and continue setup.
For help, clic:
SQLhttp://go.microsoft.com/fwlink?LinkID=20476&ProdName=Microsoft%20%20Server&EvtSr=Setup.rl&EvtI=50000&Collec=12.0.2000.8&EvtTyp=0x0AD5303%25400xB814387
<span class="notranslate">
</span>

You should go in the volume concerned with Explorer
windows
to display the hidden files and protected system files and change the rights on the folder system volume information.
Once the intervention is finished, we go to ServSQL02.
- Installing th .net framework 3.5
- It launches the Setup with "Add a node to a SQL Server Failover cluster"
- It follows the steps, most being pre-filled
- It retyped passwords if necessary.
- It launches the Setup
Once the installation is complete, you have your SQL 2014 en failover wit storage logged in iSCSI on a Windows 2012 R2.
You can make improvements, as a link between the 2 servers for the heartbeat for example, but it is optional.
2014 en failover wit storage logged in iSCSI on a Windows 2012 R2.
You can make improvements, as a link between the 2 servers for the heartbeat for example, but it is optional.
Enable comment auto-refresher