Difference between revisions of "Proxmox VM'S with public IP"
Ccunha64415 (talk | contribs) |
Ccunha64415 (talk | contribs) |
||
| (5 intermediate revisions by the same user not shown) | |||
| Line 1: | Line 1: | ||
| + | <span data-link_translate_fr_title="Proxmox VM'S avec IP publique" data-link_translate_fr_url="Proxmox VM'S avec IP publique></span>[[:fr:Proxmox VM'S avec IP publique]][[fr:Proxmox VM'S avec IP publique]] | ||
| + | <span data-link_translate_en_title="Proxmox VM'S with public IP" data-link_translate_en_url="Proxmox VM'S with public IP"></span>[[:en:Proxmox VM'S with public IP]][[en:Proxmox VM'S with public IP]] | ||
| + | |||
| + | |||
{{#seo: | {{#seo: | ||
|title=RDP-Proxmox VM'S with public IP | |title=RDP-Proxmox VM'S with public IP | ||
| Line 43: | Line 47: | ||
https://xxx.xxx.xxx.xxx:8006 | https://xxx.xxx.xxx.xxx:8006 | ||
| − | x- | + | x- to be replaced by the @IP of your server |
| − | == | + | ==Network Setup== |
<br /> | <br /> | ||
| − | * | + | * First of all, please install this package if you have not already done so (on the server via SSH). |
apt install ifupdown2 | apt install ifupdown2 | ||
| − | * | + | *When you access the Proxmox interface for the first time, please confirm the network settings.You may find one or two cards already present on the server. |
<br /> | <br /> | ||
| − | [[ | + | [[File:PROXMOX-FR-1.JPG|1600px]] |
<br /> | <br /> | ||
| − | * | + | *Explanations |
<br /> | <br /> | ||
| − | + | In order to use public IP on our VM's, our network interface eth0 (can have another name) "Network Device" must be connected by a virtual network card noted vmbrX. | |
| − | + | If the virtual network card does not exist, just click on "Create" to create it "Linux Bridge". | |
| − | + | Leave everything blank at this point, we will come back to the configuration later. | |
<br /> | <br /> | ||
| − | [[ | + | [[File:PROXMOX-FR-02.JPG]] |
| − | |||
| − | |||
| − | == | + | ==Configuring the network cards== |
| − | Notes: | + | Notes: Please make the changes on both boards before applying the configuration. |
*eth0 | *eth0 | ||
| − | + | The card must be configured as follows: | |
| − | [[ | + | [[File:Proxmox-FR-03.JPG]] |
*vmbr0 | *vmbr0 | ||
| − | [[ | + | [[File:Proxmox-FR-04.JPG]] |
| − | x- | + | x-Corresponds to the @IP of your server. |
| − | * | + | *Once you are done, to apply the new network configuration, please click on "Apply Configuration". |
| − | [[ | + | [[File:Proxmox-FR-5.JPG]] |
| Line 90: | Line 92: | ||
| − | + | From now on you can create VM's with the public @IPs you have ordered. | |
| − | + | To configure the VM's network, you just have to assign the virtual network card (vmbr0). | |
| − | [[ | + | [[File:Proxmox-FR-6.JPG|1200px]] |
| − | + | For network addressing on the VM use additional @IPs ordered with the same subnet mask as your server and the same gateway. | |
| − | + | Please follow this example: | |
| − | [[ | + | [[File:Prox-fr-7.JPG]] |
<!--T:4--> | <!--T:4--> | ||
| − | <!-- | + | <!-- End of the article --> |
<br /><br /> | <br /><br /> | ||
| − | + | Did you find this article useful ? <vote /> | |
<!--T:5--> | <!--T:5--> | ||
Latest revision as of 14:14, 6 March 2022
fr:Proxmox VM'S avec IP publique en:Proxmox VM'S with public IP
Introduction
In this article, we will explain how to configure your Hypervisor so that you can use public IPs in your VMs.
Installation Proxmox Debian 10
Normally, if you have requested it, the hypervisor will already be installed on your server. If this is not the case, please see here the steps to install it.
Add the Proxmox VE repository:
echo "deb [arch=amd64] http://download.proxmox.com/debian/pve buster pve-no-subscription" > /etc/apt/sources.list.d/pve-install-repo.list
Add the Proxmox VE repository key:
wget http://download.proxmox.com/debian/proxmox-ve-release-6.x.gpg -O /etc/apt/trusted.gpg.d/proxmox-ve-release-6.x.gpg
chmod +r /etc/apt/trusted.gpg.d/proxmox-ve-release-6.x.gpg # optional, if you have a non-default umask
Update network settings from Proxmox :
apt install ifupdown2
Update your repository and your system by running :
apt update && apt full-upgrade
Install the Proxmox VE packages
apt install proxmox-ve postfix open-iscsi
To access your Proxmox interface
https://xxx.xxx.xxx.xxx:8006
x- to be replaced by the @IP of your server
Network Setup
- First of all, please install this package if you have not already done so (on the server via SSH).
apt install ifupdown2
- When you access the Proxmox interface for the first time, please confirm the network settings.You may find one or two cards already present on the server.
- Explanations
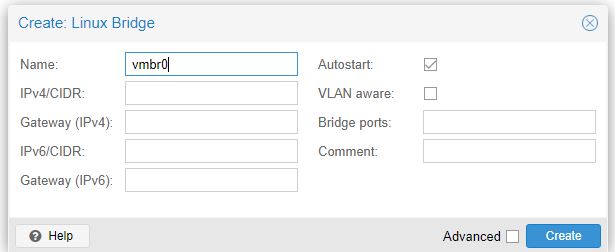
In order to use public IP on our VM's, our network interface eth0 (can have another name) "Network Device" must be connected by a virtual network card noted vmbrX.
If the virtual network card does not exist, just click on "Create" to create it "Linux Bridge".
Leave everything blank at this point, we will come back to the configuration later.
Configuring the network cards
Notes: Please make the changes on both boards before applying the configuration.
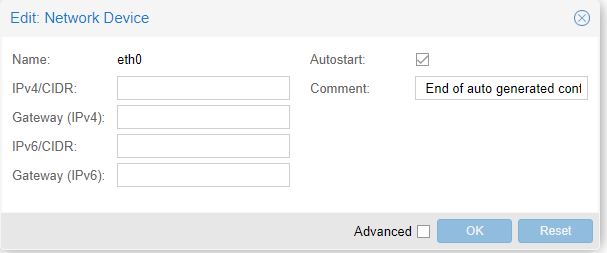
- eth0
The card must be configured as follows:
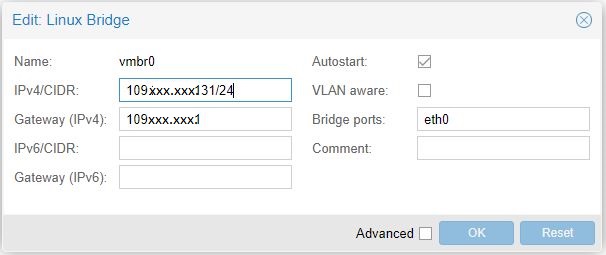
- vmbr0
x-Corresponds to the @IP of your server.
- Once you are done, to apply the new network configuration, please click on "Apply Configuration".
Conclusion
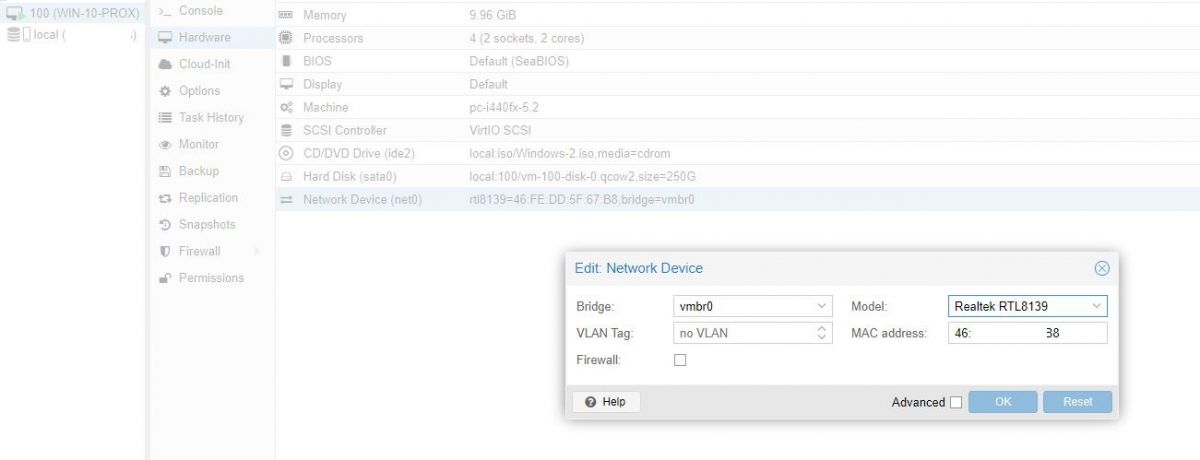
From now on you can create VM's with the public @IPs you have ordered. To configure the VM's network, you just have to assign the virtual network card (vmbr0).
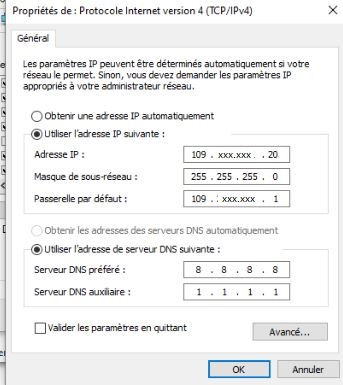
For network addressing on the VM use additional @IPs ordered with the same subnet mask as your server and the same gateway.
Please follow this example:
Did you find this article useful ?


Enable comment auto-refresher