Difference between revisions of "How to install my Server with KVM+ISO"
Ccunha64415 (talk | contribs) (Created page with "== Introduction == * Une fois que vous avez reçu vos accès pour accéder à votre KVM, vous allez pouvoir ajouter votre ISO vous-même. == Que veux dire KVM ? A quoi cela...") |
Ccunha64415 (talk | contribs) |
||
| (31 intermediate revisions by the same user not shown) | |||
| Line 1: | Line 1: | ||
| + | <span data-link_translate_en_title="How to install my Server with KVM+ISO" data-link_translate_en_url="How to install my Server with KVM+ISO"></span>[[:en:How to install my Server with KVM+ISO]][[en:How to install my Server with KVM+ISO]] | ||
| + | <span data-link_translate_fr_title="Comment installer mon serveur dédié KVM +ISO" data-link_translate_fr_url="Comment installer mon serveur dédié KVM +ISO"></span>[[:fr:Comment installer mon serveur dédié KVM +ISO]][[fr:Comment installer mon serveur dédié KVM +ISO]] | ||
== Introduction == | == Introduction == | ||
| − | * | + | * Once you have received your access to your KVM, you will be able to add your ISO yourself. |
| − | == | + | == What does KVM mean? What is it for? == |
| − | + | Acronym : Keyboard Video Mouse. | |
| − | + | The KVM also called KVM deport, KVM extender or KVM extender is a standalone system that allows to deport a user station including one or more screens as well as the mouse and a keyboard. | |
| − | == Installation | + | == Installation of your ISO via KVM == |
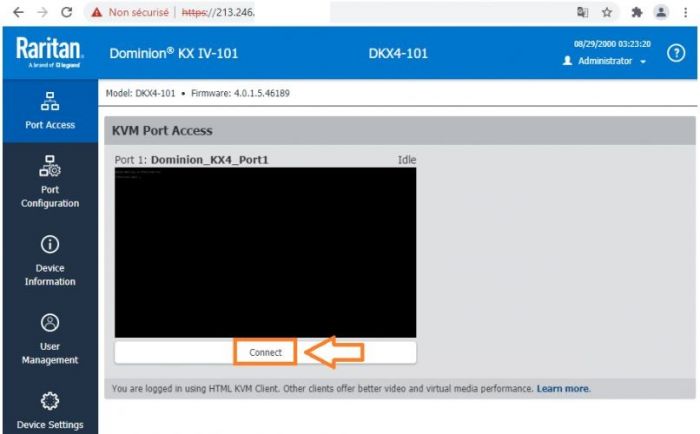
| − | ● | + | ● First of all this connect to your KVM with the identifiers that you received following your KVM request. |
| − | [[ | + | [[File:KVM5.JPG|700px]] |
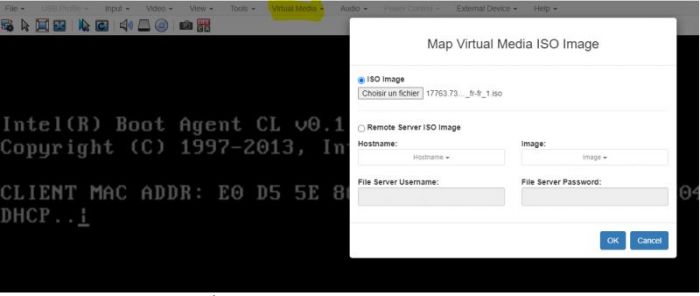
| − | ● | + | ● Then, once in the interface, go to the Virtual Media tab. |
| − | [[ | + | [[File:KVM-12.JPG|700px]] |
| − | * | + | * Here you can add your image, choosing an .iso in your computer. |
| + | [[File:KVM2.JPG|700px]] | ||
| − | |||
| + | Once the ISO is added, | ||
| + | ● Go to the Input tab of your KVM to do a Ctrl+Alt+Dell which allows you to restart the server. | ||
| − | + | [[File:KVM-1.JPG|700px]] | |
| − | ● | + | ● You can then click Dell (Delete) to access your BIOS. (The key to access the BIOS may be different depending on the version). |
| − | + | Notes: on some models, clicking (several times) on F12 when the server is restarted (brand logo) displays the boot menu directly without having to enter the Bios. | |
| − | + | == In your BIOS == | |
| + | ● Go to the BIOS tab and make sure that UEFI : Raritan Virtual CD is first in the boot order. | ||
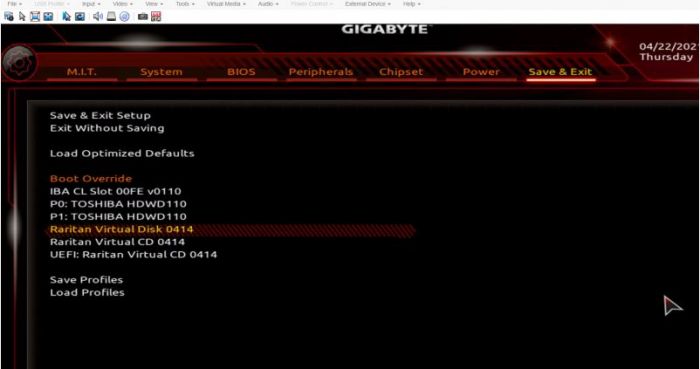
| + | ● Then go to the Save & Exit tab and select in Boot Override -> Raritan Virtual CD -> Press Enter (here the example is with a Raritan KVM). | ||
| − | |||
| − | + | The image presented below can be different depending on the BIOS version. | |
| − | + | [[File:KVM1.JPG|700px]] | |
| − | + | * After that your server reboot and proceed to the installation of your OS with the ISO previously added by you. | |
| − | + | Notes: uploading the ISO may take several minutes. | |
| + | == Installation of your ISO via with KVM LANTRONIX Spider == | ||
| − | + | == Pre-Requirements == | |
| + | * Have Java installed on your computer version 7 (later versions do not support TLS 1.0). | ||
| + | * We recommend the use of Mozilla Firefox browser. | ||
| + | |||
| + | ● First of all connect to your KVM with the identifiers you received after your KVM request. | ||
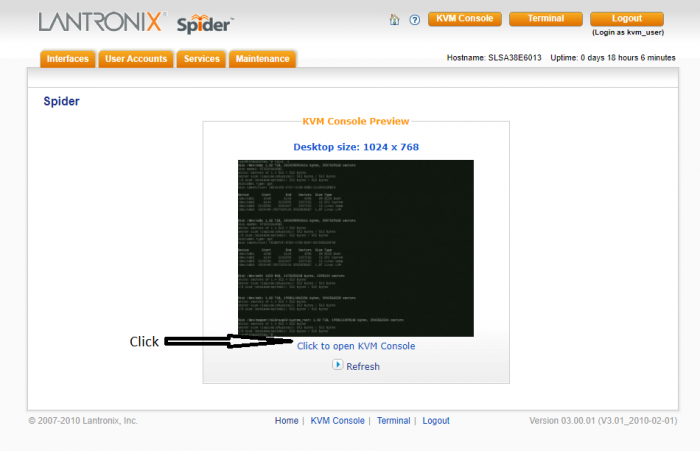
| + | ● Then, once in the interface, go to the console. | ||
| + | |||
| + | |||
| + | [[File:LAN-1.PNG|700px]] | ||
| + | |||
| + | * A file will be downloaded that will allow you to access the console. | ||
| + | * Please save this file and open it. | ||
| + | |||
| + | [[File:JAVA-1.JPG|300px]] | ||
| + | |||
| + | == Debug JAVA == | ||
| + | |||
| + | * It is possible that your JAVA does not accept the connection. For this, you must add an exception. | ||
| + | * Please see "How to configure the list of sites with exception?" on this site. | ||
| + | |||
| + | https://www.java.com/fr/download/help/exception_sitelist.html | ||
| + | |||
| + | |||
| + | [[File:JAVA-11.JPG]] | ||
| + | |||
| + | |||
| + | * Once the exception is made on the JAVA security you can open the download file and you have this image. | ||
| + | * Please click on continue. | ||
| + | |||
| + | [[File:JAVA-4.JPG]] | ||
| + | |||
| + | |||
| + | == Upload de l'ISO == | ||
| + | |||
| + | * On the console Please click on (follow steps 1/2/3): | ||
| + | |||
| + | |||
| + | [[File:JAVA-9.JPG|100Ppx]] | ||
| + | |||
| + | * and your ISO is uploaded. | ||
| + | |||
| + | * Now you need to reboot the server, so please click (Confirm Ctrl+Alt+Delete) | ||
| + | |||
| + | [[File:JAVA-7.JPG|100Ppx]] | ||
| + | |||
| + | * During the reboot of the server please press (F2) to select on or boot, alternatively you can set it on the BIOS in BOOT order (Check chapter in BIOS). | ||
| + | * Please click as shown in the picture. | ||
| + | |||
| + | [[File:JAVA-6.JPG|100Ppx]] | ||
| + | |||
| + | |||
| + | == Windows (Debug), disks are not recognized during installation. == | ||
| + | |||
| + | Why are the disks not recognized? | ||
| + | |||
| + | [[File:WIN-1-2.JPG|350px]] | ||
| + | |||
| + | |||
| + | Our automatic recycling systems use a low-level formatting system for recycling our servers. The formatting of this type, can cause that the disks are not recognized during the installation of the Windows OS. | ||
| + | In order to reset the disks, you only need your Windows installation ISO. | ||
| + | The procedure used here calls for a utility (DISKPART) that can be accessed from a Windows CMD. | ||
| + | Here is how to proceed to access the Windows CMD from your installation ISO. | ||
| + | |||
| + | * On the Windows installation screen please click on NEXt and then on "Repair". | ||
| + | |||
| + | [[File:WIN-1-3.JPG|700px]] | ||
| + | |||
| + | * On the new screen click on "Troubleshoot" and then on "Advance Options". | ||
| + | |||
| + | [[File:WIN-1-5.JPG|700px]] | ||
| + | |||
| + | * On the "Advance Options" please click on "Command Prompt" and a CMD window will open. | ||
| + | |||
| + | [[File:WIN-1-6.JPG|700px]] | ||
| + | |||
| + | == How to use DISKPART to reset the disk == | ||
| + | |||
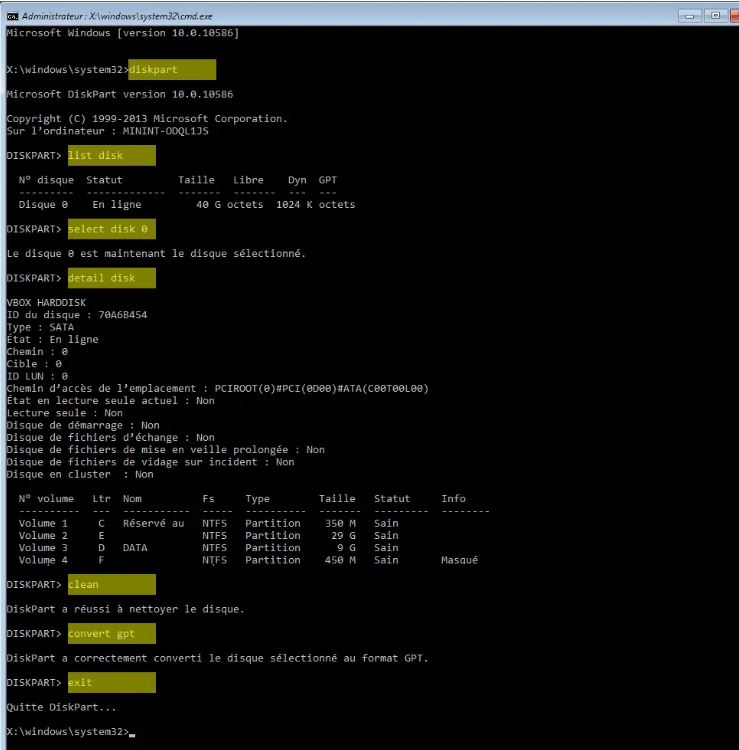
| + | * DISKPART has a large number of associated commands, including (LIST, SELECT, CLEAN, CONVERT, FOTMAT), these are the ones we will use to initialize the disk. | ||
| + | |||
| + | DISKPART (Utility) | ||
| + | list disks (List disks) | ||
| + | select disk 0 (Select disk) | ||
| + | clean (Clean the disk) | ||
| + | convert gpt (Convert to GPT) | ||
| + | exit (Return to the previous menu/exit CMD) | ||
| + | |||
| + | * Procedure to use: | ||
| + | |||
| + | [[File:WIN-5.JPG|900px]] | ||
| + | |||
| + | * To return to the BOOT. | ||
| + | |||
| + | Please insert the command "exit" until you exit the CMD and return to the "Advanced Options" page. | ||
| + | |||
| + | What you have to do is to choose one of the 2 available options "Back to Windows" for the installation menu or the option "UEFI" which will send you to the UEFI/BIOS system, especially do not click on the option "Shutdown", it will require a human intervention to turn on the server. | ||
| + | |||
| + | * and here is the disk is recognized during the installation. | ||
| + | |||
| + | [[File:WIN-7.JPG|700px]] | ||
== Conclusion == | == Conclusion == | ||
| − | + | I hope this article has helped you to install your operating system through a KVM. | |
| − | + | If you have any questions or need help, please feel free to contact us at https://fr-wiki.ikoula.com/fr/Ouvrir_un_ticket_au_support_Ikoula /Support | |
| − | [ | + | [Category:Dedicated server]] |
Latest revision as of 05:39, 23 January 2022
en:How to install my Server with KVM+ISO fr:Comment installer mon serveur dédié KVM +ISO
Introduction
- Once you have received your access to your KVM, you will be able to add your ISO yourself.
What does KVM mean? What is it for?
Acronym : Keyboard Video Mouse.
The KVM also called KVM deport, KVM extender or KVM extender is a standalone system that allows to deport a user station including one or more screens as well as the mouse and a keyboard.
Installation of your ISO via KVM
● First of all this connect to your KVM with the identifiers that you received following your KVM request.
● Then, once in the interface, go to the Virtual Media tab.
- Here you can add your image, choosing an .iso in your computer.
Once the ISO is added,
● Go to the Input tab of your KVM to do a Ctrl+Alt+Dell which allows you to restart the server.
● You can then click Dell (Delete) to access your BIOS. (The key to access the BIOS may be different depending on the version).
Notes: on some models, clicking (several times) on F12 when the server is restarted (brand logo) displays the boot menu directly without having to enter the Bios.
In your BIOS
● Go to the BIOS tab and make sure that UEFI : Raritan Virtual CD is first in the boot order.
● Then go to the Save & Exit tab and select in Boot Override -> Raritan Virtual CD -> Press Enter (here the example is with a Raritan KVM).
The image presented below can be different depending on the BIOS version.
- After that your server reboot and proceed to the installation of your OS with the ISO previously added by you.
Notes: uploading the ISO may take several minutes.
Installation of your ISO via with KVM LANTRONIX Spider
Pre-Requirements
- Have Java installed on your computer version 7 (later versions do not support TLS 1.0).
- We recommend the use of Mozilla Firefox browser.
● First of all connect to your KVM with the identifiers you received after your KVM request. ● Then, once in the interface, go to the console.
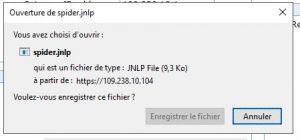
- A file will be downloaded that will allow you to access the console.
- Please save this file and open it.
Debug JAVA
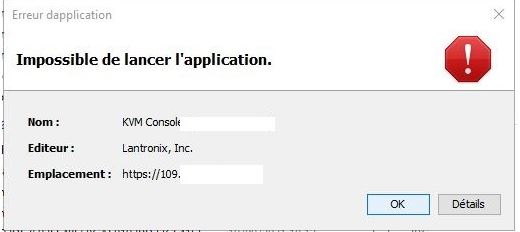
- It is possible that your JAVA does not accept the connection. For this, you must add an exception.
- Please see "How to configure the list of sites with exception?" on this site.
https://www.java.com/fr/download/help/exception_sitelist.html
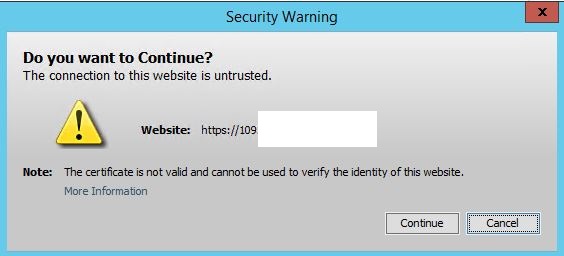
- Once the exception is made on the JAVA security you can open the download file and you have this image.
- Please click on continue.
Upload de l'ISO
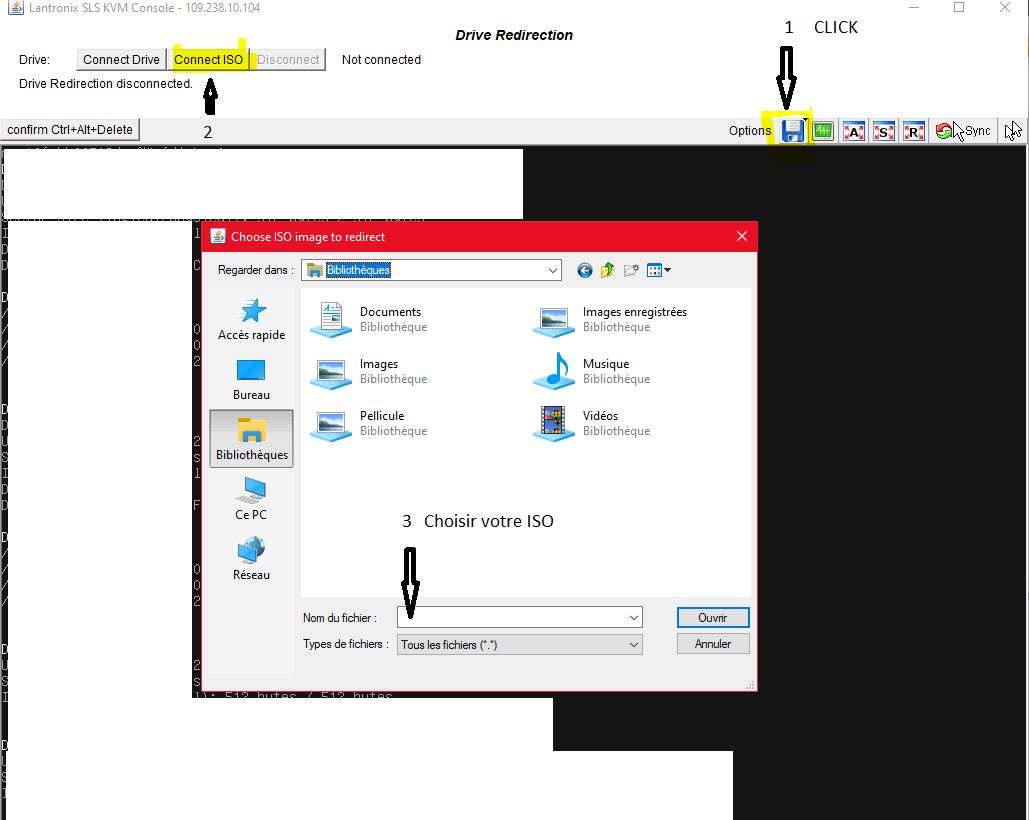
- On the console Please click on (follow steps 1/2/3):
- and your ISO is uploaded.
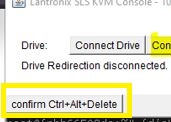
- Now you need to reboot the server, so please click (Confirm Ctrl+Alt+Delete)
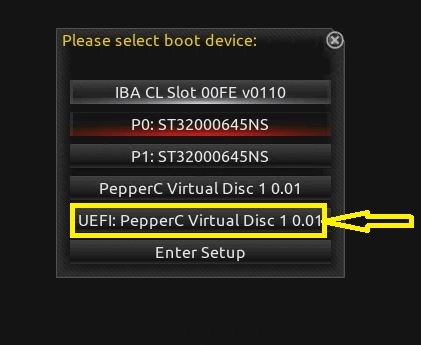
- During the reboot of the server please press (F2) to select on or boot, alternatively you can set it on the BIOS in BOOT order (Check chapter in BIOS).
- Please click as shown in the picture.
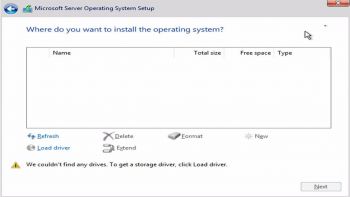
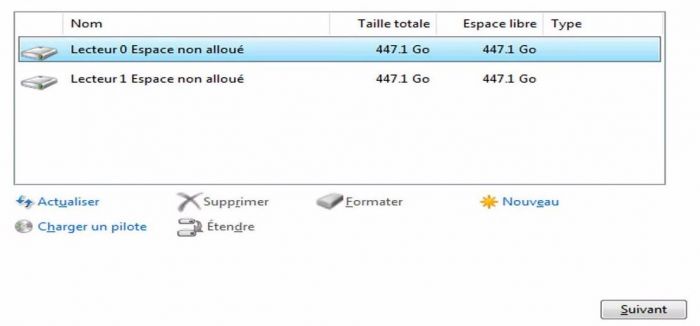
Windows (Debug), disks are not recognized during installation.
Why are the disks not recognized?
Our automatic recycling systems use a low-level formatting system for recycling our servers. The formatting of this type, can cause that the disks are not recognized during the installation of the Windows OS.
In order to reset the disks, you only need your Windows installation ISO.
The procedure used here calls for a utility (DISKPART) that can be accessed from a Windows CMD.
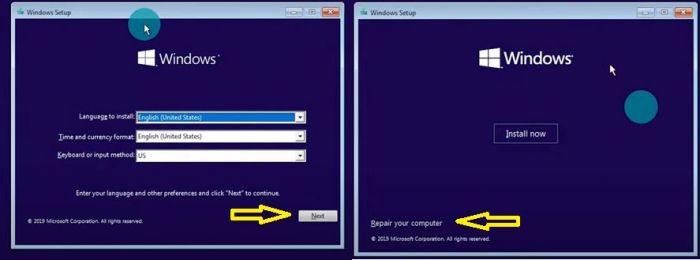
Here is how to proceed to access the Windows CMD from your installation ISO.
- On the Windows installation screen please click on NEXt and then on "Repair".
- On the new screen click on "Troubleshoot" and then on "Advance Options".
- On the "Advance Options" please click on "Command Prompt" and a CMD window will open.
How to use DISKPART to reset the disk
- DISKPART has a large number of associated commands, including (LIST, SELECT, CLEAN, CONVERT, FOTMAT), these are the ones we will use to initialize the disk.
DISKPART (Utility)
list disks (List disks)
select disk 0 (Select disk)
clean (Clean the disk)
convert gpt (Convert to GPT)
exit (Return to the previous menu/exit CMD)
- Procedure to use:
- To return to the BOOT.
Please insert the command "exit" until you exit the CMD and return to the "Advanced Options" page.
What you have to do is to choose one of the 2 available options "Back to Windows" for the installation menu or the option "UEFI" which will send you to the UEFI/BIOS system, especially do not click on the option "Shutdown", it will require a human intervention to turn on the server.
- and here is the disk is recognized during the installation.
Conclusion
I hope this article has helped you to install your operating system through a KVM.
If you have any questions or need help, please feel free to contact us at https://fr-wiki.ikoula.com/fr/Ouvrir_un_ticket_au_support_Ikoula /Support
[Category:Dedicated server]]
