Difference between revisions of "Configuring Outlook 2007 - POP"
(Created page with "This article has been created by an automatic translation software. You can view the article source here.<br /> Select the "Mail" fro...") |
|||
| (18 intermediate revisions by one other user not shown) | |||
| Line 1: | Line 1: | ||
| − | This article has been created by an automatic translation software. You can view the article source [[:fr:Configuration Outlook 2007 - POP|here]].<br /> | + | <span data-link_translate_en_title="Configuring Outlook 2007 - POP" data-link_translate_en_url="Configuring Outlook 2007 - POP"></span>[[:en:Configuring Outlook 2007 - POP]][[en:Configuring Outlook 2007 - POP]] |
| + | <span data-link_translate_he_title="קביעת התצורה של Outlook 2007 - פופ" data-link_translate_he_url="%D7%A7%D7%91%D7%99%D7%A2%D7%AA+%D7%94%D7%AA%D7%A6%D7%95%D7%A8%D7%94+%D7%A9%D7%9C+Outlook+2007+-+%D7%A4%D7%95%D7%A4"></span>[[:he:קביעת התצורה של Outlook 2007 - פופ]][[he:קביעת התצורה של Outlook 2007 - פופ]] | ||
| + | <span data-link_translate_ru_title="Настройка Outlook 2007 - поп" data-link_translate_ru_url="%D0%9D%D0%B0%D1%81%D1%82%D1%80%D0%BE%D0%B9%D0%BA%D0%B0+Outlook+2007+-+%D0%BF%D0%BE%D0%BF"></span>[[:ru:Настройка Outlook 2007 - поп]][[ru:Настройка Outlook 2007 - поп]] | ||
| + | <span data-link_translate_ja_title="Outlook 2007 は-POP の構成" data-link_translate_ja_url="Outlook+2007+%E3%81%AF-POP+%E3%81%AE%E6%A7%8B%E6%88%90"></span>[[:ja:Outlook 2007 は-POP の構成]][[ja:Outlook 2007 は-POP の構成]] | ||
| + | <span data-link_translate_ar_title="تكوين Outlook 2007-الملوثات العضوية الثابتة" data-link_translate_ar_url="%D8%AA%D9%83%D9%88%D9%8A%D9%86+Outlook+2007-%D8%A7%D9%84%D9%85%D9%84%D9%88%D8%AB%D8%A7%D8%AA+%D8%A7%D9%84%D8%B9%D8%B6%D9%88%D9%8A%D8%A9+%D8%A7%D9%84%D8%AB%D8%A7%D8%A8%D8%AA%D8%A9"></span>[[:ar:تكوين Outlook 2007-الملوثات العضوية الثابتة]][[ar:تكوين Outlook 2007-الملوثات العضوية الثابتة]] | ||
| + | <span data-link_translate_zh_title="配置 Outlook 2007-流行" data-link_translate_zh_url="%E9%85%8D%E7%BD%AE+Outlook+2007-%E6%B5%81%E8%A1%8C"></span>[[:zh:配置 Outlook 2007-流行]][[zh:配置 Outlook 2007-流行]] | ||
| + | <span data-link_translate_ro_title="Configurarea Outlook 2007 - POP" data-link_translate_ro_url="Configurarea+Outlook+2007+-+POP"></span>[[:ro:Configurarea Outlook 2007 - POP]][[ro:Configurarea Outlook 2007 - POP]] | ||
| + | <span data-link_translate_pl_title="Konfigurowanie programu Outlook 2007 - POP" data-link_translate_pl_url="Konfigurowanie+programu+Outlook+2007+-+POP"></span>[[:pl:Konfigurowanie programu Outlook 2007 - POP]][[pl:Konfigurowanie programu Outlook 2007 - POP]] | ||
| + | <span data-link_translate_de_title="Konfigurieren von Outlook 2007 - POP" data-link_translate_de_url="Konfigurieren+von+Outlook+2007+-+POP"></span>[[:de:Konfigurieren von Outlook 2007 - POP]][[de:Konfigurieren von Outlook 2007 - POP]] | ||
| + | <span data-link_translate_nl_title="Configureren van Outlook 2007 - POP" data-link_translate_nl_url="Configureren+van+Outlook+2007+-+POP"></span>[[:nl:Configureren van Outlook 2007 - POP]][[nl:Configureren van Outlook 2007 - POP]] | ||
| + | <span data-link_translate_it_title="Configurazione di Outlook 2007 - POP" data-link_translate_it_url="Configurazione+di+Outlook+2007+-+POP"></span>[[:it:Configurazione di Outlook 2007 - POP]][[it:Configurazione di Outlook 2007 - POP]] | ||
| + | <span data-link_translate_pt_title="Configurando o Outlook 2007 - POP" data-link_translate_pt_url="Configurando+o+Outlook+2007+-+POP"></span>[[:pt:Configurando o Outlook 2007 - POP]][[pt:Configurando o Outlook 2007 - POP]] | ||
| + | <span data-link_translate_es_title="Configurar Outlook 2007 - POP" data-link_translate_es_url="Configurar+Outlook+2007+-+POP"></span>[[:es:Configurar Outlook 2007 - POP]][[es:Configurar Outlook 2007 - POP]] | ||
| + | <span data-link_translate_fr_title="Configuration Outlook 2007 - POP" data-link_translate_fr_url="Configuration_Outlook_2007_-_POP"></span>[[:fr:Configuration Outlook 2007 - POP]][[fr:Configuration Outlook 2007 - POP]] | ||
| + | <br /> | ||
| + | |||
| + | {{#seo: | ||
| + | |title=Configuring Outlook 2007 - POP | ||
| + | |title_mode=append | ||
| + | |keywords=these,are,your,keywords | ||
| + | |description=Configuring Outlook 2007 - POP | ||
| + | |image=Uploaded_file.png | ||
| + | |image_alt=Wiki Logo | ||
| + | }} | ||
| + | |||
| + | This article has been created by an automatic translation software. You can view the article source [[:fr:Configuration Outlook 2007 - POP|here]].<br /><span data-translate="fr"></span> | ||
| + | |||
Select the "Mail" from the control panel of your PC icon. | Select the "Mail" from the control panel of your PC icon. | ||
| Line 6: | Line 32: | ||
| − | - If you want to associate the | + | - If you want to associate the POP account with the default Outlook profile |
| − | - If you want to create a new profile for the | + | - If you want to create a new profile for the POP account |
| − | 1- If you want to associate the | + | 1- If you want to associate the POP account with the default Outlook profile |
| − | - Click on ' | + | - Click on 'E-mail accounts' |
[[File:EX10 ConfOutl07pop 0.png|EX10_ConfOutl07pop_0.png]] | [[File:EX10 ConfOutl07pop 0.png|EX10_ConfOutl07pop_0.png]] | ||
| Line 23: | Line 49: | ||
The "Choose a messaging service" window appears. | The "Choose a messaging service" window appears. | ||
| − | Select "Microsoft <span class="notranslate">Exchange</span> | + | Select "Microsoft <span class="notranslate">Exchange</span>'. POP 3«, IMAP or http "and click"Nex t": |
| Line 31: | Line 57: | ||
Go to the nex t | Go to the nex t | ||
| − | 1.1 -If you want to create a new profile for the | + | 1.1 -If you want to create a new profile for the POP account |
| − | - Click | + | - Click 'Show profiles' |
[[File:EX10 ConfOutl07pop 2.png|EX10_ConfOutl07pop_2.png]] | [[File:EX10 ConfOutl07pop 2.png|EX10_ConfOutl07pop_2.png]] | ||
| − | - Create a new profile by clicking | + | - Create a new profile by clicking 'Add' |
Write the name of the new profile and click OK : | Write the name of the new profile and click OK : | ||
| Line 49: | Line 75: | ||
2- The "Automatic Configuration" window appears. | 2- The "Automatic Configuration" window appears. | ||
| − | Fill in the different fields and check the | + | Fill in the different fields and check the "Manually configure server settings or additional server types" |
Then click Nex t : | Then click Nex t : | ||
| Line 64: | Line 90: | ||
| − | Account type : ''' | + | Account type : '''POP 3''' |
Incoming mail server : '''ex 10.biz ''' | Incoming mail server : '''ex 10.biz ''' | ||
| − | Outgoing mail server : ''' | + | Outgoing mail server : '''SMT p.ex10.biz ''' |
Username : '''indicate your login ''' | Username : '''indicate your login ''' | ||
| Line 74: | Line 100: | ||
Password : '''specify your password ''' | Password : '''specify your password ''' | ||
| − | Then click on " | + | Then click on "Additional settings" : |
[[File:EX10 ConfOutl07pop 6.png|EX10_ConfOutl07pop_6.png]] | [[File:EX10 ConfOutl07pop 6.png|EX10_ConfOutl07pop_6.png]] | ||
| − | - Go to the "Outgoing server" tab and check the box "my server outgoing | + | - Go to the "Outgoing server" tab and check the box "my server outgoing ('. SMTP ) requires authentication |
| − | + | Then check the box "Use same settings as my mail server incoming" | |
[[File:EX10 ConfOutl07pop 7.png|EX10_ConfOutl07pop_7.png]] | [[File:EX10 ConfOutl07pop 7.png|EX10_ConfOutl07pop_7.png]] | ||
| − | - | + | - Then go to the 'Advanced Options' tab |
| − | Cochez la case « Ce serveur nécessite une connex ion chiffrées ( | + | Cochez la case « Ce serveur nécessite une connex ion chiffrées ('. SSL ). » |
| − | + | Incoming server (POP 3) : '''995''' | |
| − | + | Outgoing server ('. SMTP ) : '''587''' | |
| − | « Utiliser le type de connex ion chiffrée suivant » : ''' | + | « Utiliser le type de connex ion chiffrée suivant » : '''TLS ''' |
Cochez la case « Laisser un ex emplaire des messages sur le serveur » | Cochez la case « Laisser un ex emplaire des messages sur le serveur » | ||
| − | + | Click OK. | |
[[File:EX10 ConfOutl07pop 8.png|EX10_ConfOutl07pop_8.png]] | [[File:EX10 ConfOutl07pop 8.png|EX10_ConfOutl07pop_8.png]] | ||
[[Category:Hosted_Exchange]] | [[Category:Hosted_Exchange]] | ||
| − | + | <comments /> | |
Latest revision as of 14:46, 27 September 2021
en:Configuring Outlook 2007 - POP
he:קביעת התצורה של Outlook 2007 - פופ
ru:Настройка Outlook 2007 - поп
ja:Outlook 2007 は-POP の構成
ar:تكوين Outlook 2007-الملوثات العضوية الثابتة
zh:配置 Outlook 2007-流行
ro:Configurarea Outlook 2007 - POP
pl:Konfigurowanie programu Outlook 2007 - POP
de:Konfigurieren von Outlook 2007 - POP
nl:Configureren van Outlook 2007 - POP
it:Configurazione di Outlook 2007 - POP
pt:Configurando o Outlook 2007 - POP
es:Configurar Outlook 2007 - POP
fr:Configuration Outlook 2007 - POP
This article has been created by an automatic translation software. You can view the article source here.
Select the "Mail" from the control panel of your PC icon.
You have two possibilities of configuration :
- If you want to associate the POP account with the default Outlook profile
- If you want to create a new profile for the POP account
1- If you want to associate the POP account with the default Outlook profile
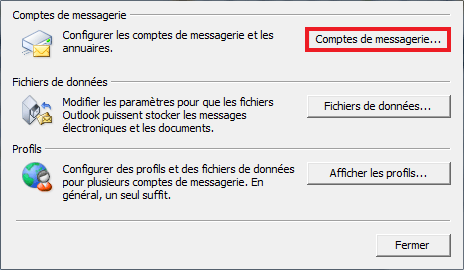
- Click on 'E-mail accounts'
The 'E-mail accounts' window appears. In the 'Mail' tab, click New.
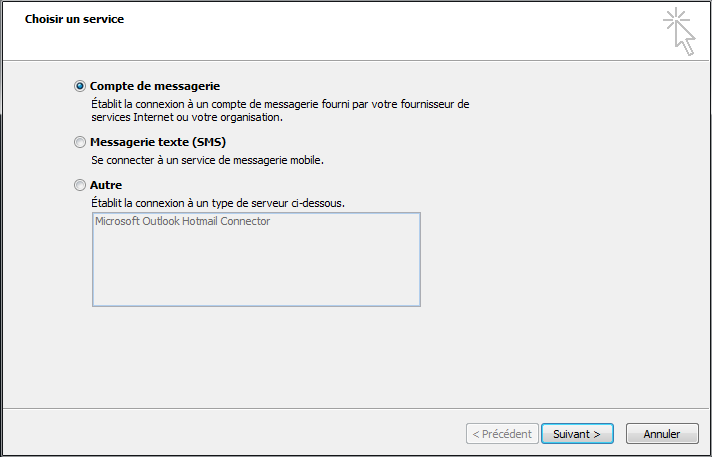
The "Choose a messaging service" window appears. Select "Microsoft Exchange'. POP 3«, IMAP or http "and click"Nex t":
Go to the nex t
1.1 -If you want to create a new profile for the POP account
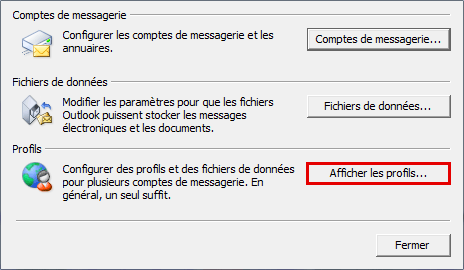
- Click 'Show profiles'
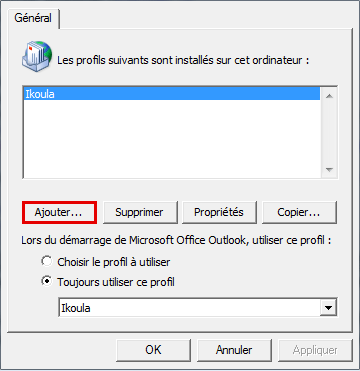
- Create a new profile by clicking 'Add'
Write the name of the new profile and click OK :
Go to the nex t
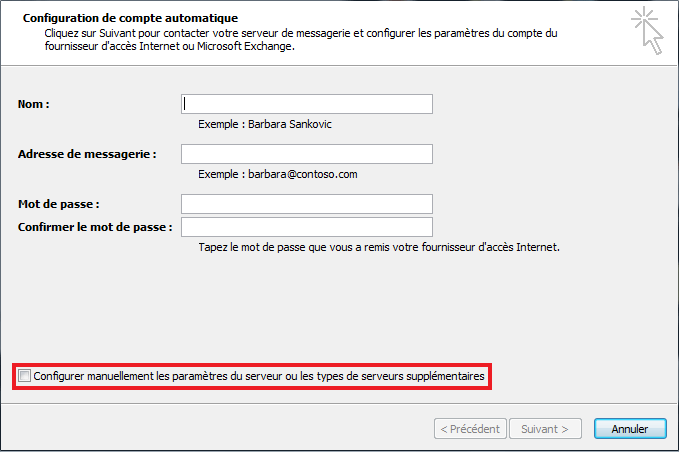
2- The "Automatic Configuration" window appears.
Fill in the different fields and check the "Manually configure server settings or additional server types" Then click Nex t :
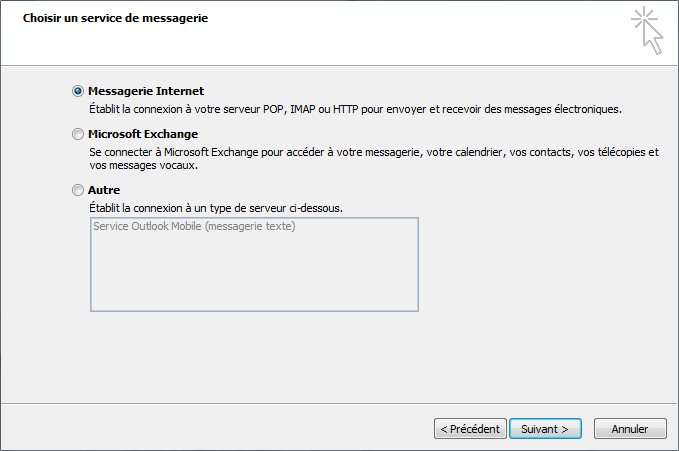
- The "Choose a messaging service" window appears. Cochez la case « Messagerie Internet » puis cliquez sur Suivant :
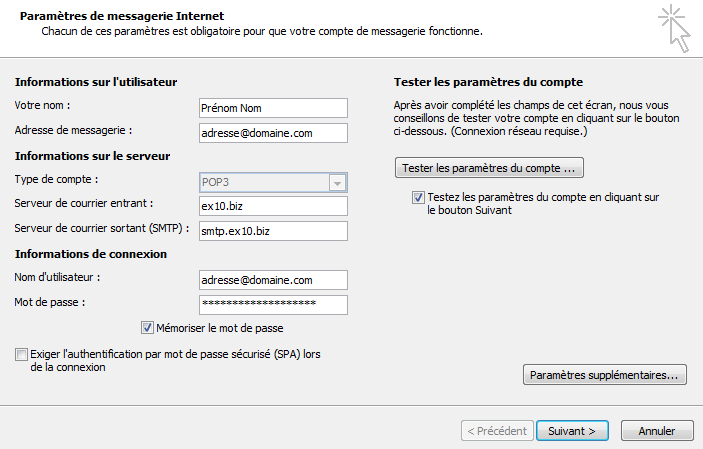
- The "Internet e-mail settings" window appears.
Enter your name and email address.
Account type : POP 3
Incoming mail server : ex 10.biz
Outgoing mail server : SMT p.ex10.biz
Username : indicate your login
Password : specify your password
Then click on "Additional settings" :
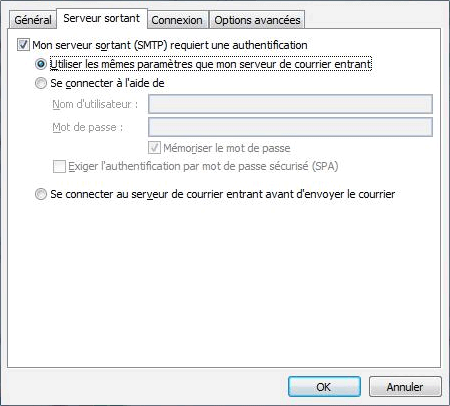
- Go to the "Outgoing server" tab and check the box "my server outgoing ('. SMTP ) requires authentication
Then check the box "Use same settings as my mail server incoming"
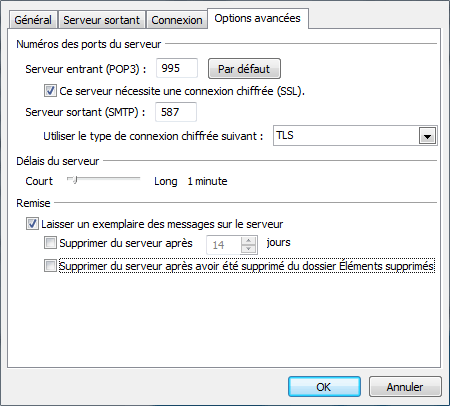
- Then go to the 'Advanced Options' tab
Cochez la case « Ce serveur nécessite une connex ion chiffrées ('. SSL ). »
Incoming server (POP 3) : 995
Outgoing server ('. SMTP ) : 587
« Utiliser le type de connex ion chiffrée suivant » : TLS
Cochez la case « Laisser un ex emplaire des messages sur le serveur »
Click OK.
Enable comment auto-refresher