Difference between revisions of "How to set up your Mac Mail manually"
Tmendes2ffe9 (talk | contribs) (Created page with "{{#seo: |title=Accéder aux logs de mon hébergement |title_mode=append |keywords=these,are,your,keywords |description=Découvrez dans cet article comment accéder aux logs de...") |
Tmendes2ffe9 (talk | contribs) |
||
| Line 9: | Line 9: | ||
==I. How to manually set up your mailbox == <!--T:1--> | ==I. How to manually set up your mailbox == <!--T:1--> | ||
| − | + | <br> | |
<p> When you’re manually setting up your mailbox, make sure that you’re using the right logins | <p> When you’re manually setting up your mailbox, make sure that you’re using the right logins | ||
(Email password), hostname etc). <br> | (Email password), hostname etc). <br> | ||
| Line 17: | Line 17: | ||
click on « Other » → « Add Mail Account ».<br> | click on « Other » → « Add Mail Account ».<br> | ||
</p> | </p> | ||
| − | + | <br> | |
| − | [[File:iPhone1.jpg| | + | [[File:iPhone1.jpg|300px]] |
| − | + | <br> | |
| + | <br> | ||
<p>1. Enter your name, email address, password and he discription will automactically add | <p>1. Enter your name, email address, password and he discription will automactically add | ||
itself <br> | itself <br> | ||
| Line 30: | Line 31: | ||
Email : The email you’ve assigned in « Name » Description : fills in automatically<br> | Email : The email you’ve assigned in « Name » Description : fills in automatically<br> | ||
</p> | </p> | ||
| + | <br> | ||
| − | [[File:iPhone2.jpg| | + | [[File:iPhone2.jpg|300px]] |
==II. Entering your account settings manually == <!--T:2--> | ==II. Entering your account settings manually == <!--T:2--> | ||
| − | + | <br> | |
| − | |||
<p>If Mail cannot find your email setttings, you | <p>If Mail cannot find your email setttings, you | ||
must enter them manually. Click on next, | must enter them manually. Click on next, | ||
| Line 53: | Line 54: | ||
suppose to look like this :<br> | suppose to look like this :<br> | ||
</p> | </p> | ||
| + | <br> | ||
| − | [[File:iPhone3.jpg| | + | [[File:iPhone3.jpg|300px]] |
| − | + | <br> | |
| + | <br> | ||
To modify the (POP or IMAP) you have to | To modify the (POP or IMAP) you have to | ||
click on « Advanced » and to modify the | click on « Advanced » and to modify the | ||
SMTP Port you have to click on SMTP. <br> | SMTP Port you have to click on SMTP. <br> | ||
| − | + | <br> | |
| − | [[File:iPhone4.jpg| | + | [[File:iPhone4.jpg|300px]] [[File:iPhone5.jpg|300px]] |
Latest revision as of 12:48, 1 July 2021
I. How to manually set up your mailbox
When you’re manually setting up your mailbox, make sure that you’re using the right logins
(Email password), hostname etc).
In order to set up your Mac, you have to :
1.Click on Settings → Mail →Accounts → Add Account.
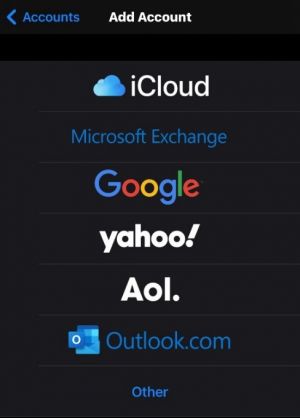
2.Once you’ve done all that, you’ll arrive on a page that looks like this and you’ll have to
click on « Other » → « Add Mail Account ».
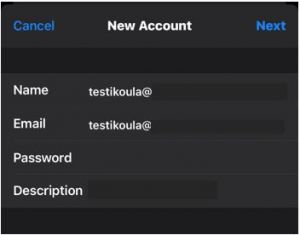
1. Enter your name, email address, password and he discription will automactically add
itself
2.Click on « Next », afterward the will try to find your email settings and completes the
configuration of your account.
3.If you’ve entered everything correctly the mail will find your seetings and all you’ll have
to do is click on « Next », so you can be able to finalize the set up
Your configuration suppose to look like this :
Name : The email that is assigned on your plateforme (DirectAdmin or Plesk)
Email : The email you’ve assigned in « Name » Description : fills in automatically
II. Entering your account settings manually
If Mail cannot find your email setttings, you
must enter them manually. Click on next,
then do the following :
Select IMAP or POP for your new account. If
you are not sure which option to select,
contact your email provider
Enter the receiving server and sending
server information. Then touch Next. If you
do not have this information, try searching
for it.
If your email settings are correct, touch Save
to complete the configuration. If your email
settings are incorrect, you will be prompted
to change them .
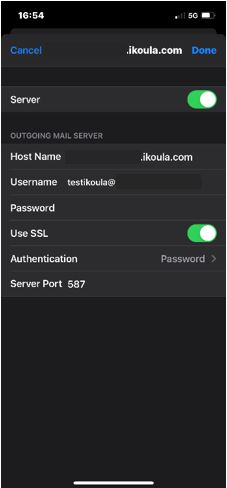
Once you’ve entered the information, it
suppose to look like this :
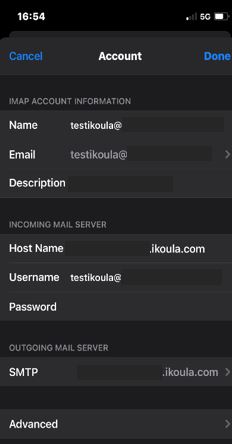
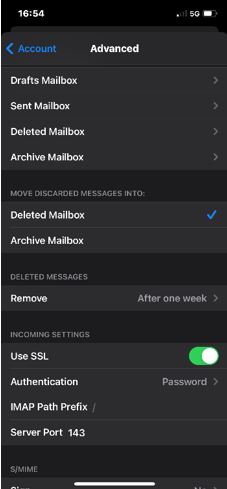
To modify the (POP or IMAP) you have to
click on « Advanced » and to modify the
SMTP Port you have to click on SMTP.
